Internally, I have to question how big Intel’s consumer motherboard design team is. We know their processor and chipset design groups must be comparatively huge to pump out all the products we see on our shelves. But to produce only one or two consumer motherboards with each chipset, it comes into question whether an Intel board would contain all the features, updates (cf. BIOS later), performance and competitiveness when compared to products from third party vendors, for which motherboards are their main business. Our last reviews of P55 and H57 show that Intel usually plays it safe – having a working product on their end is more important than bells and whistles. However in a market where a ‘working product’ should be the de facto standard, Intel invariably has tough competition.
Overview
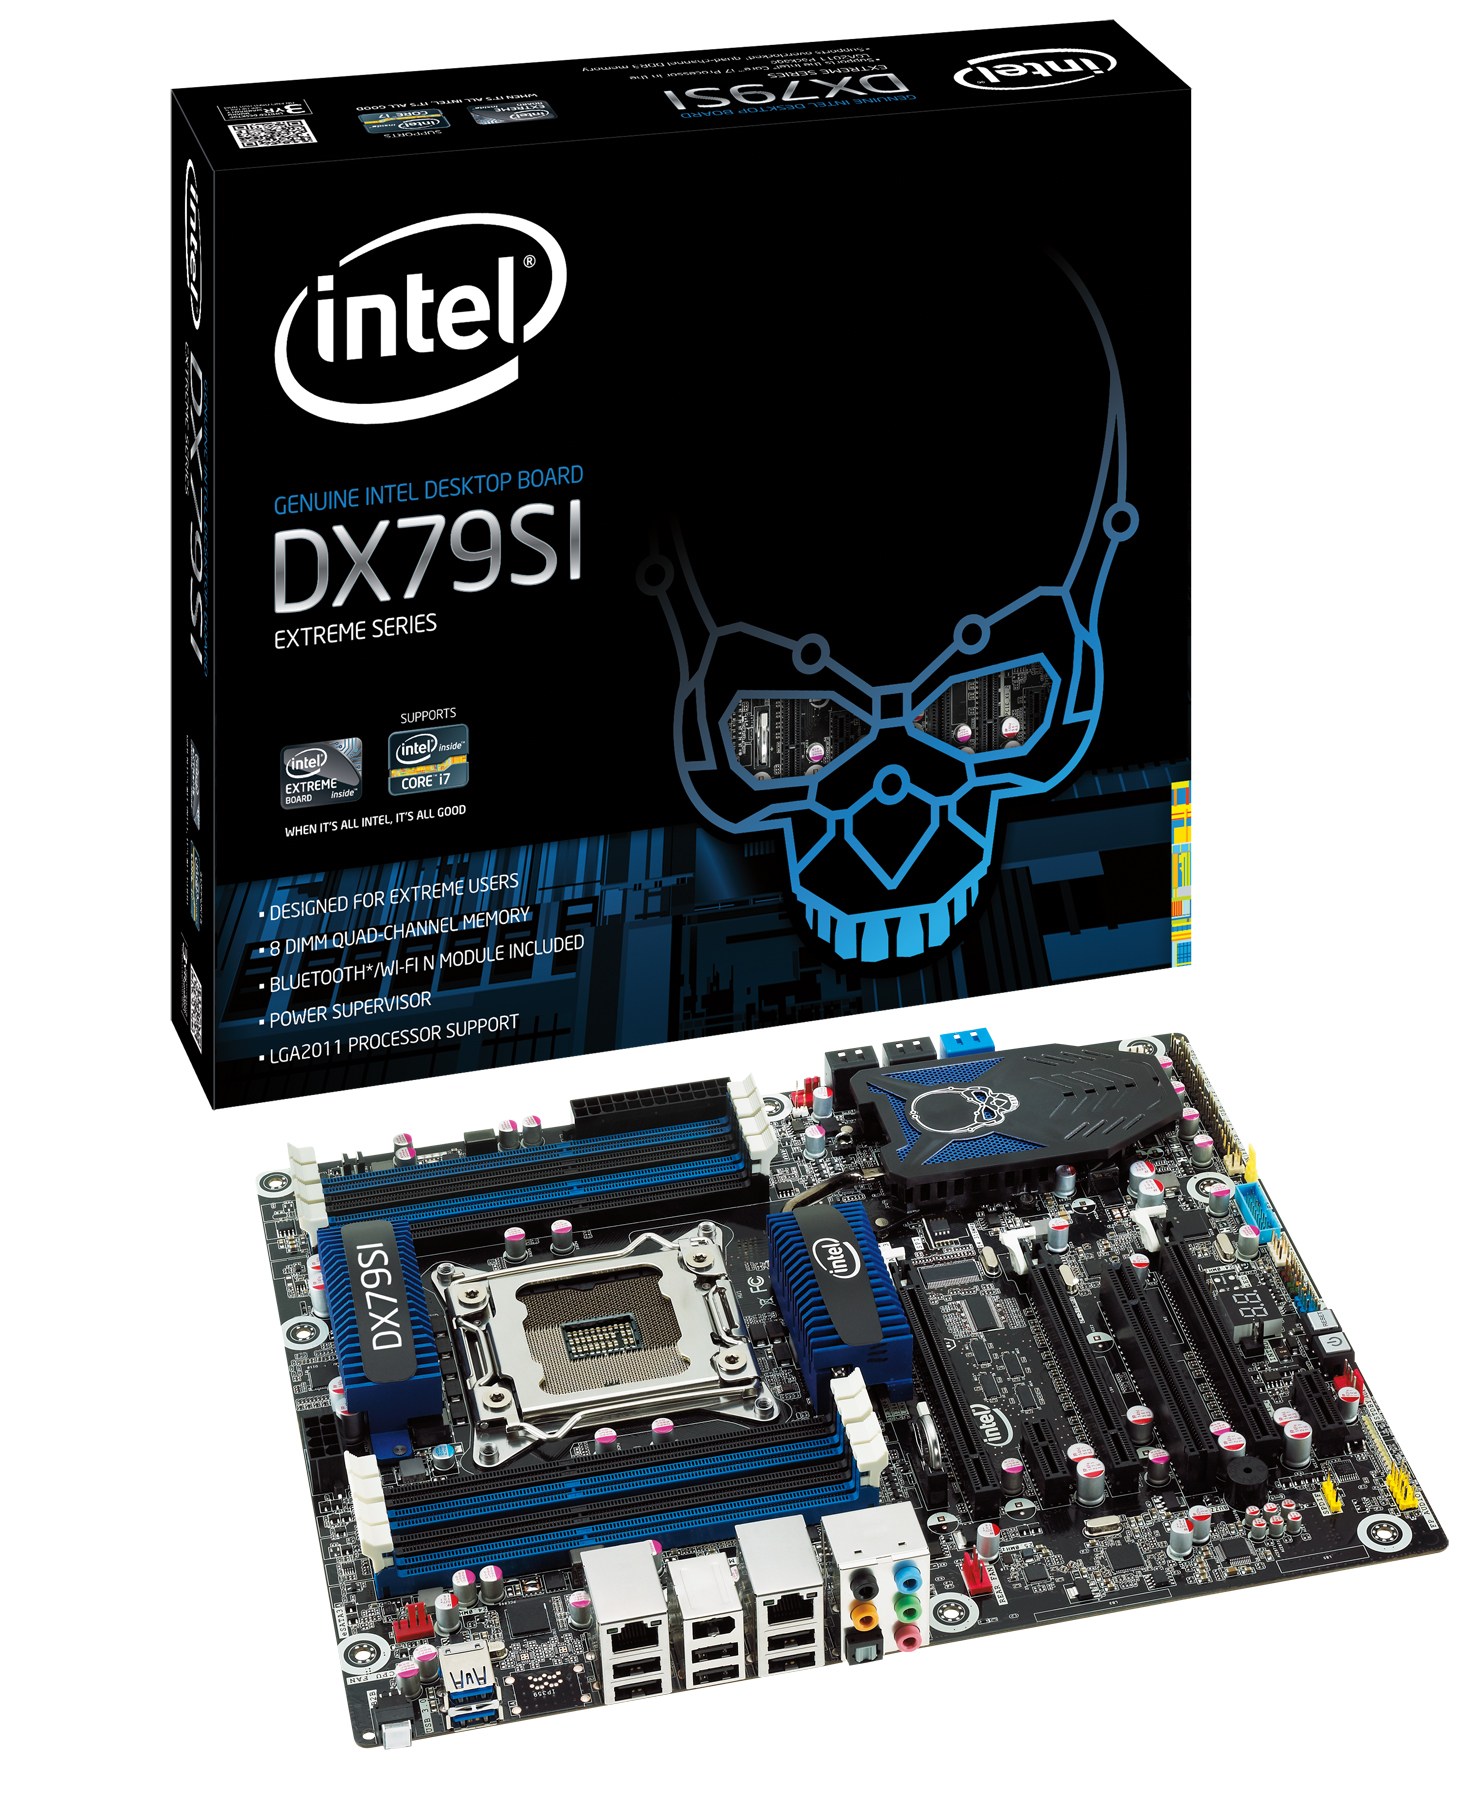
The DX79SI ‘Siler’ motherboard from Intel is a hard one to summarize. If I were being lazy, I could merely say ‘it works’, however there is more to that than meets the eye. In some areas, it gives more than standard – e.g. dual gigabit Ethernet. But with one hand it gives and the other it takes away, with no option for teaming.
Users of Intel boards of past will notice the continuing ‘skull’ theme in a blue/black miasma of components and connectors, which unlike previous iterations do not light up. The board sports the bare minimum from the SATA connectors, as well as a lack of thought to the PCIe layout for anyone using more than one GPU. The PCIe are only rated for Gen 2, which isn’t surprising – other vendors sporting Gen 3 compatibility are outside X79 specifications for now.
The BIOS itself is simple and functional; however do not expect anything spectacular. While ASUS, Gigabyte, MSI and the test have teams of designers for graphical interfaces, Intel does get left behind in its application of a basic system still. It is not always clear what is a menu and what is not, however one thing I do like is that the text turns yellow when you change it, making it easy to see what default is. This makes looking at the Auto OC options a lot easier. The ‘Back2BIOS’ switch on the IO panel is a feature I hope other vendors adopt as well.
Performance is nothing to shout about, and the Intel software is, while visually quite easy to navigate, ultimately limiting. There are no ‘easy’ menus, requiring the user to know the ins and outs of a motherboard in order to use it. No OS fan controls either – those are strictly in the BIOS. If the media sample I received for this review is indicative of a retail package, while the mouse mat addition is slightly amusing, there are no SATA cables, but an SLI connector and a Bluetooth/wifi module included.
The Intel DX79SI ‘Siler’ motherboard is expected to retail for approximately $290-$300 and comes with a 3-year limited warranty.
Visual Inspection
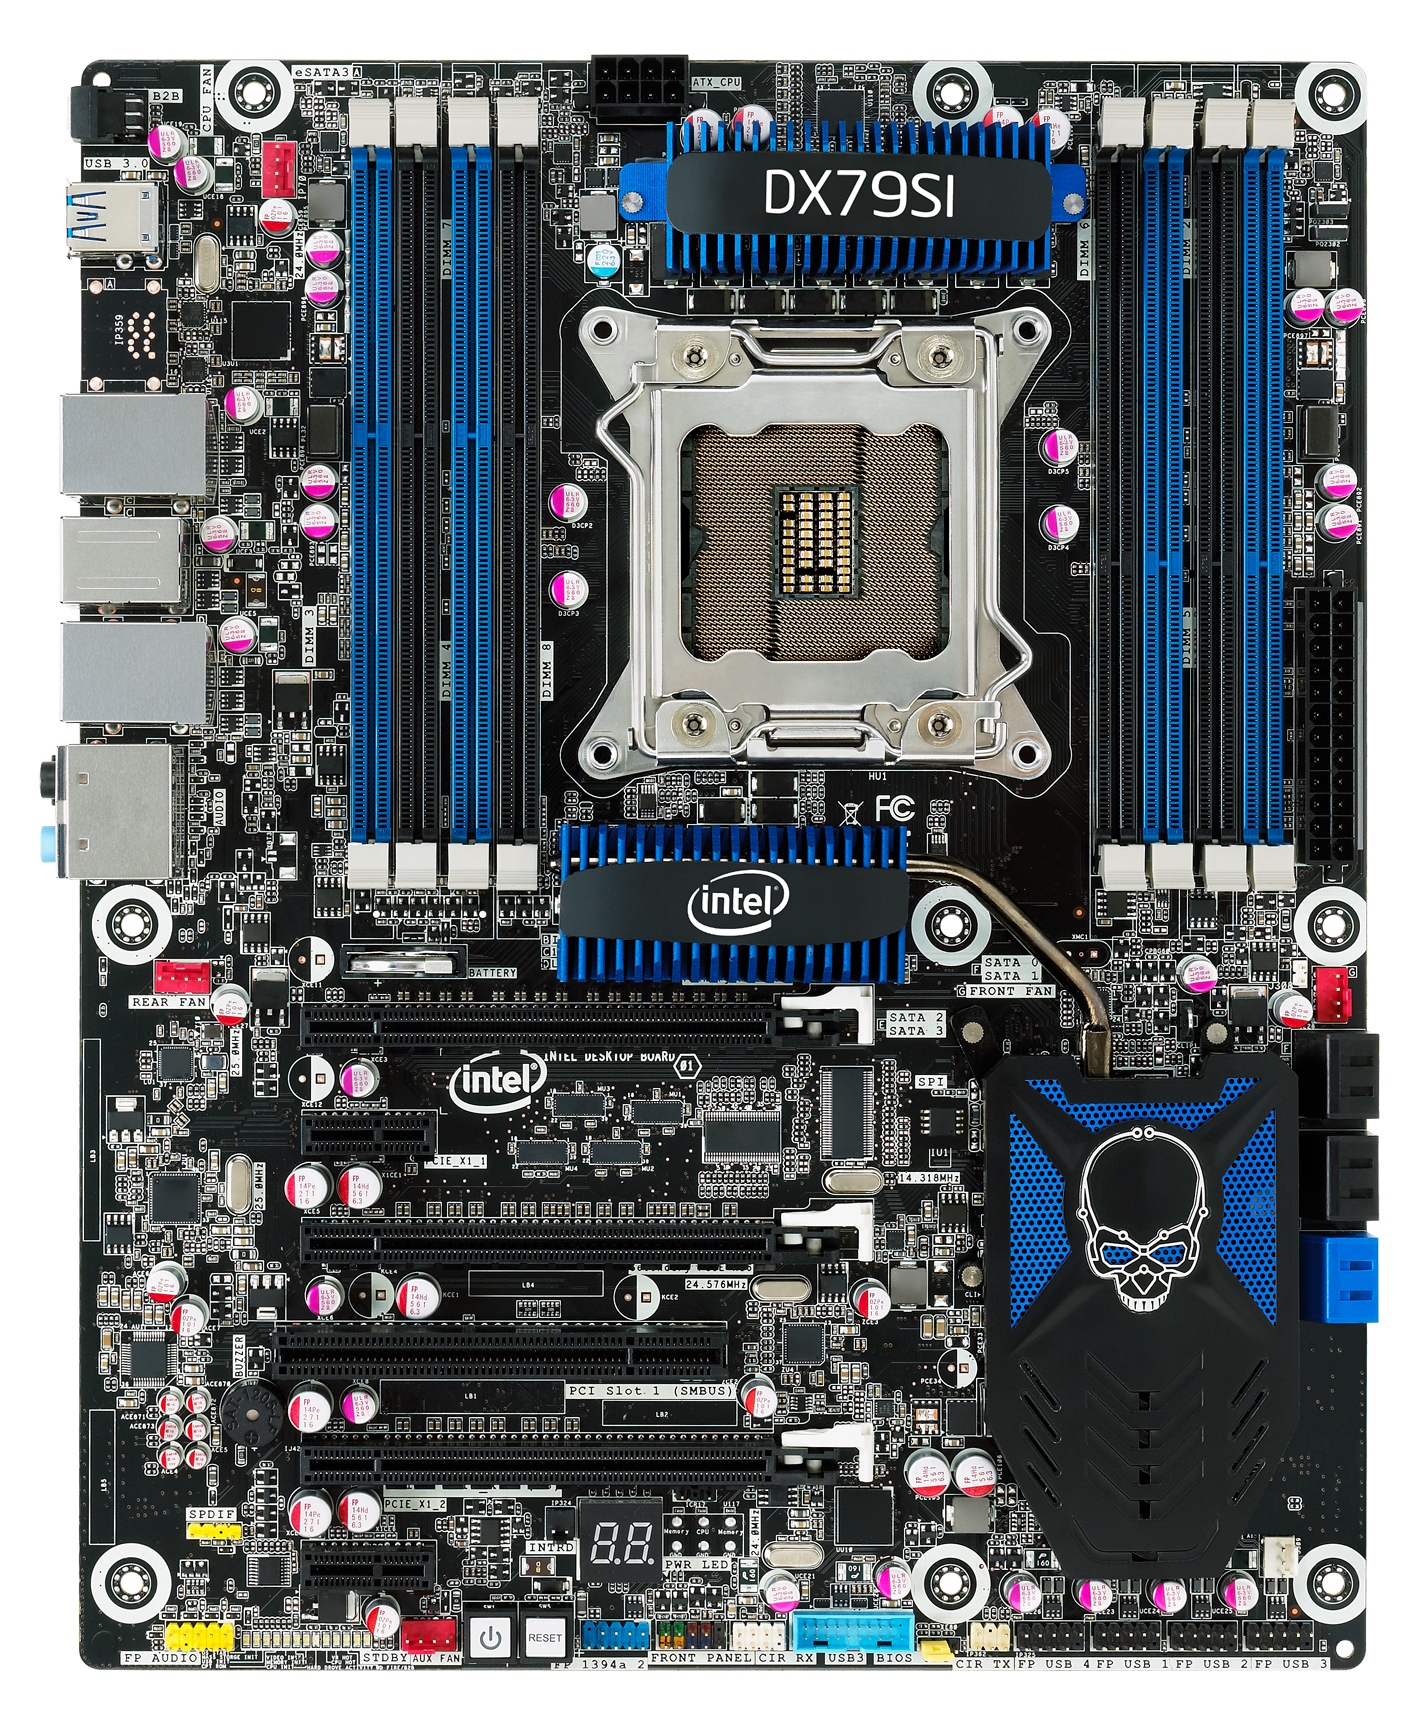
If we ignore the skull heatsink for a second, the Intel board actually looks fairly busy on the PCB, with almost every nook and cranny filled with a trace to some component or another. As with all X79 products, the area consumed by the socket and memory (in this case, 8 DIMMS, 2 per channel) is just under half the board in itself. The power delivery heatsink at the top is by itself and very simple, possibly leading to overclocking issues or throttling later on.
The main CPU fan header is at a slightly odd place, to the left of the DIMMs. This requires the fan cable to go over the memory (hopefully your fan cable will be long enough), which could be an issue if a user decides to actively cool their memory. The red fan headers on board actually almost follow four points of a compass, with a rear fan header by the IO, a front header by the SATA ports, and an auxiliary fan header next to the power/reset switches.
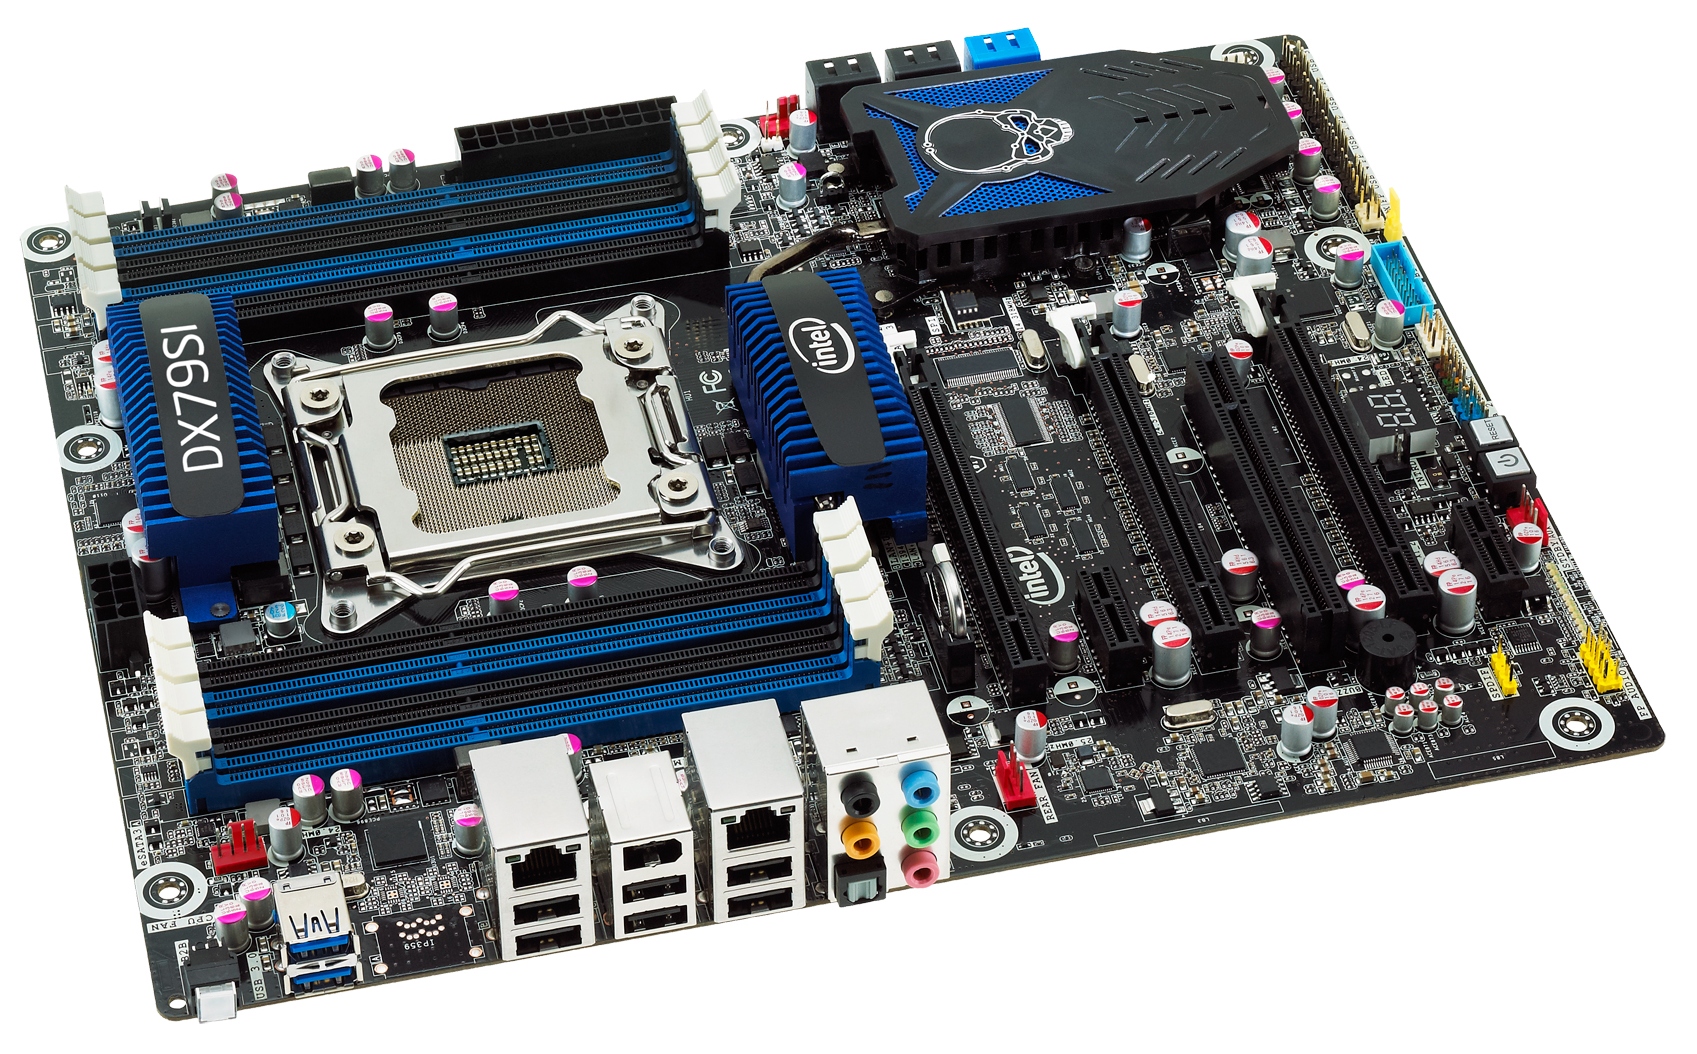
The PCH is covered by that low profile passive ‘skull’ design, which actually hides a relatively small heatsink underneath, hence the connection via heatpipe to a proper air cooled fin arrangement in the middle of the board. To the right of this skull design are the SATA ports, all from the PCH, so two SATA 6 Gbps (blue) and four SATA 3 Gbps (black). Users will note that there are no extra SATA controllers on board, so there are no extra SATA ports or eSATA.
Next to the power/reset buttons is a series of LEDs, indicating what part of the POST process is working. This works in conjunction with the 2-digit debug LED also on board. I can much use for this in case errors arrive, however there are no options in the BIOS to turn these lights off. Depending on the case used (varying from bland to windowed) to house the system, these lights could provide an unwelcome aesthetic effect.
One of my main criticisms with the motherboard is the PCIe layout. In order, we have a PCIe x16, x1, x16, PCI, x16 (limited to x8), x1. The issue lies in double-width dual GPU setups, whereby the GPUs have to be placed into the x16 slots by order. This leaves no gap between the GPUs for happy airflow – during my dual GTX580 tests on an open bench test bed, I was surprised and worried about the heat generation, which would only freak me out if it were in a case. A lot of motherboard manufacturers in X79 should be placing the first and second PCIe slots at least an extra PCIe width apart, allowing for sufficient airflow, however Intel have gone for the ‘it works’ route here.
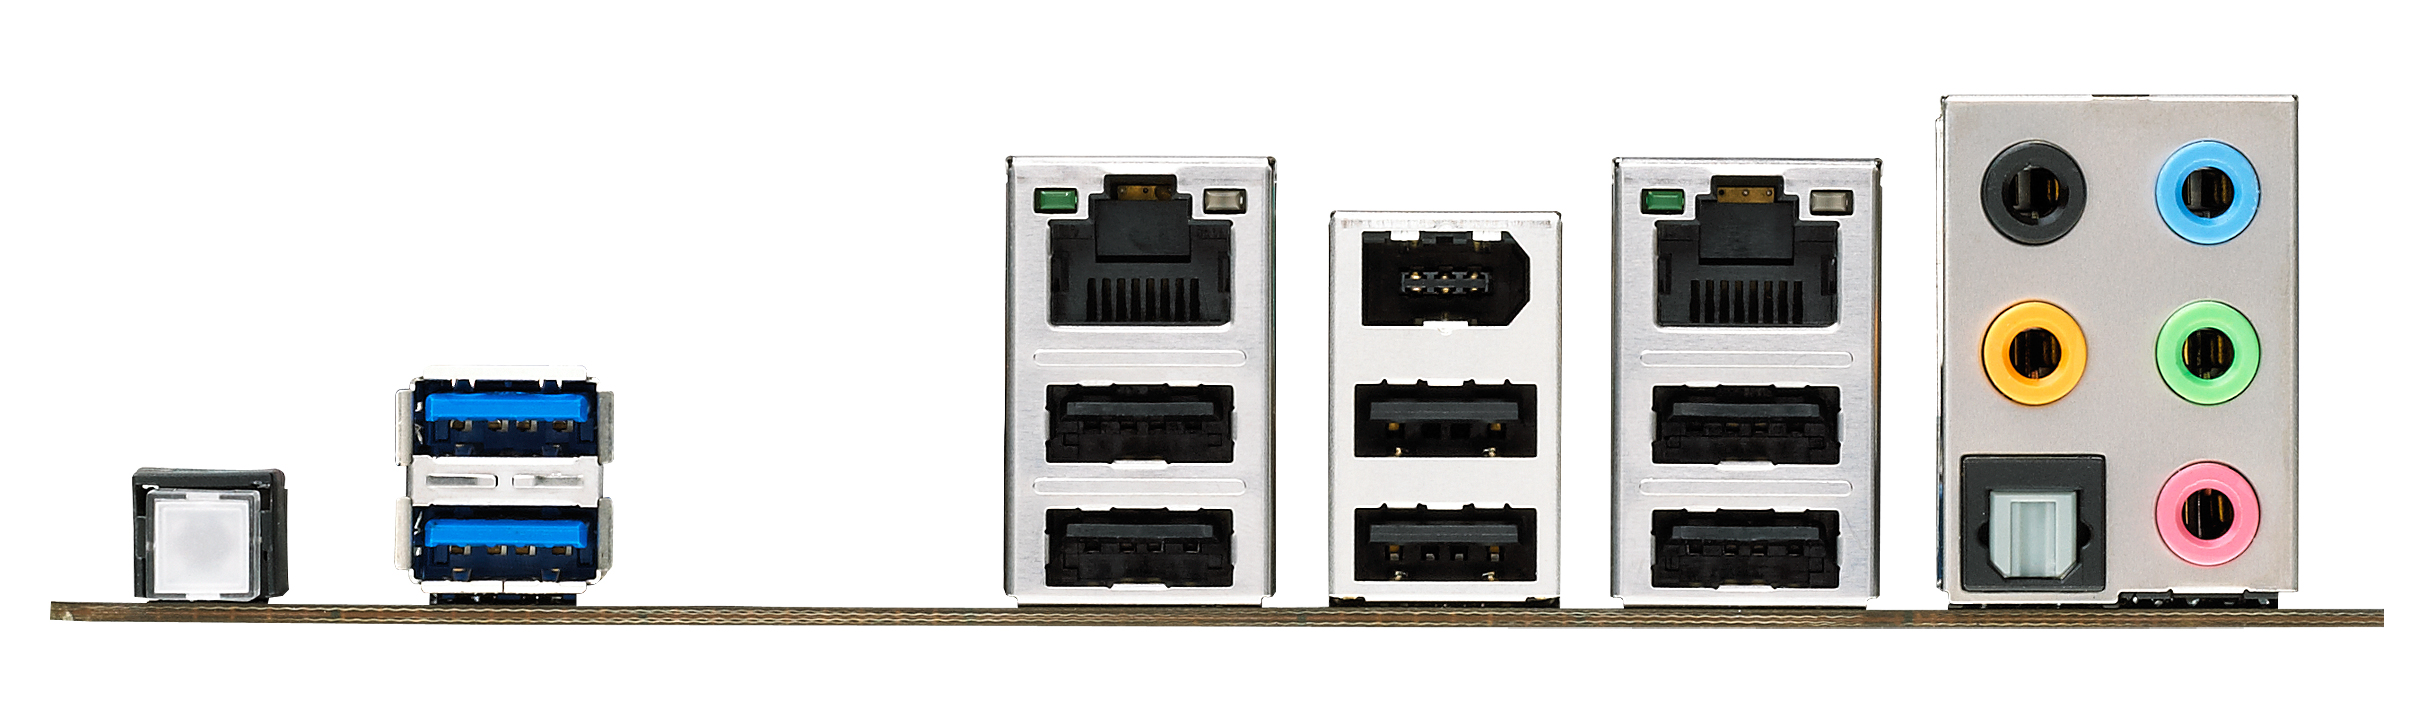
At various levels, the IO panel is a little disappointing. It’s very basic, showcasing two USB 3.0, six USB 2.0, dual gigabit Ethernet (Intel NICs of course), Firewire, optical S/PDIF output and audio jacks. The plus point here is the Back2BIOS button on the left, which when in ‘on’ mode, glows red and always boots into the BIOS. Another click and the system will boot normally. This would be handy for certain boards that connect the USB late in the POST sequence, making it a hassle to use the keyboard to enter the BIOS. There is a big gap in the I/O, suggesting that Intel have skimped on perhaps some more USB 3.0 or eSATA to plug the gap.
BIOS
Having not personally delved into an Intel motherboard BIOS for quite a while, it was going to be interesting to see their take on the grand cityscape of graphical BIOS opportunities. As I postulated earlier, it is hard to gauge just how much time, effort and people Intel put in this department, given they are more in the market for selling processors and chipsets. The answer to this could be considered straightforward after booting into their BIOS.
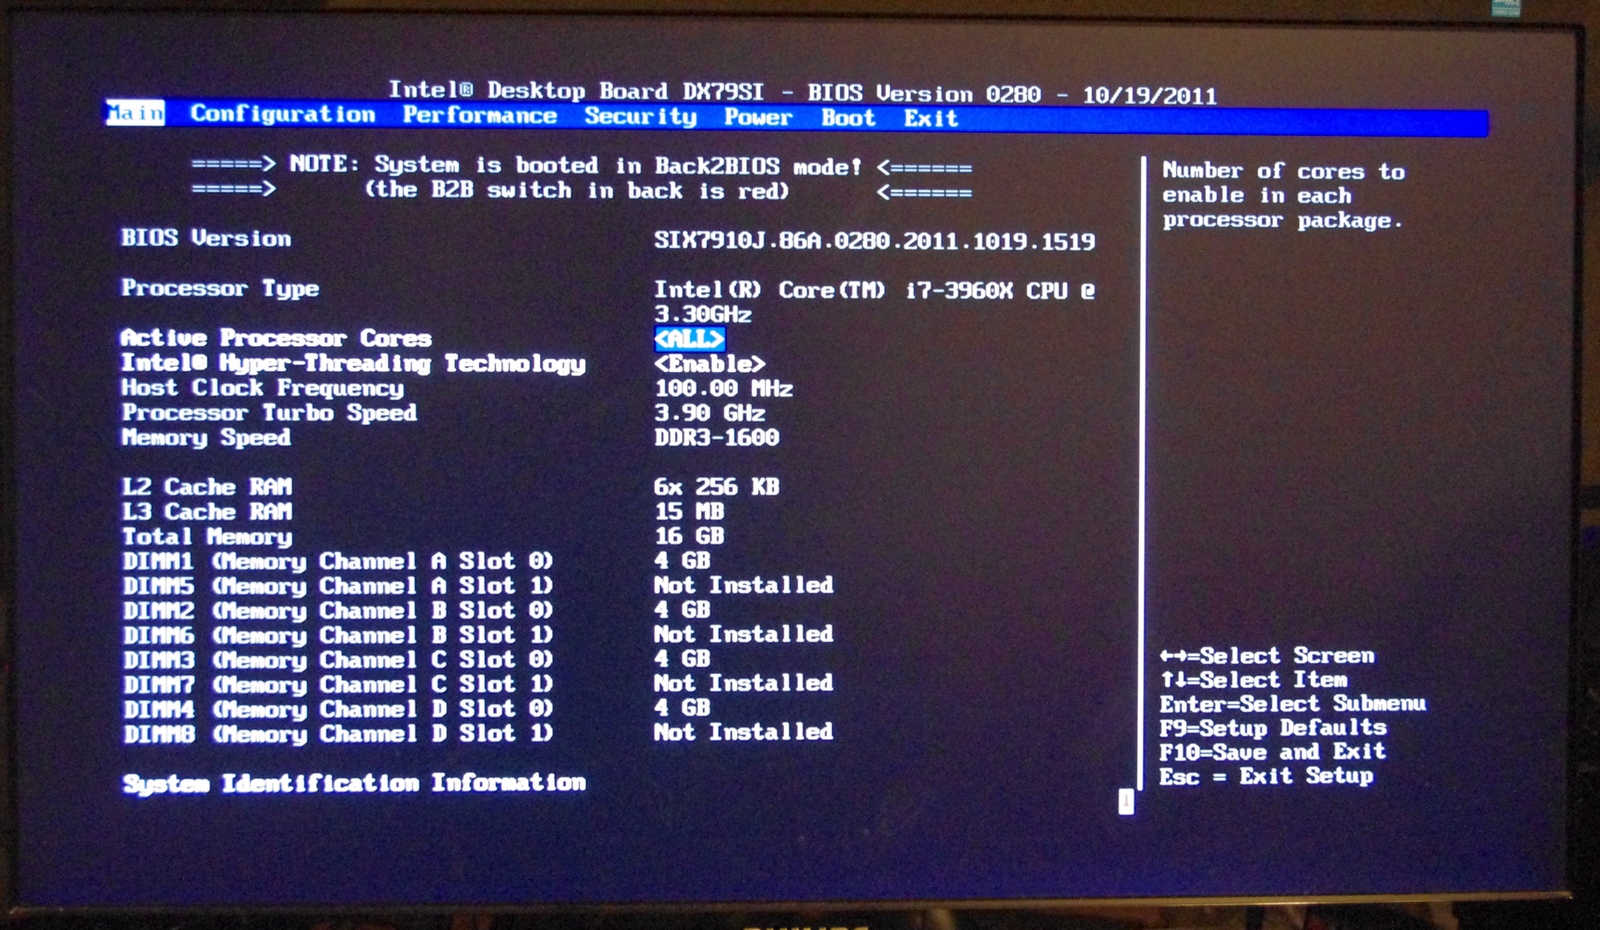
Do not expect much in the way of graphics, unless you have a penchant for ASCII art. However the first screen does contain a lot of info that other motherboard manufacturers do not bother to show right off the bat – BIOS version, processor, speed, frequency, memory and memory speed. In the best graphical implementations on other products we also get fan speeds and voltage quick reference values, so there is definitely room for improvement here.
The primary screen of interest however is the performance section for overclocking. Right at the top is the Overclocking Assistant, where the user can select either a 1.00x or 1.25x gear ratio (I’ve heard that only 1% of CPUs can do a 1.66x ratio, so there’s method in limiting it to 1.25x here), which creates a processor speed menu underneath for selecting an optimum CPU speed. These are sets of predefined CPU values pre-programmed into the BIOS, so your mileage may vary – make sure there is sufficient cooling at hand. I will go through these options later in the overclocking section.
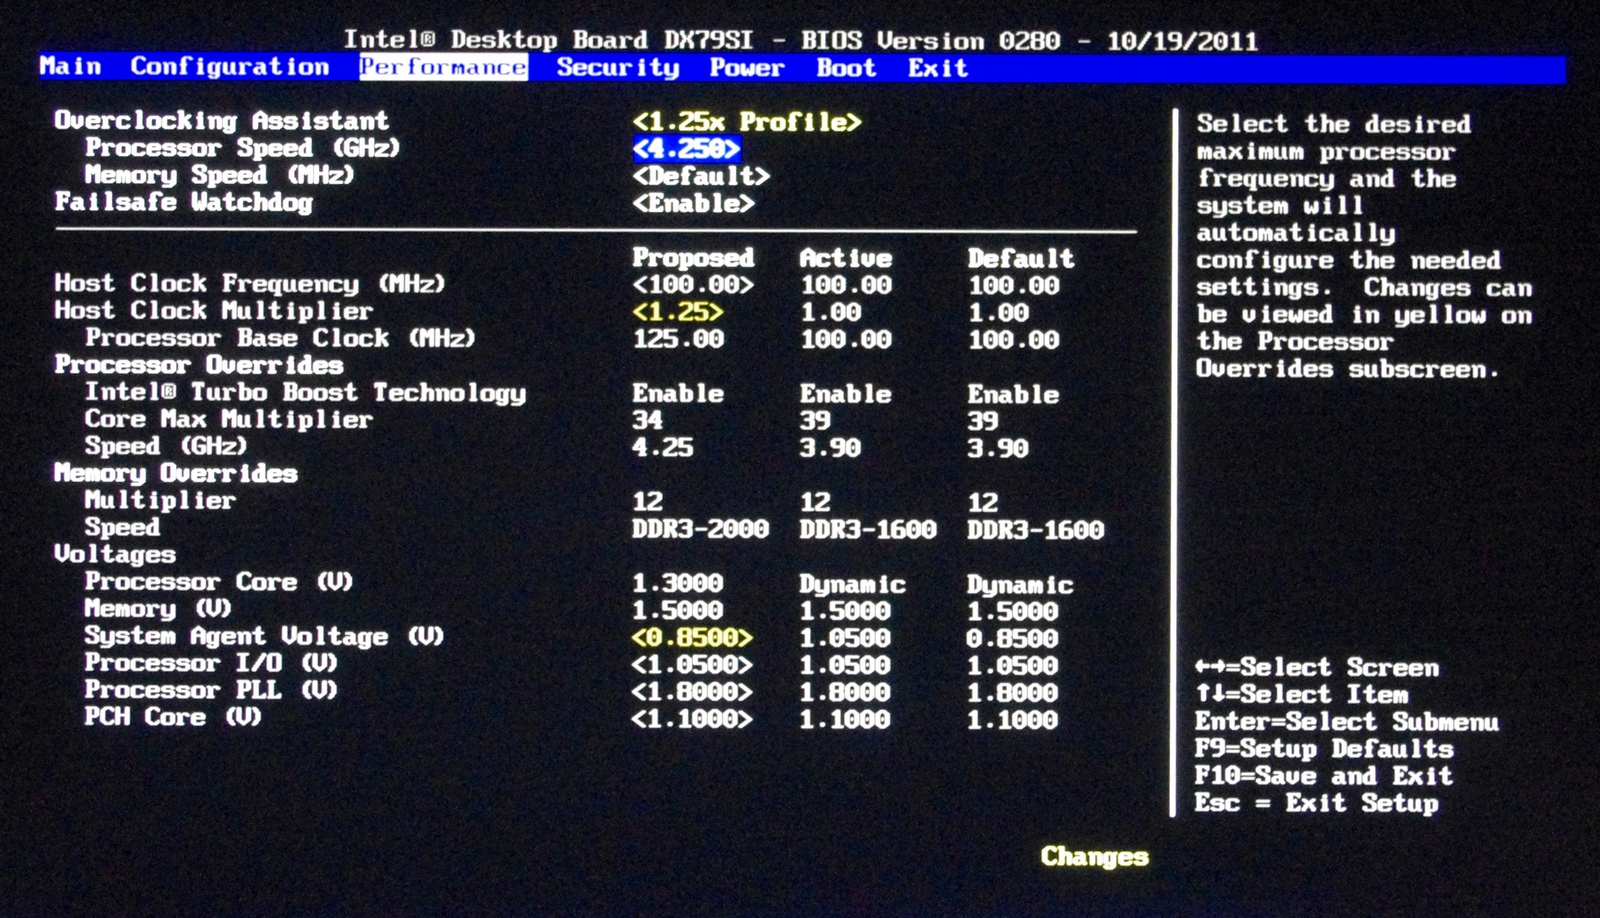
What’s odd about this menu is that the ‘Processor Overrides’ and ‘Memory Overrides’ sections are actually expandable into new screens of options – this isn’t immediately obvious when you first look at it. The processor related screen deals with voltage, V-Droop, Turbo Boosts technology and power limits, whereas the memory configuration is where we deal with XMP and sub-timings. If you have manually overclocked before, there is not anything here that should be confusing.
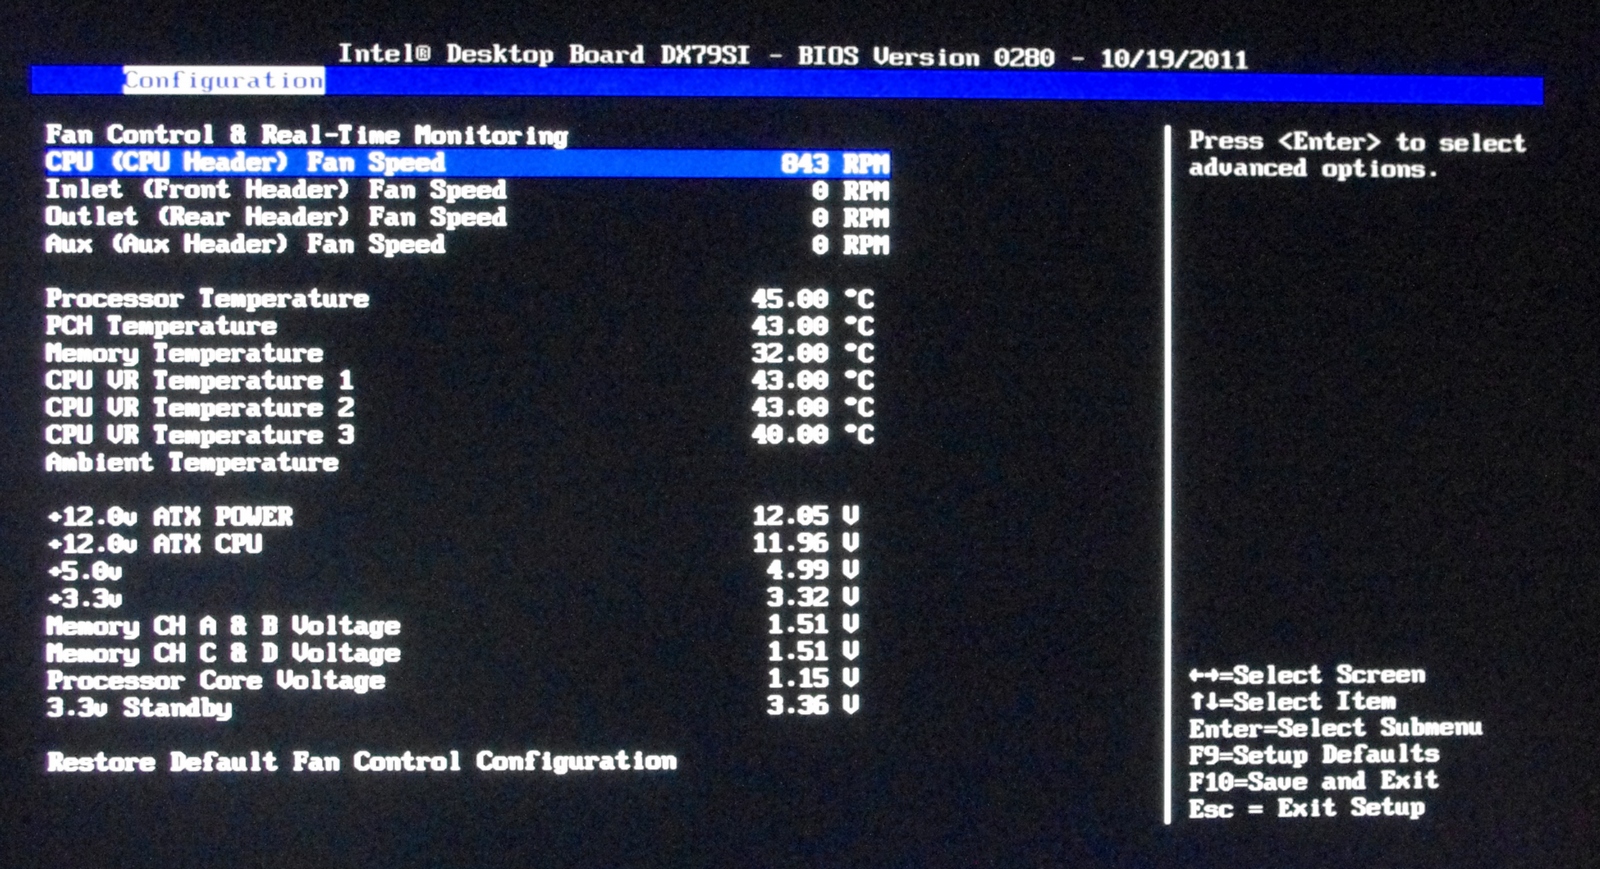
Of importance to a lot of people are the fan control options. As the OS controls are non-existent, we are left to navigate the BIOS to optimize the four fan headers on board. The Real-Time Monitoring screen shows information relating to current fan speeds, temperatures and voltages. In a similar fashion to the performance screen, it is not painfully obvious that the fan speed values actually delve into sub menus where more specific fan controls can be adjusted. In this respect, Intel should probably consider a little notification or color change to an option which is a sub menu.
One main criticism levied at a lot of motherboard manufacturers is the limited amount of ways a user can enter a value in a BIOS. Take something as simple as a voltage setting – some users like to use a the plus/minus keys, some like to choose an offset, some may perhaps even enjoy a menu to select values, while others like myself prefer a direct entry method. Unfortunately, Intel is let down here in terms of direct entry. The menu system is also questionable, with the ‘default’ setting near the 1.0000 V option, requiring the user to scroll all the way to 1.3 V or above for a specific setting.
Overclocking
As I noted back in my review of the ASUS P9X79 Pro, overclocking on the X79 is slightly more involved than P67/Z68, but not as complex as other Intel platforms. We have a ‘gear ratio’ to select (usually 1.00x or 1.25x) which gives a default frequency of either 100 MHz or 125 MHz, then we can adjust +/- a few MHz as with Sandy Bridge.
Intel thankfully provides a series of Auto-OC options in the BIOS, either on the 1.00x or 1.25x ratios as required. To start, I tested the first ratio, which offers 4.0-4.6 GHz on the multipliers. The voltage settings would automatically be adjusted depending on the speed chosen – 4.6 GHz being run at 1.42 V. The board would eventually boot at 4.6 GHz (for some reason it had two failed attempts), but while in the OS it was rock stable, passing a Blender stability test. I did notice however, that if the board was booted at this speed, and then the Auto-OC options were ‘disabled’, as the board still had that 46x option in memory, it would still boot at that level, which is contrary to what the user is selecting.
At the 1.25x gear ratio however, things were not as peachy. While it still offers a good range of CPU speeds to chose from (~4.0-4.625 GHz), the board would simply not apply the gear. Even if this was set manually, the gear would not engage, leaving the CPU at 1.00x on the gear and 35x on the multiplier. There is something not latching in the BIOS to apply this setting – hopefully this will be remedied in an update.
In turn, I tried adjusting the settings manually. As with ASUS X79 review (and future reviews), I limited the CPU to 1.4 V and adjusted the multiplier. The highest setting that was truly stable was 47x – 48x would usually boot (if the power limits were increased), but would at some point fail a stress test.
For memory, there are several options a user can pick. There are Auto-OC options, which are from 1600 MHz to 2133 MHz, in the subtiming menus a user can select XMP, or manually adjust the DRAM strap. The Auto OC options were an odd sort – at 1600 MHz, the memory would be set to 8-8-8, at 1867 MHz we would get 8-10-8, then at 2133 MHz it would default to 9-9-9. This last setting would not boot on my 2133 9-11-9 kit; I am under the impression that the automatic sub-timings were not optimized for this memory kit. In terms of manual adjustment of timings, it’s actually quite rough – none of the options are able to be set on ‘auto’, so you have to know all the exact sub-timings for your kit.
XMP settings worked well, though it selected DDR3-2000 8-10-8, rather than DDR3-2133 9-11-9 to which my kit should be set to. After speaking with G.Skill, I have been told that for some reason there are XMP issues for those boards which are not XMP 1.3 rated. Nowhere in the Intel specifications can I find that the DX79SI is XMP 1.3, though it would be quite odd if it was not.
As a combined overclock, there are more issues to contend with. If an Auto-OC option is selected for CPU, you cannot select XMP on the memory, you have to use an Auto-OC DRAM option, which as said previously, is not exactly pushing your DRAM to the limit. Nevertheless, taking into account temperatures and options, the 4.4 GHz Auto-OC option at the DDR3-1867 works well.
Board Features
| Intel DX79SI | |
| Size | ATX |
| CPU Interface | LGA2011 |
| CPU Support | Intel Second Generation Core i7 Sandy Bridge E |
| Chipset | Intel X79 |
| Base Clock Frequency | 100.0 MHz |
| Core Voltage | Default, 1.000 V to 1.920 V |
| CPU Clock Multiplier | Auto, 5x to 65x |
| DRAM Voltage | Auto, 1.20 V to 1.99 V |
| DRAM Command Rate | Auto, 1T, 2T |
| Memory Slots | Eight DDR3 DIMM slots supporting up to 64 GB Up to Quad Channel Support for DDR3, 1066-2400 MHz |
| Expansion Slots | 2 x PCIe Gen 3 x16 1 x PCIe Gen 3 x8 2 x PCIe Gen 2 x1 1 x PCI |
| Onboard SATA/RAID | 2 x SATA 6 Gbps, Support for RAID 0, 1, 5, 10 4 x SATA 3 Gbps, Support for RAID 0, 1, 5, 10 |
| Onboard | 4 x SATA 3 Gbps (PCH) 2 x SATA 3 Gbps (PCH) 4 x Fan Headers 1 x S/PDIF Out Header 1 x Front Panel Header 1 x Front Panel Audio Header 4 x USB 2.0 Headers 1 x USB 3.0 Header 1 x Remote Thermal Probe Header 1 x IEEE 1394a Header Power / Reset / Clear CMOS Buttons + Debug LED Board Status LEDs |
| Onboard LAN | Dual Intel Gigabit 82579L + 82574L |
| Onboard Audio | Realtek ALC892 |
| Power Connectors | 1 x 24-pin ATX connector 1 x 8-pin 12V connector |
| Fan Headers | 1 x CPU Fan Header 2 x Chassis Headers 1 x Auxillary Header |
| IO Panel | 6 x USB 2.0 2 x USB 3.0 1 x Back2Bios 2 x Intel Gigabit Ethernet 1 x Optical S/PDIF Out Connector 2 x FireWire / IEEE 1394a Audio Jacks |
| BIOS Version | 280 - 10/19/2011 |
| Warranty Period | 3 Years |
In The Box
Unfortunately, there seems to be a large discrepancy in terms of what’s in the box compared to my media sample and what exactly Intel are going to ship with the DX79SI. Personally, I have:
Intel ‘Skull’ themed mouse mat
Two slot length SLI connector
Long SLI connector
Thermal Probe
In terms of what should be included, according to the manuals:
Bluetooth/Wifi Module
Driver CD
User Manual
Despite all this, we see a distinct lack of SATA cables provided. With a significant proportion of HDDs being sold as OEM, sans cables, it is a shock to see a product without cables being provided.
Software
Again, for some reason due to this media sample, my range of installing drivers and software was limited to what I could download from the Intel pre-release website. This required a manual installation of the chipset drivers, LAN drivers, USB 3.0 drivers, and so on. While not exhaustive by any means, I hope the driver CD in the retail package has an ‘Install All’ option.
In terms of software, the only one currently available to me is the Intel Extreme Tuning Utility (XTU), which is essentially their overclocking software. There are no fan controls for the OS, or ability to change the power modes here. However, the XTU is a well designed piece of software with aesthetics to match.
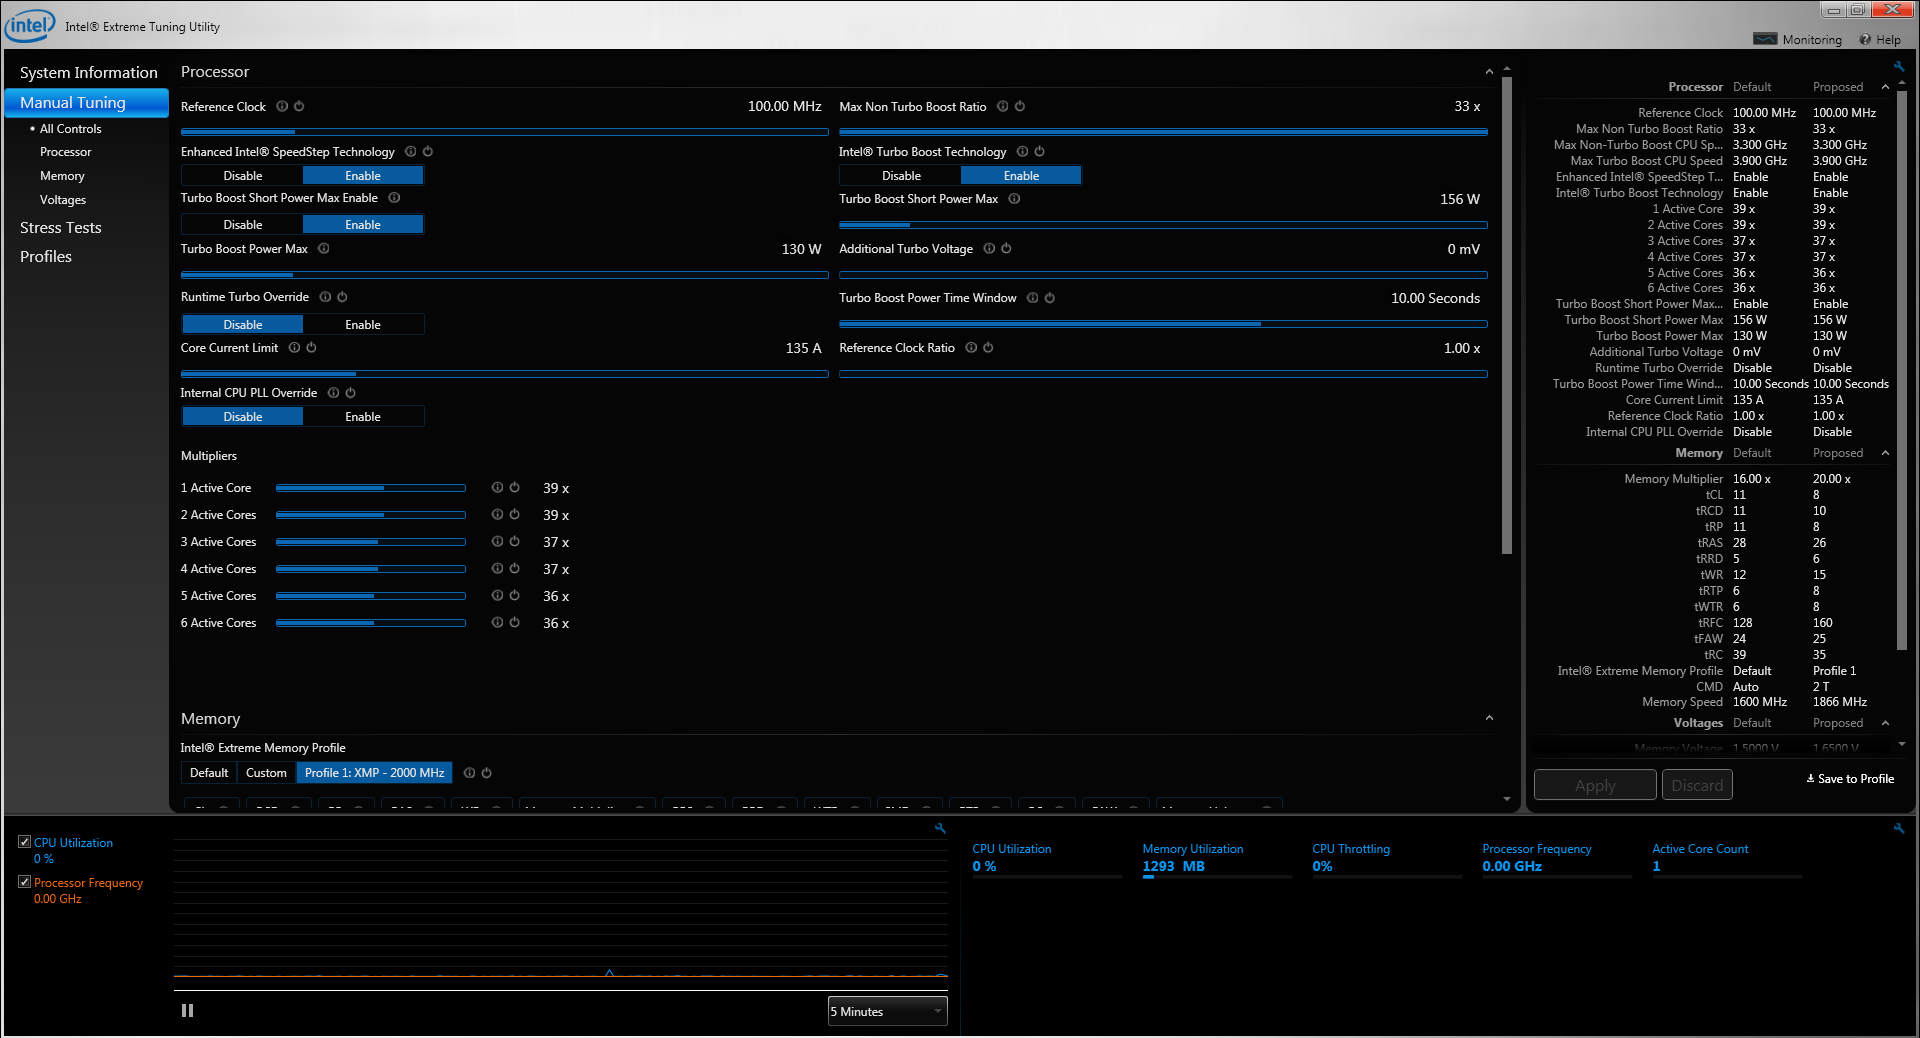
The core piece of XTU is the manual tuning. Almost all of the BIOS settings for the CPU are adjustable here in terms of sliders, with simple cancel buttons to return to default values. Any changes you make here should turn up yellow, indicating a reboot is required to apply the changes (unless you select an option in the BIOS which allows you to change the CPU multiplier on the fly).
As mentioned previously, the lack of OS fan controls is one major aspect which lets this board down as an overall consumer product. Hopefully this will change in future.
Test Setup
| Processor | Intel Sandy Bridge-E i7-3960X 6 Cores, 12 Threads, 3.3 GHz (3.9 GHz Turbo) |
| Motherboards | Intel DX79SI 'Siler' |
| Cooling | Intel All-In-One Liquid Cooler, made by Asetek |
| Power Supply | Silverstone 1000W 80 PLUS Silver |
| Memory | G.Skill RipjawsZ DDR3-2133 9-11-9 28 4x4 GB Kit 1.65V |
| Memory Settings | XMP |
| Video Cards | XFX HD 5850 1GB ECS GTX 580 1536MB |
| Video Drivers | Catalyst 11.8 NVIDIA Drivers 285.62 |
| Hard Drive | Micron RealSSD C300 256GB |
| Optical Drive | LG GH22NS50 |
| Case | Open Test Bed - CoolerMaster Lab V1.0 |
| Operating System | Windows 7 64-bit |
| SATA Testing | Micron RealSSD C300 256GB |
| USB 2/3 Testing | Patriot 64GB SuperSonic USB 3.0 |
Where applicable, the results in this review are directly compared to the following chipsets and boards which we have reviewed previously.
Power Consumption
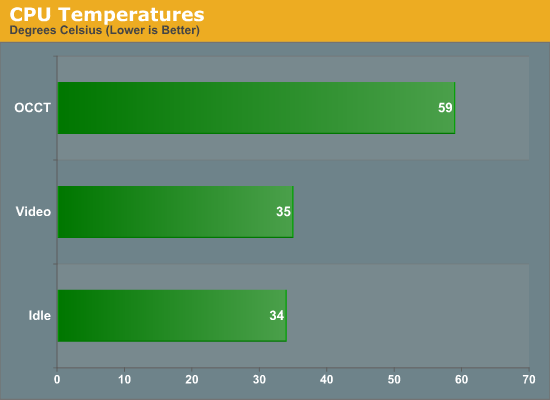
Power consumption was tested on the system as a whole with a wall meter connected to the power supply, while in a dual GPU configuration. This method allows us to compare the power management of the UEFI and the board to supply components with power under load, and includes typical PSU losses due to efficiency. These are the real world values that consumers may expect from a typical system (minus the monitor) using this motherboard.
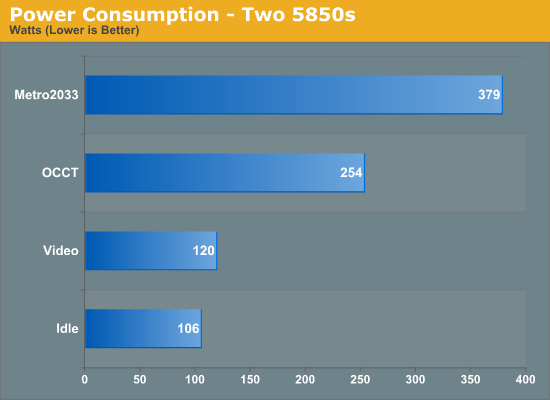
With most users’ running boards on purely default BIOS settings, we are running at default settings for the CPU temperature tests. This is, in our outward view, an indication of how well (or how adventurous) the vendor has their BIOS configured on automatic settings. With a certain number of vendors not making CPU voltage, turbo voltage or LLC options configurable to the end user, which would directly affect power consumption and CPU temperatures at various usage levels, we find the test appropriate for the majority of cases. This does conflict somewhat with some vendors' methodology of providing a list of 'suggested' settings for reviewers to use. But unless those settings being implemented automatically for the end user, all these settings do for us it attempt to skew the results, and thus provide an unbalanced 'out of the box' result list to the readers who will rely on those default settings to make a judgment.
System Benchmarks
USB Speed
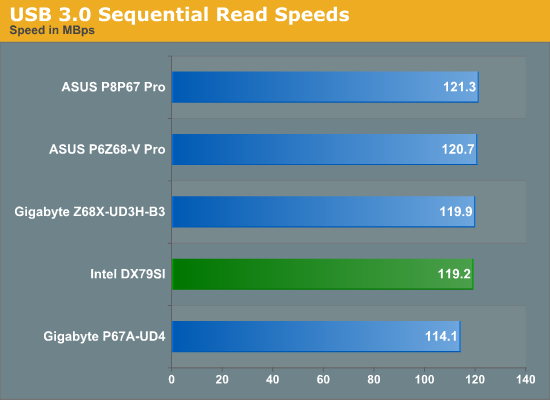
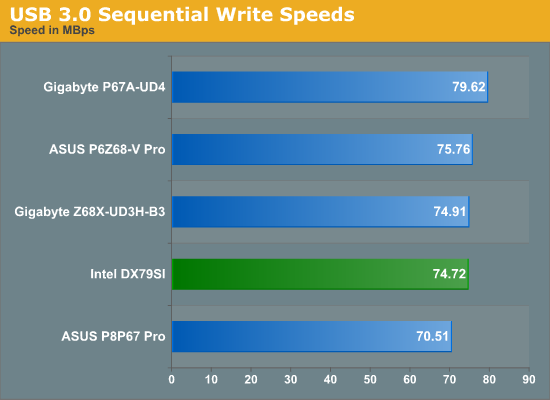
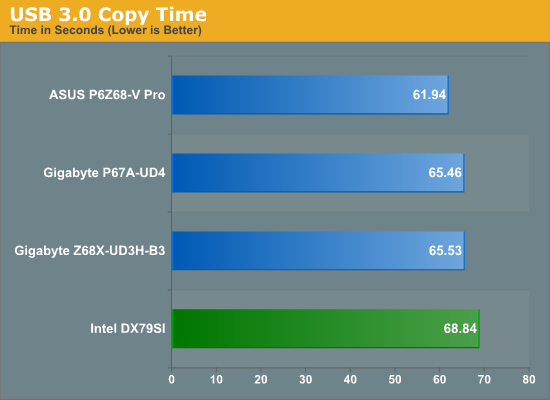
For this benchmark, we run CrystalDiskMark to determine the ideal sequential read and write speeds for the USB port using our 64GB Patriot SuperSpeed USB 3.0 drive. Then we transfer a set size of files from the SSD to the USB drive, and monitor the time taken to transfer. The files transferred are a 1.52 GB set of 2867 files across 320 folders – 95% of these files are small typical website files, and the rest (90% of the size) are the videos used in the Sorenson Squeeze test.
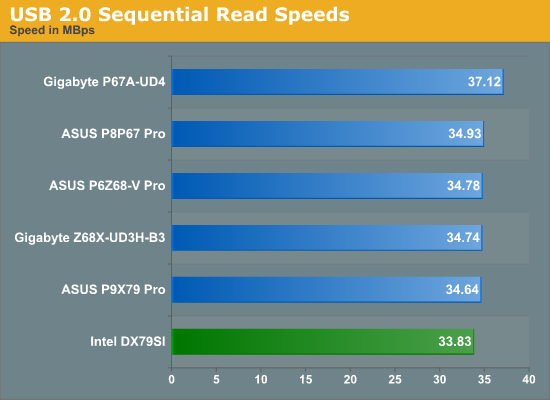
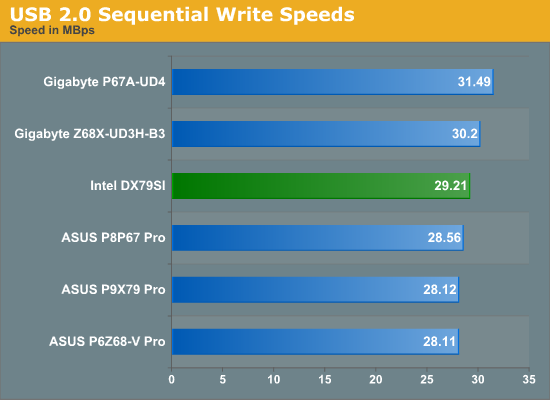
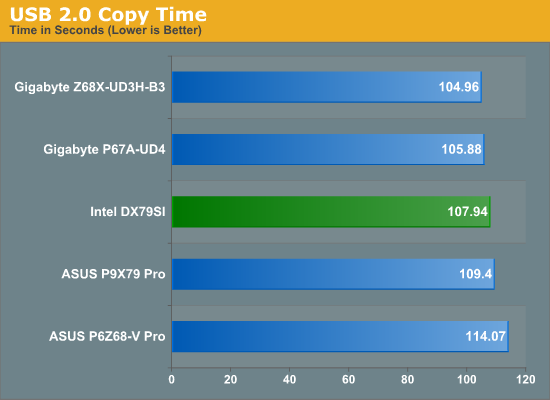
Despite the less than great sequential speeds, the Intel is board still as good as, if not better than, the ASUS P9X79 Pro.
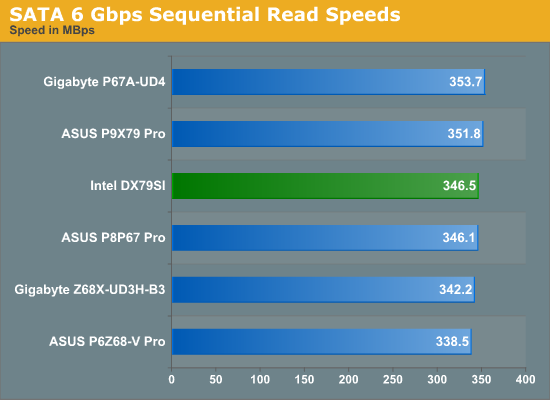
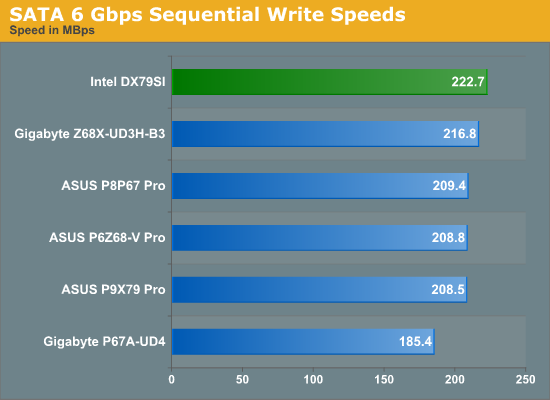
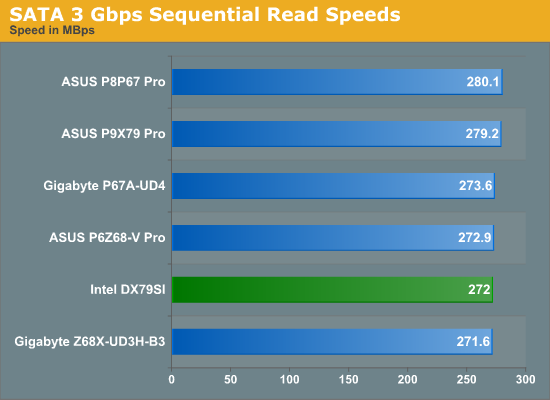
SATA Testing
We also use CrystalDiskMark for SATA port testing. The operating system is installed on the Micron RealSSD C300, which is rated at 355 MB/s read and 215 MB/s write, and the sequential test is run at the 5 x 1000 MB level. This test probes the efficiency of the data delivery system between the chipset and the drive, or in the case of additional SATA ports provided by a third party controller, the efficiency between the controller, the chipset and the drive.

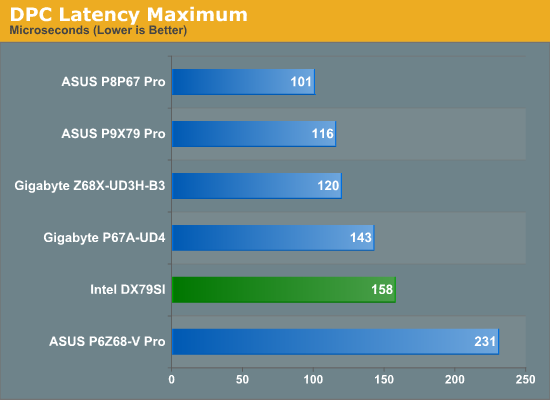
DPC Latency
Deferred Procedure Call latency is a way in which Windows handles interrupt servicing. In order to wait for a processor to acknowledge the request, the system will queue all interrupt requests by priority. Critical interrupts will be handled as soon as possible, whereas lesser priority requests, such as audio, will be further down the line. So if the audio device requires data, it will have to wait until the request is processed before the buffer is filled. If the device drivers of higher priority components in a system are poorly implemented, this can cause delays in request scheduling and process time, resulting in an empty audio buffer – this leads to characteristic audible pauses, pops and clicks. Having a bigger buffer and correctly implemented system drivers obviously helps in this regard. The DPC latency checker measures how much time is processing DPCs from driver invocation – the lower the value will result in better audio transfer at smaller buffer sizes. Results are measured in microseconds and taken as the peak latency while cycling through a series of short HD videos - under 500 microseconds usually gets the green light, but the lower the better.
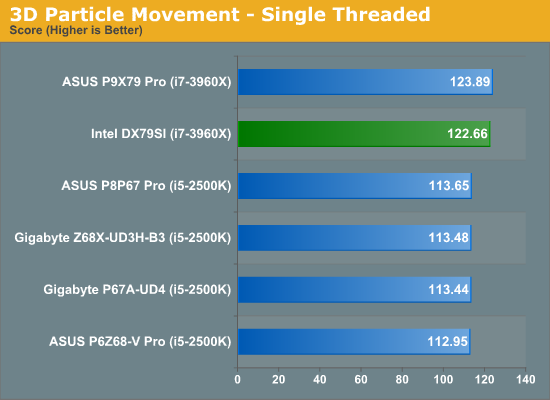
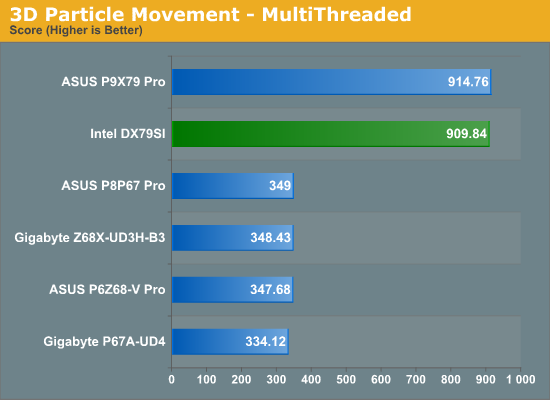
3D Movement Algorithm Test
The algorithms in 3DPM employ both uniform random number generation or normal distribution random number generation, and vary in various amounts of trigonometric operations, conditional statements, generation and rejection, fused operations, etc. The benchmark runs through six algorithms for a specified number of particles and steps, and calculates the speed of each algorithm, then sums them all for a final score. This is an example of a real world situation that a computational scientist may find themselves in, rather than a pure synthetic benchmark. The benchmark is also parallel between particles simulated, and we test the single thread performance as well as the multi-threaded performance.
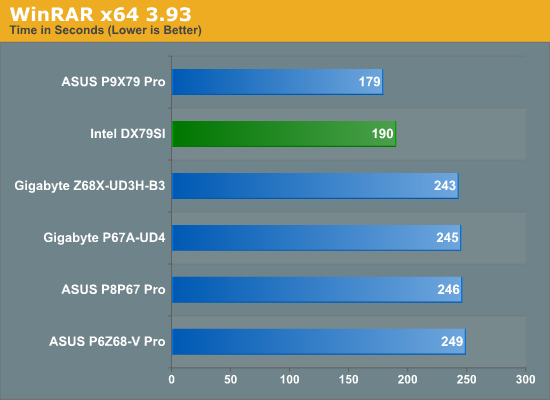
WinRAR x64 3.93 - link
With 64-bit WinRAR, we compress the set of files used in the USB speed tests. WinRAR x64 3.93 attempts to use multithreading when possible.
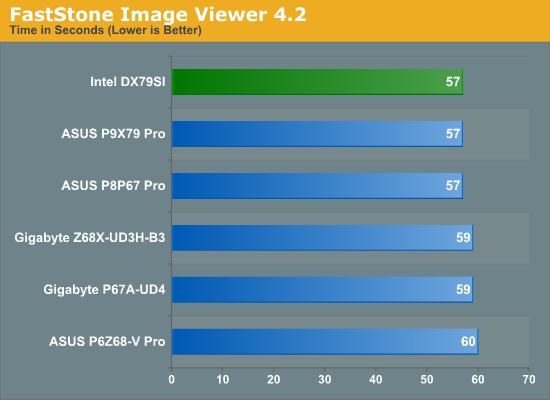
FastStone Image Viewer 4.2 - link
FastStone Image Viewer is a free piece of software I have been using for quite a few years now. It allows quick viewing of flat images, as well as resizing, changing color depth, adding simple text or simple filters. It also has a bulk image conversion tool, which we use here. The software currently operates only in single-thread mode, which should change in later versions of the software. For this test, we convert a series of 170 files, of various resolutions, dimensions and types (of a total size of 163MB), all to the .gif format of 640x480 dimensions.
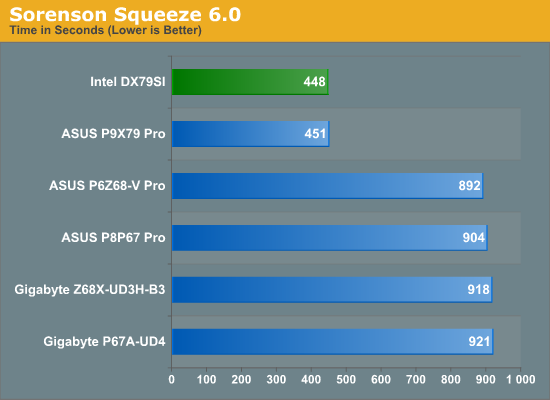
Sorenson Squeeze 6.0 - link
Sorenson Squeeze is a professional video encoder, complete with a vast array of options. For this test, we convert 32 HD videos, each a minute long and approximately 42 MB in size, to WMV 512KBps format. Squeeze can encode multiple videos at once, one for each thread.
Aliens vs. Predator Benchmark
Aliens vs. Predator is a DirectX 11 science fiction first-person shooter video game, developed by Rebellion Developments. Available as a standalone benchmark, on default settings the benchmark uses 1920x1080 with high AF settings. Results are reported as the average frame rate across 4 runs.
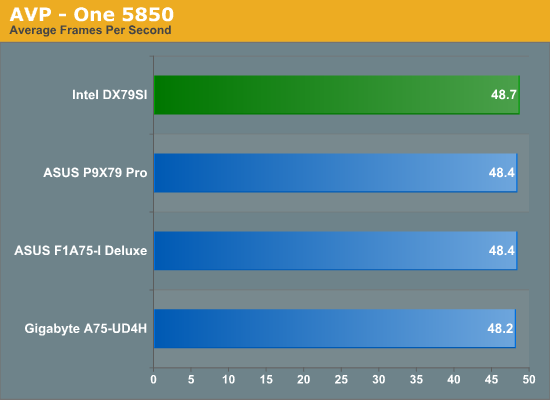
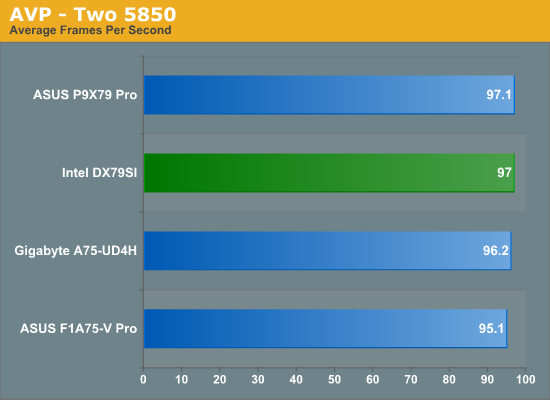
Using 5850s shows almost no difference for AVP in single GPU mode. In
dual GPU mode, the X79 boards have a slight advantage, presumably due to
the CPU or the extra GPU bandwidth compared to the A75 platforms.
Dirt 3
Dirt 3 is a rallying video game and the third in the Dirt series of the Colin McRae Rally series, developed and published by Codemasters. Using the in game benchmark, Dirt 3 is run at 1920x1080 with full graphical settings. Results are reported as the average frame rate across 4 runs.
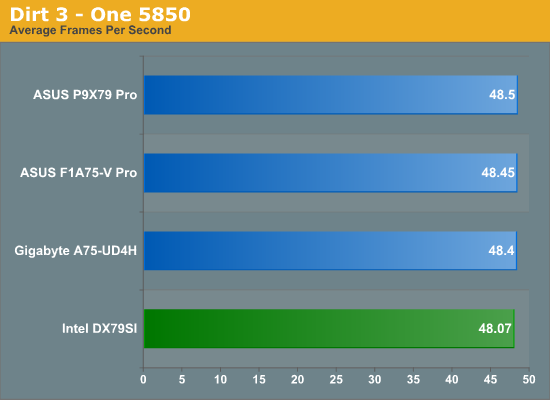

With 5850s in Dirt3, the dual GPU scenario shows difference between
other platforms - up to 10 FPS difference. Despite the difference
between the DX79SI and P9X79 Pro results, both are reasonably within
statistical variance.
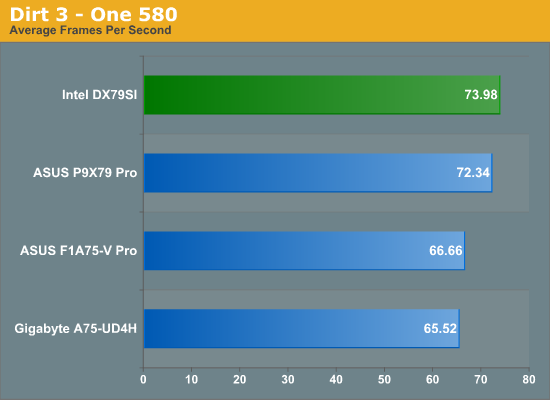
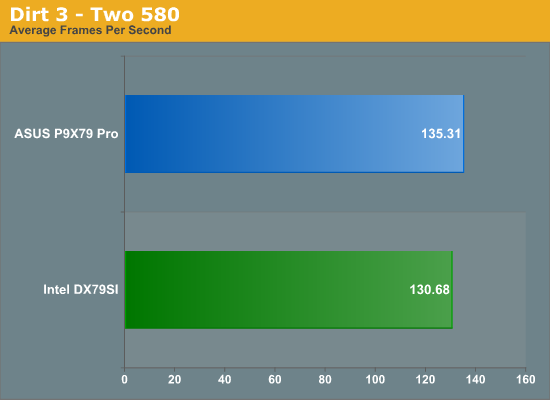
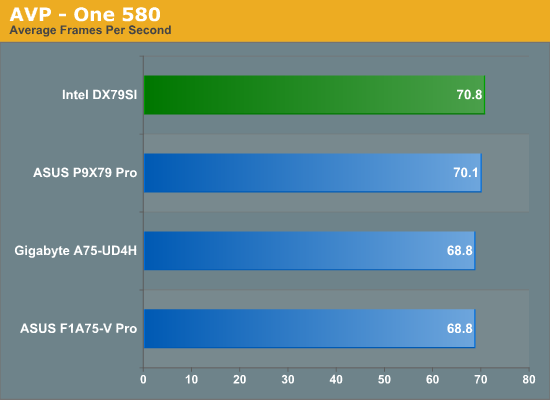
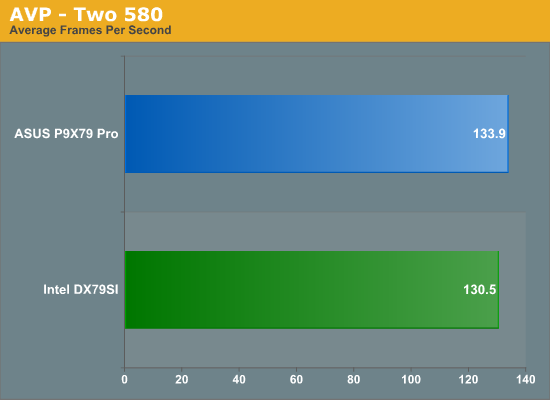
With more powerful GPUs, we again see the X79 pulling ahead slightly in single GPU mode. We see again that the DX79SI falls slightly behind in dual GPU mode.
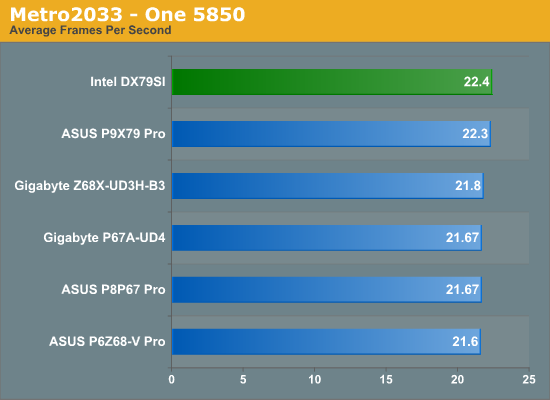
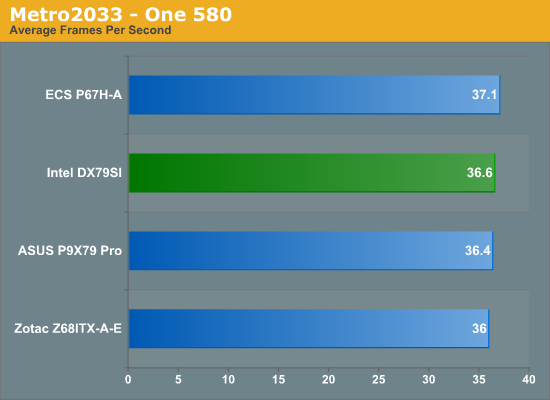
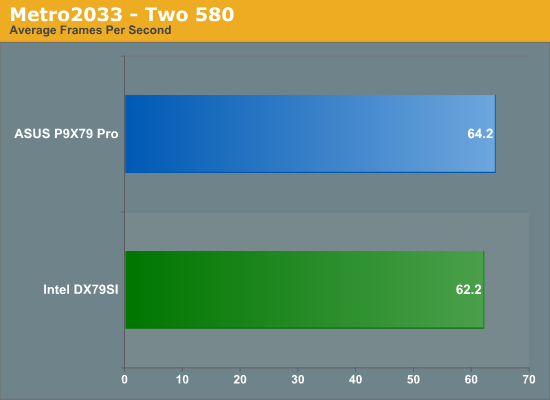
Metro2033
Metro 2033 is a challenging DX11 benchmark that challenges every system that tries to run it at any high-end settings. Developed by 4A Games and released in March 2010, we use the inbuilt DirectX 11 Frontline benchmark to test the hardware at 1920x1080 with full graphical settings. Results are given as the average frame rate from 10 runs.
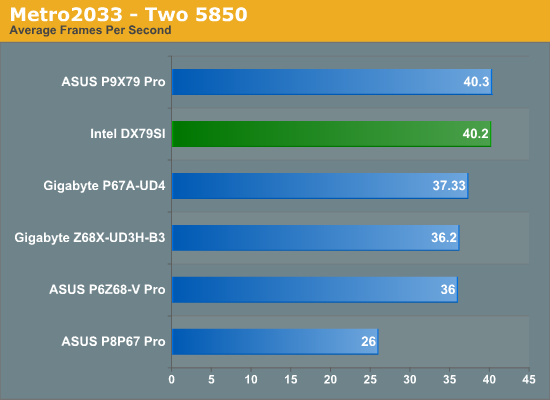
The extra bandwidth for the second GPU really shows here, with the X79s
having x16/x16, and the P67/Z68s having x8/x8 (except the P8P67 Pro,
which had x16/x4).
On the basis that Intel primarily ships a working motherboard at the beginning of a chipset release, it is hard to say how much effort they put into a product for the consumer. As media, our media samples usually contain an Intel board and a processor – that board being the product of what one assumes to be from a small team in comparison to the processor and chipset design arms. For other companies for which motherboard manufacture is their one and only business, they are more likely to heed consumer feedback and adapt their products to better fit into the market. Intel does not need to do this – their motherboard sales are a fraction of everything else. Nevertheless, consumers and system builders may wish to pair an Intel board with an Intel CPU as an indicator to retain a single companies components.
So what Intel has provided is a simple, yet functional, $300 motherboard for X79. The good thing is that it works, and is stable. As a stickler for specifications, Intel does not have to pursue absolute performance from the VRMs in overclockability, but if that happens anyway, it becomes a bonus. However, in this quest for a ‘board that works’ philosophy, we are let down on several points.
Firstly is the PCIe configuration, especially when double slot dual GPUs are used. These have to take up the first two PCIe x16 slots, which when the GPUs are double slot width leave no gap between them. There were times in my dual GTX580 testing where I was concerned about temperatures, perhaps suggesting that users in this situation use custom fan profiles on their GPUs. Next in the firing line is the software for users – there is nothing apart from an overclocking utility for the OS. Although it is well made, some form of fan controls is essentially a must-have in the current land of motherboard comparison. As a result, this automatically removes it from any awards I may have been considering giving the board after testing. Also of note is the lack of SATA cables in the package. Unfortunately, I have a media sample rather than a retail package, which lacks the Bluetooth/Wifi module, but nothing in the product specifications points to any SATA cables being bundled.
Despite this, there are positives to the board. It houses dual gigabit Intel NICs, which is always welcome when spending $300 on a board. Alongside this, I really liked the ‘Back2BIOS’ button on the I/O panel, providing a quick and sure-fire way to get back into the BIOS and change various options. The BIOS does not win any awards, being a simple functional menu system with various ASCII art representations of parts of the board, but it gives info when required which is still an issue for some motherboard manufacturers. Also a positive is the overclocking settings, which on the 1.00x gear ratio instantly provided 4.6 GHz at 1.42 V. As we’ve reviewed previously, at this speed and voltage the processor can get quite toasty (80C in a Blender stress test), even with the Intel Liquid Cooler outside of a case, so consumers may consider a lower speed setting which also works well with memory, such as 4.4 GHz and DDR3-1866.
In the grand scheme of things, this board works. However for the price, there is not anything that makes it stand from the crowd. I would not recommend it for anyone considering using more than one GPU due to the spacing, or for those that want to adjust fan speeds for temperature and noise from motherboard OS controls.
The Intel DX79SI is expected to retail in the $290-$300 region, and comes with a 3 year limited warranty.
Source: AnandTech
No comments:
Post a Comment