This front screen is the EZ Mode of ASUS’ BIOS, implemented to give somewhat of a ‘system-at-a-glance’ for users. We get the board name, BIOS version, CPU installed, CPU frequency, CPU temperature, CPU voltage, DRAM installed on a per module basis, SATA information, boot order, fan speeds, a boot menu and the fan profile for the CPU fan. I have remarked on the level of detail I like to see when entering the BIOS, and what ASUS provides upon entry is essentially what I need if I am examining a system for the first time without opening the case. From this screen users can also enable XMP on the left hand side, adjust the boot order by drag and drop, perform quick tuning or move into the graphical fan controls.

Selecting QFan Control shows the four different CPU fan groups, all controllable by PWM or DC, and here I have selected the manual fan option which allows the gradient adjustment.
One of my gripes about fan controls over the past two years is that the output of the fan can be given in two ways – either by RPM (or % of max RPM) or by voltage input. What annoys me is when motherboard manufacturers confuse the two, because voltage input is not proportional to RPM and most fans have a dead-zone or a non-linear curve. As a result, 50% power might be 30% RPM or 60% RPM, depending on how the fan is made. This can be confusing to a non-expert, and the only way to ensure you have it right is to appropriately label the axes on the graph but also to perform fan testing. ASUS does provide a fan testing tool, but this graph only shows ‘%’ as the axis and says ‘fan’s operating speed’ at the top, which makes no mention of RPM, % of RPM or applied fan voltage. /end gripe

For easier overclocking, ASUS did introduce the EZ Tuning Wizard last year to help people overclock their system. In OC mode, it asks the user to choose from a list of system uses (Office, Gaming) and then the type of CPU cooler being used (box cooler, tower cooler, water cooler, unknown). Using this information and what the BIOS already knows in the system, it will suggest and implement an appropriate overclock that should factor 95%+ of production processors and DRAM. In the lucky event when you might not have a good processor, the system is designed to automatically recover from a failed boot.

Here it suggested a 23% CPU increase, and no improvement on the DRAM. Users can either cancel, go back and adjust the options, or implement the overclock with a reboot by clicking Next.
For experienced users, the Advanced mode is the place to go to have better granularity for overclocking and chipset options. By virtue of the ROG line and the fact that this is the X99 Rampage V Extreme, there will be a few more overclocking options compared to regular channel motherboards.

At the top of the Advanced Mode is a more stereotypical front page for a motherboard, giving lists of numbers associated with firmware versions and basic system information

Extreme Tweaker holds the overclocking options, implemented somewhat as a long list with several sub-menu options. At the top we have the ‘target’ numbers showing the user what speed the system will be if the options are saved. Personally I think this info needs to move into the Hardware Monitor section on the right, so it stays persistent when the user scrolls through the options.
Also at the top is a sub-menu for overclocking presets, which in our BIOS offered the following:

Because the Rampage V Extreme is for gamers, overclockers and extreme overclockers (those who use liquid nitrogen to get frequency and performance records), there are options for all. In this case a gamer can implement the OC Profiles for either a 6-core (5820K) or 8-core (5930K, 5960X) CPUs, whereas extreme overclockers might want the DRAM OC profiles.

The ROG teams who work on the X99 Extreme are very proud of their DRAM knowledge, and so one of the focal points for this board is the memory section which derives from the board design to firmware capability. Here we have our regular list of sub-timings, along with an indication of the per-channel numbers. The Memory Presets menu gives an interesting list:

ASUS has gone through most of the high end memory kits and provided overclocking sub-timing packages for them. Some extreme overclockers find this useful, and so it is included. Also it is worth noting that at the top we have an IC Analyzer option, which states the following:

It gives a set of instructions so the user can find out if they have Micron, Hynix or Samsung integrated circuits on their DRAM. Unfortunately DRAM vendors like to hide/obfuscate the memory they are using due to the way the market is highly competitive, and different ICs can overclock at different rates, so having a way to determine which is which can be very helpful if you know what you are doing

At the bottom of the DRAM tuning sub-menu are a series of options relating to memory training when the machine is first turned on. X99 as a platform has stricter requirements for DRAM than previous platforms, and various parameters need to be optimized during post. These can technically be disabled here in order to improve POST times but it is not recommended as the user may end up with a less stable system as a result. Many of these optimizations are due to how silicon behaves as a function of temperature and age, and by doing them it enables the system to read and write knowing that there’s less chance of an error by aligning correctly.

A feature on most of ASUS’ models over last few years has been related to digital power, and the control therein. This allows the user, who is typically an overclocker, to adjust how the processor reacts to voltage drop as a result of load, or switching frequencies when load is applied. The power phases for the system can also be pushed beyond regular limitations, as well as thermal control. Normally for simple overclocking we adjust the load line calibration to ensure consistent voltage application when overclocked. This typically comes at the expense of power consumption and temperature, but improves stability.
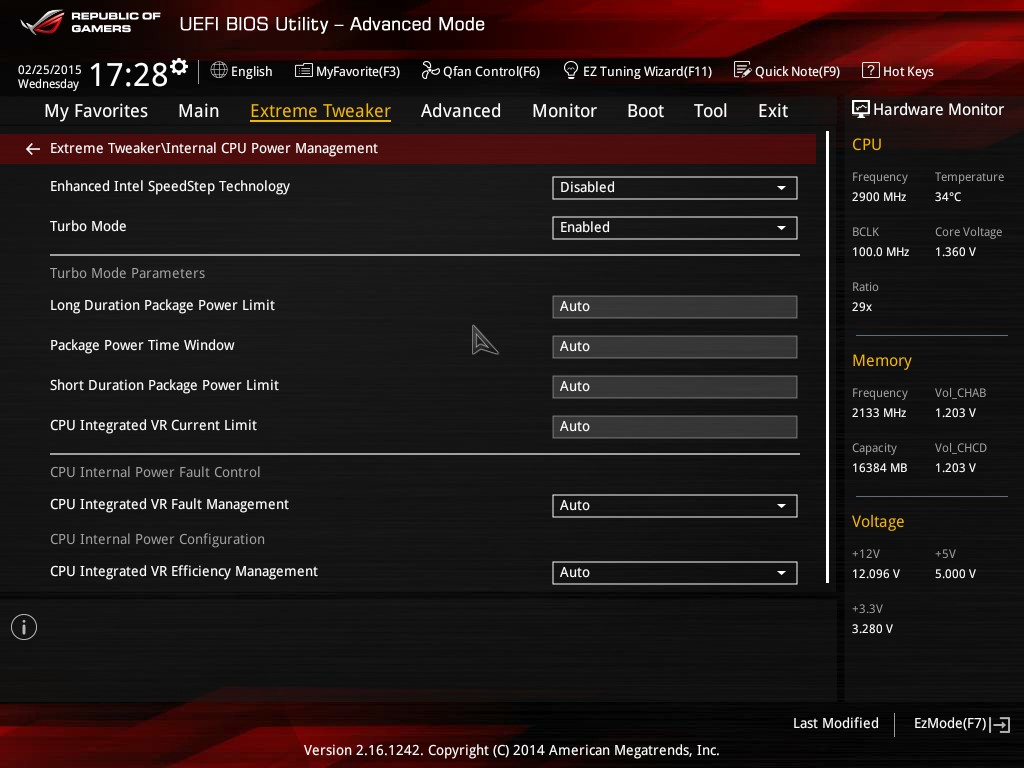
Overclockers can also adjust the turbo mode parameters, in particular the CPU response to high power drain loads and whether to keep turbo mode active in such scenarios.
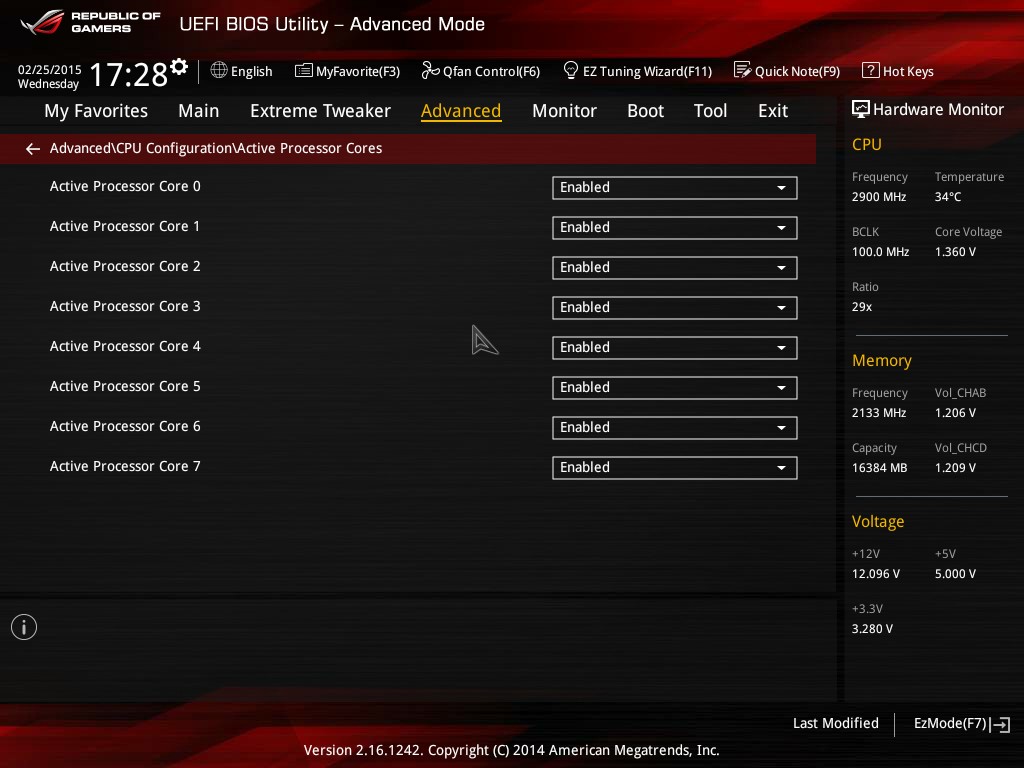
One feature ASUS likes to promote, particularly for overclockers that only require a few cores, is that ASUS can enable/disable each of the cores on the CPU individually. This allows the user to select the best 1/2/3/4 cores on the silicon die to get the best frequencies.
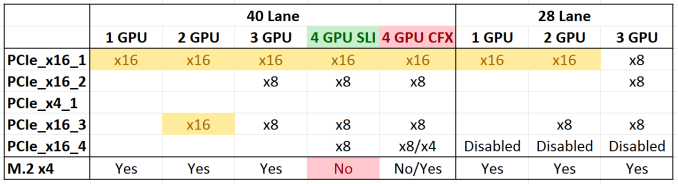
One feature I enjoy is being able to see what is installed where and at what speed. We have some of that with the DRAM in EZ mode, but ASUS does not implement something like Board Explorer which we see on ASRock and MSI products. Instead we get a feature like this shown above, where it shows the PCIe slots, which ones are installed and at what speed. Users can adjust the linked speed of each slot as well. Normally a user might adjust this due to compatibility with some PCIe cards, or if an internal failure caused the CPU to no longer support high PCIe speed.
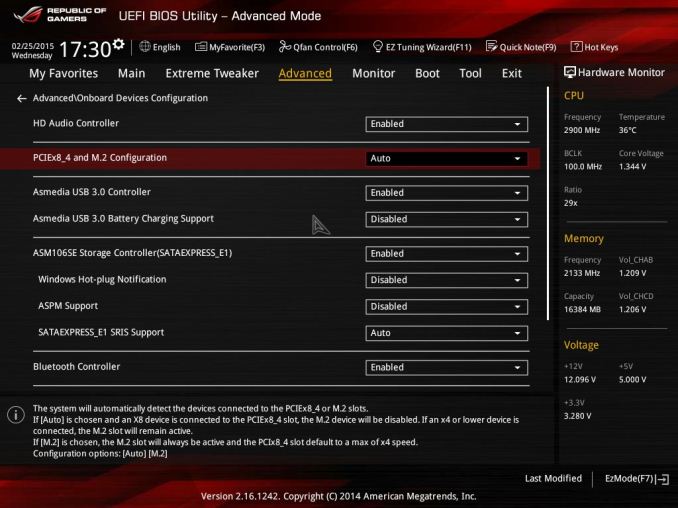
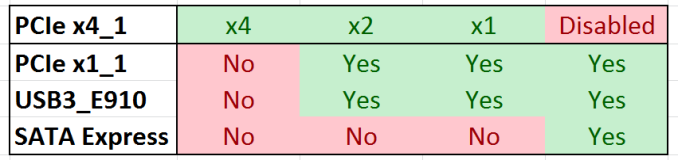
In the previous page we noted that the PCIe configuration, particularly when multiple GPUs, the M.2 slot or the black PCIe 2.0 x4 are in use. The Onboard Devices Configuration menu is where the user can enable and disable various features in order to make sure they have the right stuff enabled and where the bandwidth goes. In the last page I mentioned that despite motherboards being advertised with X, Y and Z, sometimes not all of them can be enabled at once – this onboard devices menu is where the fate of your features is decided. It is worth noting that ASMedia’s battery charging support for the two rear IO USB 3.0 ports was disabled by default in our BIOS. Users will need to re-enable it to get access to this feature.
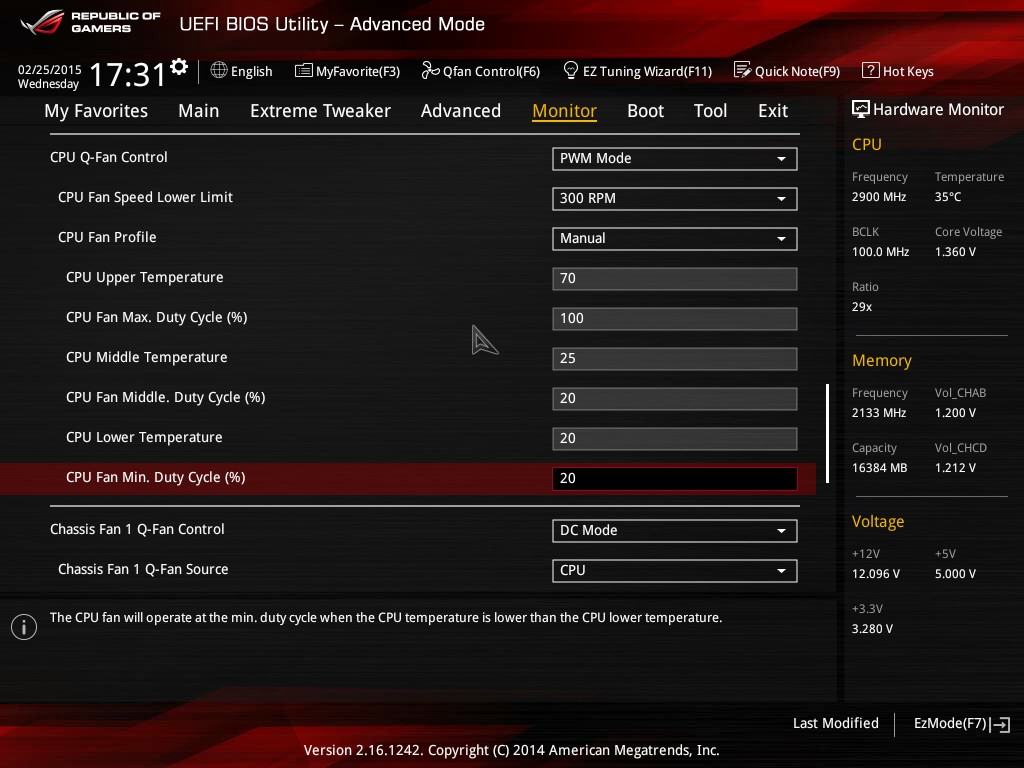
The Monitor menu gives a long list of all the temperature sensors, fan speeds and voltages detectable on the motherboard, including the data from the three optional thermal sensors if a user implements thermistors on the appropriate headers. We also get the basic implementation of the fan controls, similar to the old style we used to see:
Users can select which mode the fan group is in, a minimum speed, a preset profile or a manual adjustment based on a two point gradient.
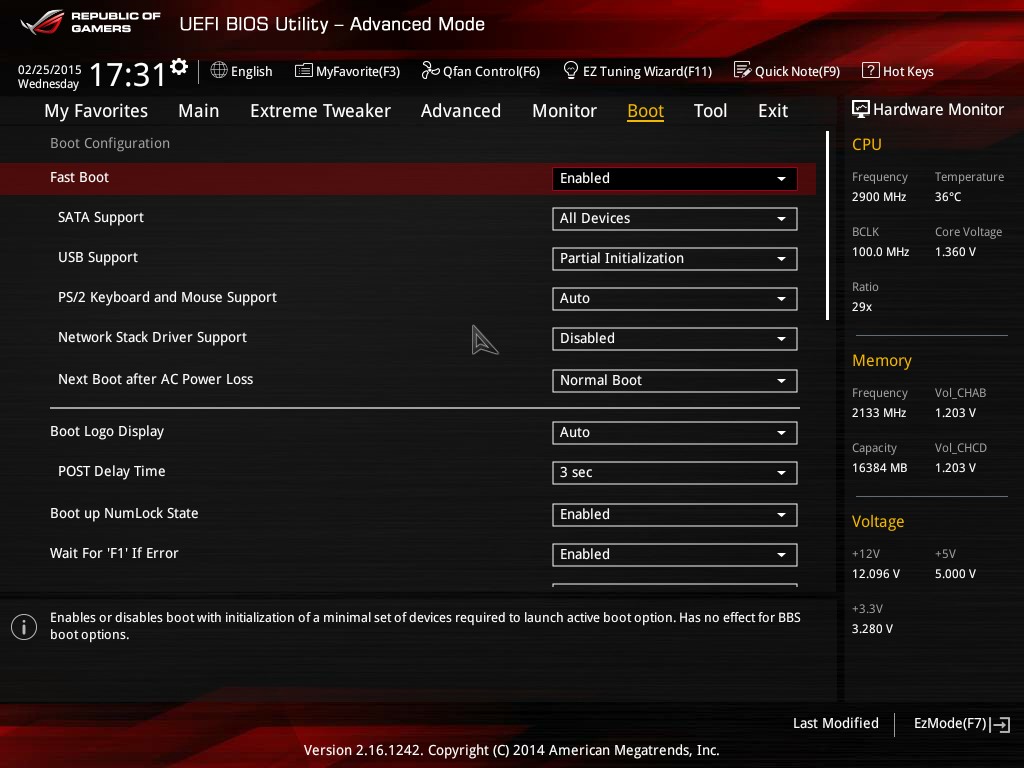
The Boot tab gives options for fast booting modes, adjustment of the boot logo, what do to in the event of a booting error and boot override that allows for a one-time boot from a different storage device.
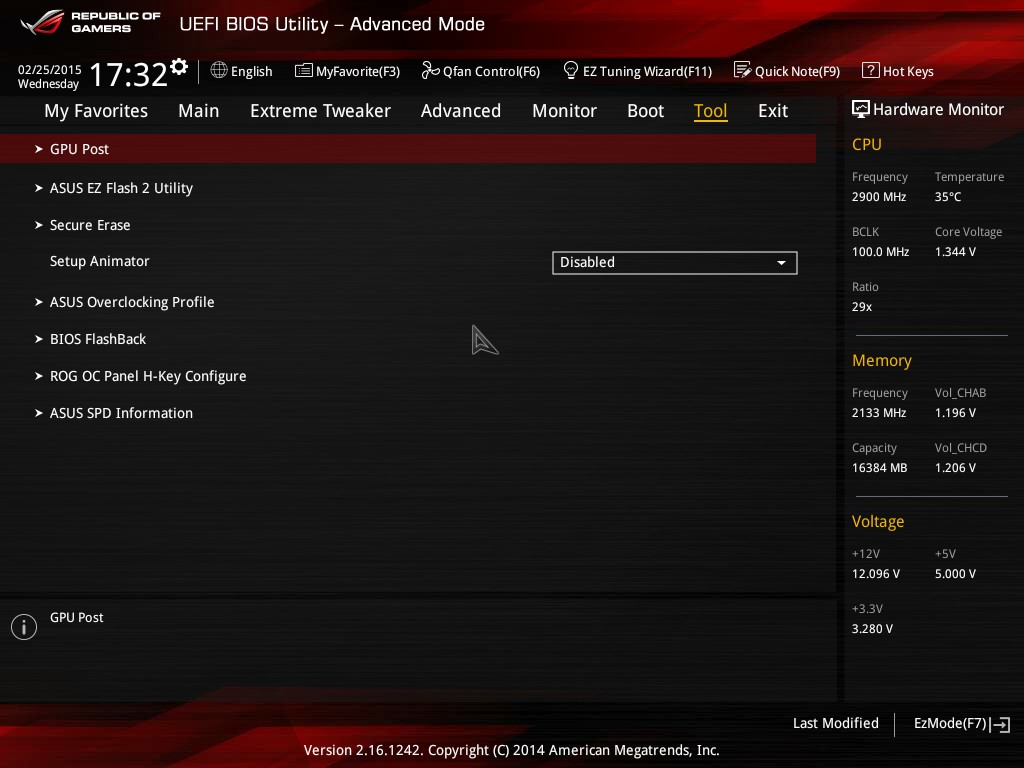
A lot of the ROG specific features can be found in the Tool menu. We’ve covered a lot of these before, but a brief rundown:
GPU Post: More detailed information about PCIe devices
EZ Flash 2: Update the BIOS
Secure Erase: Perform a complete wipe-to-zero for an SSD, restoring performance but losing data
OC Profile: Save sets overclocking settings for use in different scenarios
BIOS Flashback: Restore/update from the other BIOS
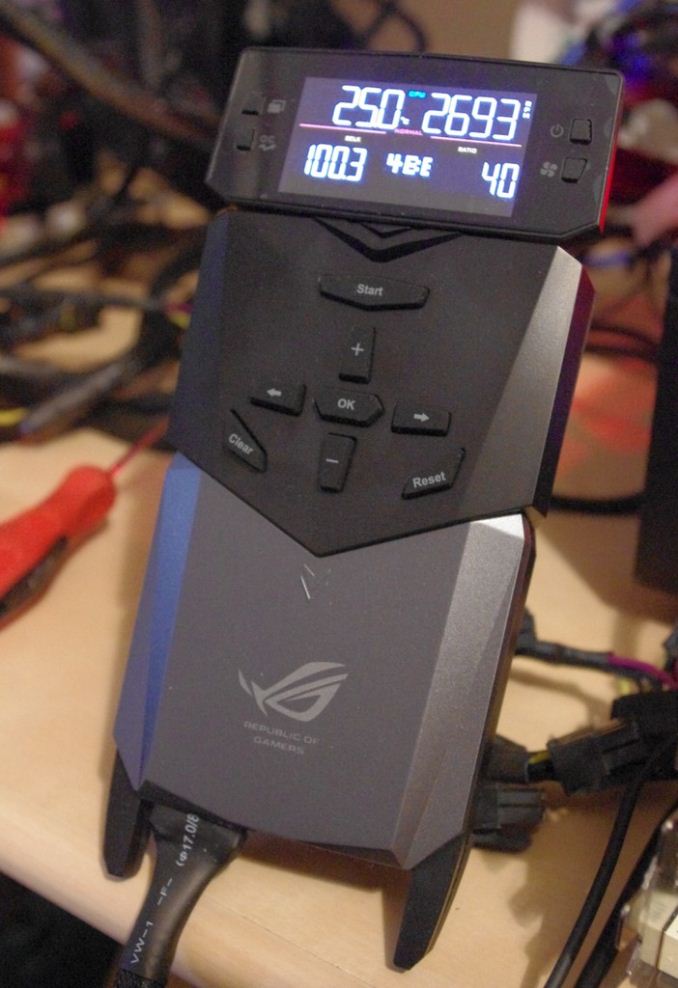
OC Panel H-Key: Implement a set of overclock options at push of a button
SPD Information: Detail about the DRAM installed
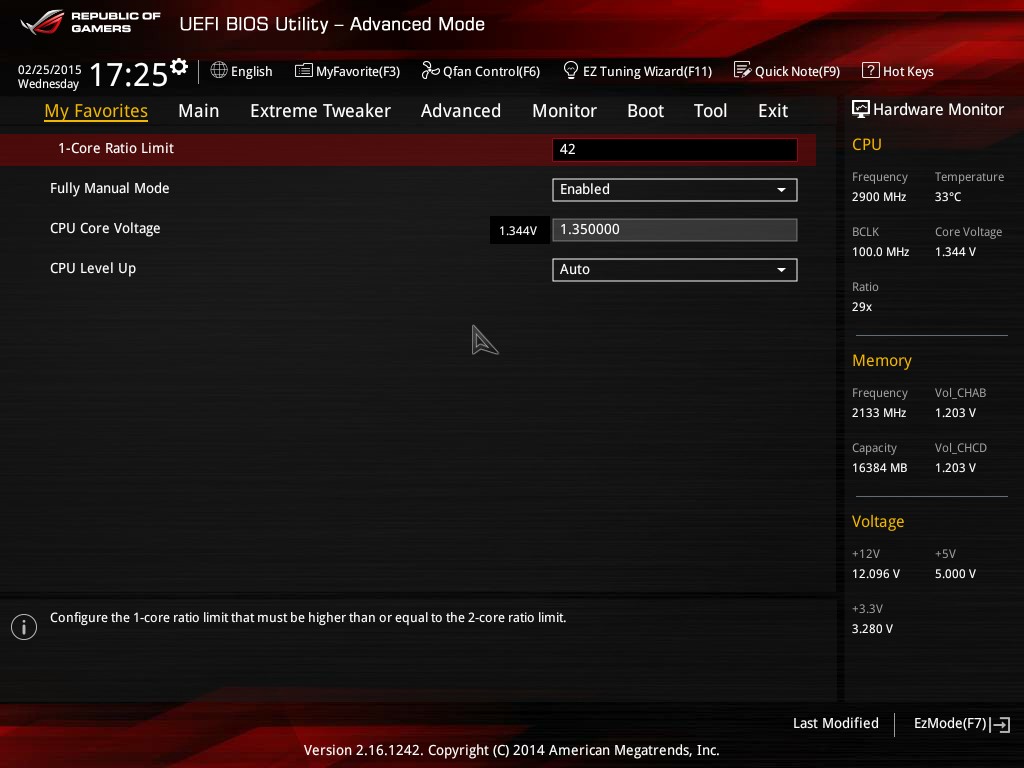
One last feature to mention is My Favorites:
Overclockers can indicate a series of options they like and get them copied into a custom menu, making it easier to scroll through the options that matter to their overclock. For example, these are the options we usually adjust for manual 24/7 overclocking. The only downside here is that there is not an option to boot straight into the My Favorites menu – instead the user needs to navigate each time.
ASUS Rampage V Extreme Software
At the beginning of the previous section, I asked some perhaps unanswerable questions relating to BIOS usage. I could easily flip them around and point them in the direction of the bundled software that comes with motherboards:
- How many users ever use the software?
- How many users overclock? Using the BIOS, Software or other?
- What percentage of users ever update the software?
- To those that do not use the software, what stops you?
Some of these numbers could be obtained by the manufacturer automatically if the user was connected to the internet (but they do not get this info, no need to worry). But the last question we could get some responses to. Off the top of my head, the three most common that I have heard come down to usability (or lack thereof), or that it’s useless, or they don’t want to use it. Similar to the smartphone space, there’s a general element of malaise that comes with buying hardware from a manufacturer but also then using software from the same company. In this case we’re not fighting complete UI rearrangement, but a couple of tools that might improve usage / update software as required. On one side it is a little baffling as it is such a minor thing, but on the other it only takes a bad experience to be put off.
Getting the right balance of usability, suitability of tools and design can be a tough one, especially when it used to be so bad. Now most of the manufacturers get users to access their tools through a singular interface, or at least a repetitive designed interface, rather than bundling 7 different tools at once. The problem here lies in the fact that there are two different tools: ones made by the manufacturer, and ones to which the manufacturer has a license to distribute. For example, with the right Realtek license, a motherboard manufacturer can reskin the audio software and even code in their own features. Similarly on the networking side, depending on what sort of redistribution license the manufacturer has with cFos, they can just bundle the cFos software, or enhance it with a manufacturer logo/skin, or add in their own algorithms and tools. Actually, most manufacturers bundle cFos because it is network controller agnostic, and the Realtek software is relatively bad. In this circumstance, Killer sits in the middle (but on the bad side of middle).
ASUS attacks the software front harder than most other manufacturers. This isn’t just as a result of iterative gains – over the past four years there has been a couple of complete redesigns and adjustments (moving from one coding platform to another, for example) in an attempt to realign itself with the customer base. Most of ASUS’ tools come under the AI Suite banner, though there are a few which have separate icons on the desktop.
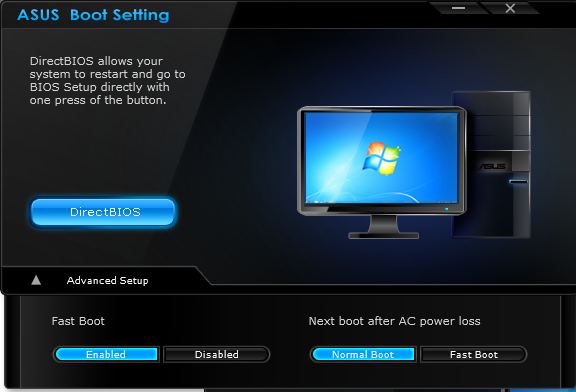
ASUS Boot Setting is a tool to enable Fast Boot without going into the BIOS, but also allows users to go into the BIOS with a reboot and without having to press DEL/F2 in order to get there. I actually use the DirectBIOS button a fair amount when testing, particularly after a completed overclock test and when it’s time to adjust the settings.
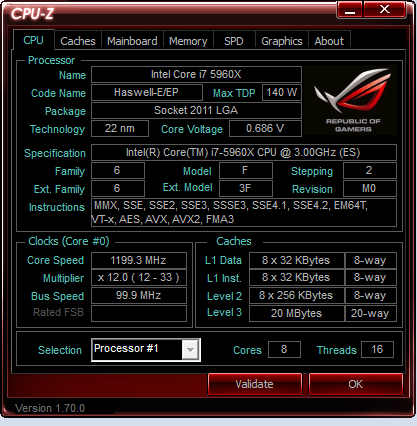
Bundled on the CD is a version of CPU-Z, software commonly used by overclockers for frequency verification of the CPU and DRAM. This is an example of licensed software that ASUS has been able to reskin and add a logo for. The purpose of this was to make the screenshots proving overclockers’ scores and to promote the use of ROG hardware for those scores. That being said, the software is platform agnostic and works just as well in competitor brand G, M and ASR, some of whom also have their own variants of CPU-Z.
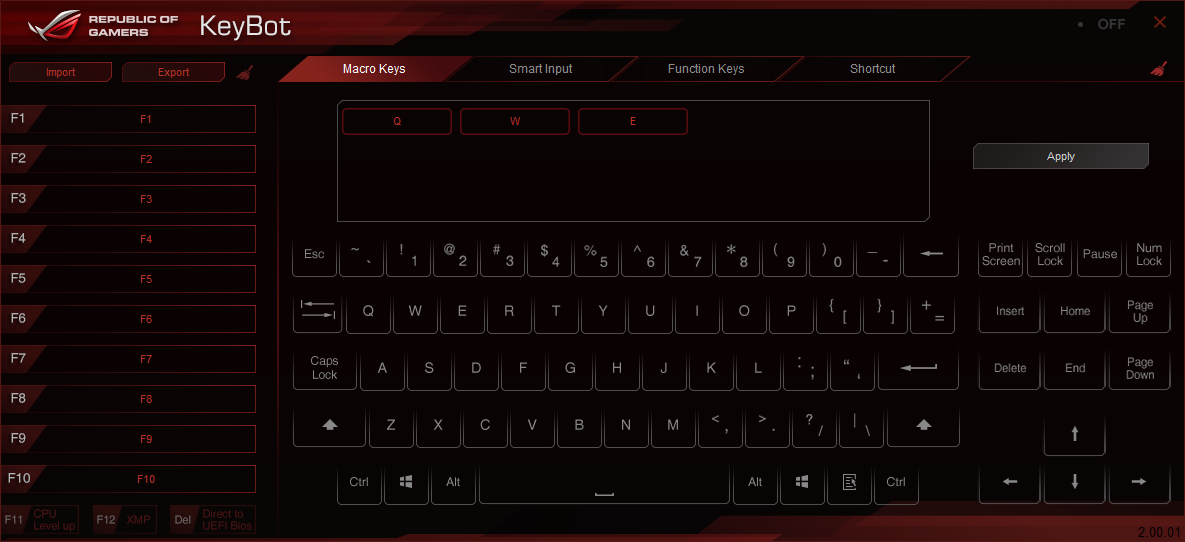
Keybot was launched last year with ROG motherboards, allowing users to assign macros to the various F keys on the keyboard. Here’s an interesting statistic for you: I have been running the program WhatPulse for 6+ years and it tracks my key presses and clicks on each of my systems separately. I am writing this on my UX301 which I purchased Q2 last year, and since then I have typed 1.12 million keys, and this is the rate of which I have pressed the F1 to F10 keys in that time:
F1: 5
F2: 2228
F3: 13
F4: 24
F5: 350
F6: 5
F7: 8
F8: 0
F9: 1
F10: 0
The evidence is in. I press F2 a lot because it’s the shortcut to rename a file or a cell in Excel, and F5 for webpage refreshing. F5 might seem low, but I have a touch screen which is perhaps a little easier to refresh with large buttons installed. (For those interested, the space bar came out top with 137k, and the backspace at 54k. I make a lot of mistakes.)
My point here about using F-keys for macros is this: I hardly ever use most of my F-keys. That makes them the perfect target for macros, and it somewhat alleviates the need for a keyboard with macros. Keybot stores its macros within a chip on the motherboard, allowing for persistent use in other operating systems or when the software isn’t running.
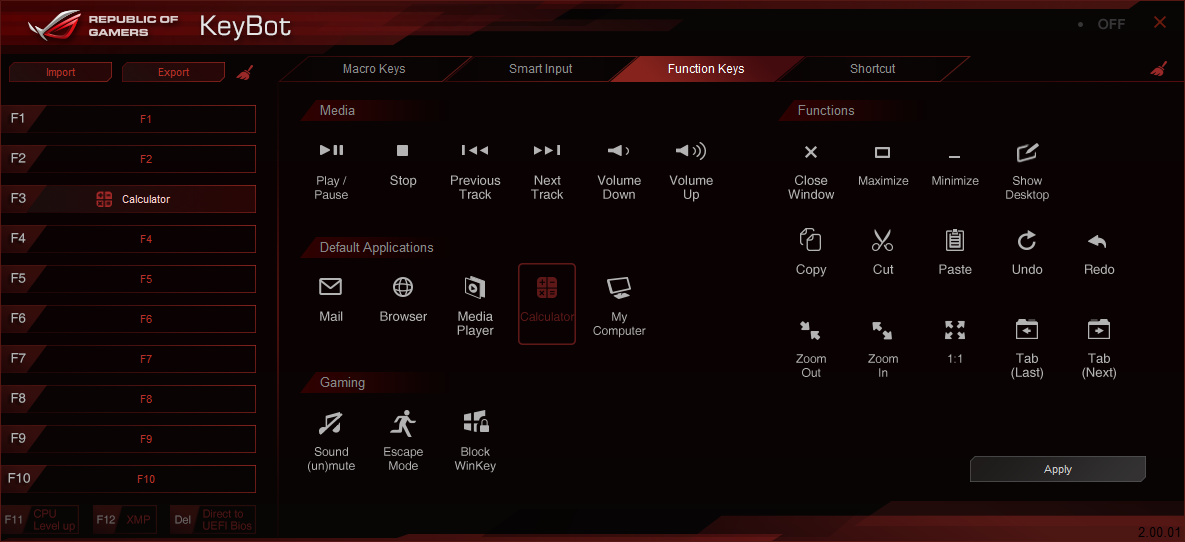
The macros can be assigned to keys, programs or quick-use features such as ‘Block WinKey’ which can be an important feature in gaming.
On the grand scheme of things, Keybot is a simple macro recorder that uses onboard hardware to keep persistent macros. Something like AutoHotKey is invariably a lot more powerful, but lacks that persistent implementation feature.
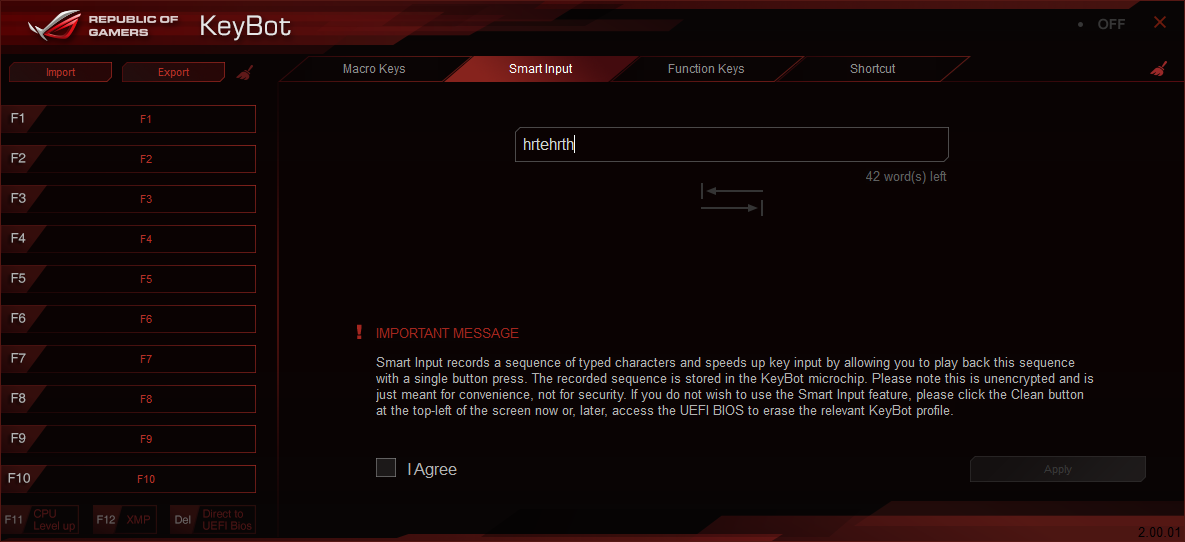
It is worth noting that the Smart Input method allows a string of characters to be input at once, something that might be used for passwords and such. ASUS has noted on this page that the recorded sequence stored on the Keybot chip is not encrypted, so if you subsequently sell the motherboard without resetting the Keybot profile, the new user might get a hold of it (if they figure out what it is). I also do not suggest realigning each macro to a funny phrase when you sell the motherboard either. I mean you can do it, and it would be quite funny if you’re selling to a friend, but I don’t suggest it.
MemTweakIt falls under the overclocking realm of the software package, allowing users to adjust most of the timings of their DRAM on the fly. None of these options have guidelines over how to adjust them – MemTweakIt is thus reliant on the user doing some research into what each option means and how to adjust it appropriately.
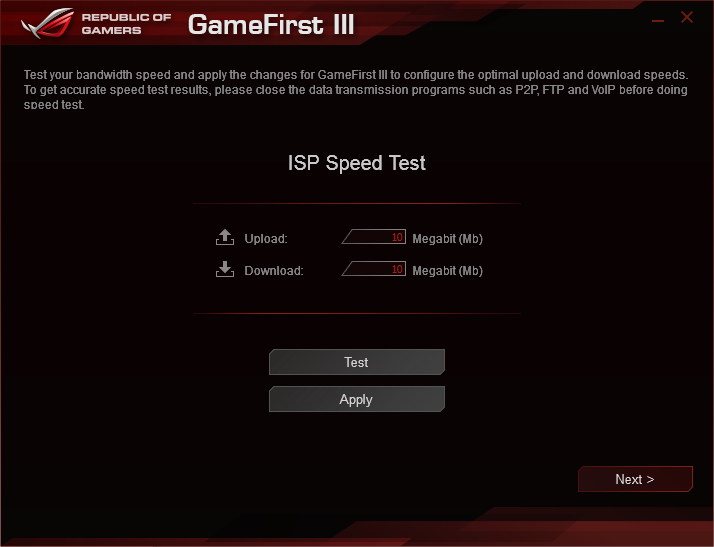
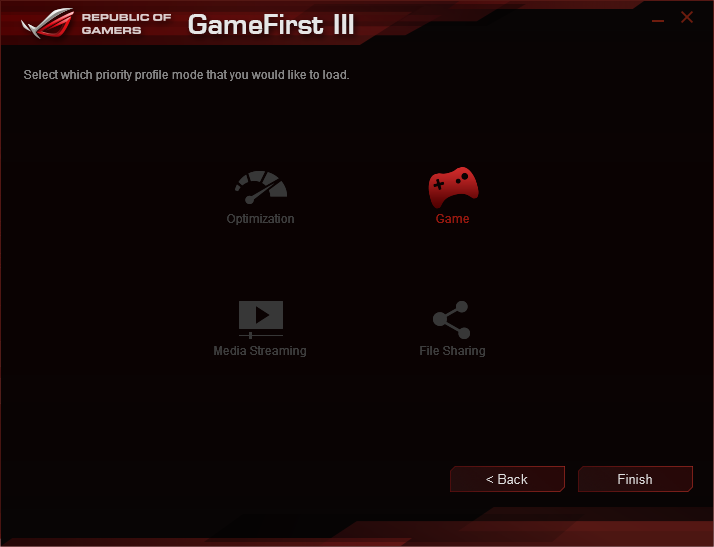
In previous generations, ASUS has used a skinned version of cFos as its network management software, but on the release of GameFirst III, I was told that it was a wholly new program built in-house. It would seem that ASUS found it more cost effective to start from the ground up in basic network management than continue to pay for cFos licenses. It was launched with the Z97 ROG series, and we also get it here. Due to the way it works, it requests a speed test to begin and then asks which workload is a priority:
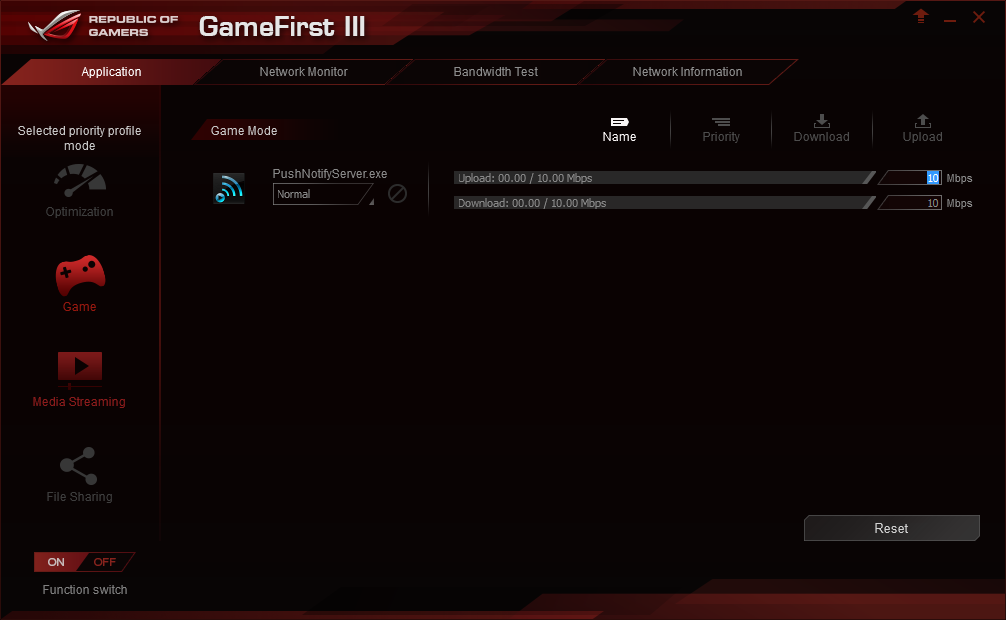
This implements a predefined hierarchy for various common programs, but allows users to add their own.
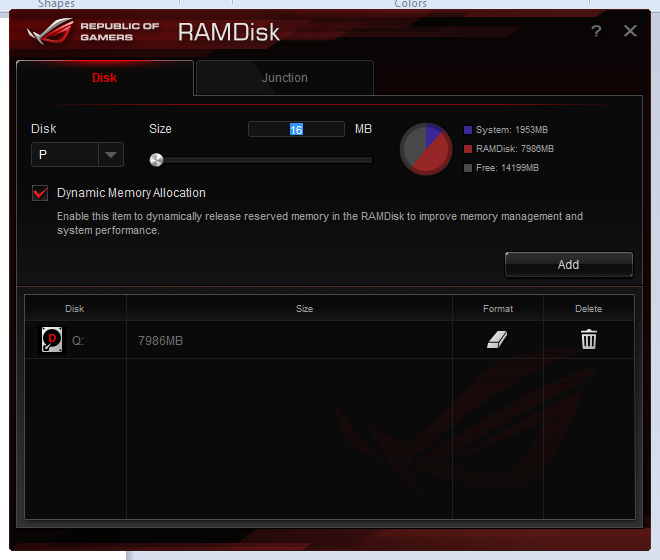
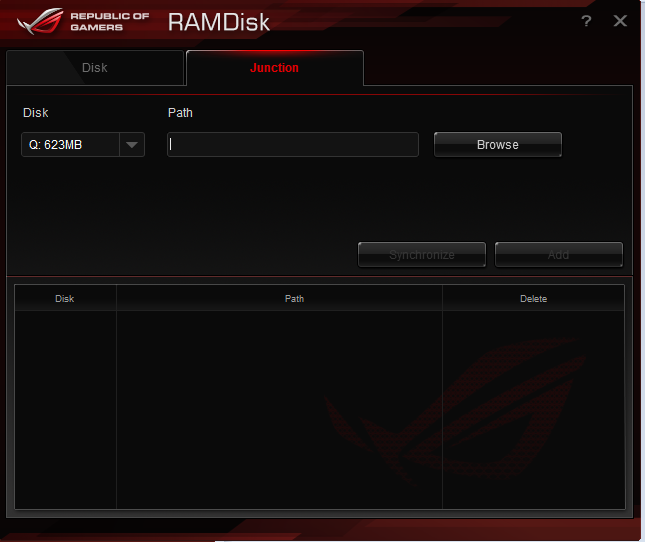
With the recent launch of large memory kits, such as those from G.Skill and Corsair using 16GB modules for a peak total of 128GB in an X99 system, now would be the best time to bring up the concept of RAMDisks. For those new to the term, a RAMDisk is a section of DRAM that can be used like a storage device. It offers lightning fast access times, but the downside is that the contents are purged when the system is rebooted (and you are also limited by space). RAMDisks can help when it comes to temporary file generation for these reasons. There are a variety of RAMDisk software in the market, most of them are not free ($30+) or have limitations (e.g. 4GB max), but ASUS bundles some with ROG motherboards.

The software determines the maximum memory in the system (in this case 16GB), how much is currently in use, and how much is free. The user can then select a drive letter, how much memory to allocate, and then off you go. In the screenshot above, we created the Q: drive with 8GB of storage. There is a small danger that using a RAMDisk will deplete available memory for the system, and as a result ASUS has an option for dynamic memory allocation which will adjust the size of the RAMDisk if you are hitting limits.
It is worth noting that it takes some time for RAMDisks to be enabled. When launching the program a warning pops up, stating that if RAMDisks are loaded when the machine is turned on, it can delay startup time by 2 minutes for a 16GB RAMDisk, so keep this in mind.
ASUS also offers a tool to create symbolic links between directories in the drive and the RAMDisk, which is how temp file arrangement would happen. The software would dump the temp file into the regular spot, but the symbolic link causes it to be redirected automatically (without the program knowing) into the RAMDisk. As mentioned previously, contents are wiped when the system is restarted.
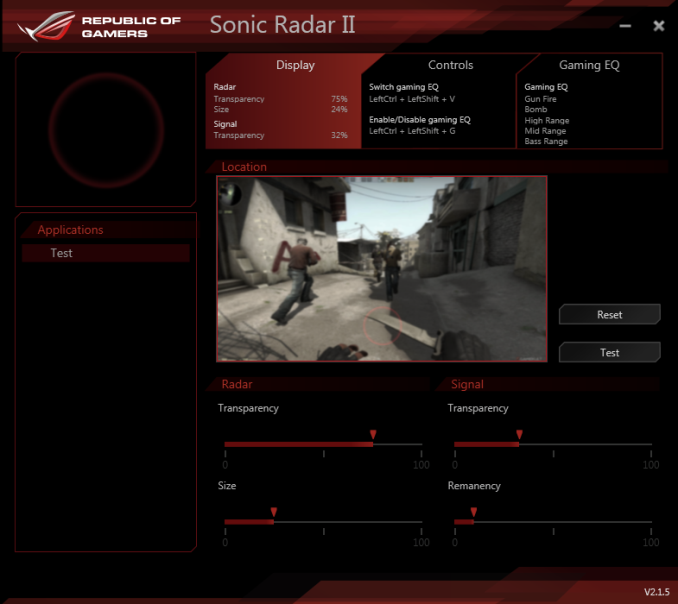
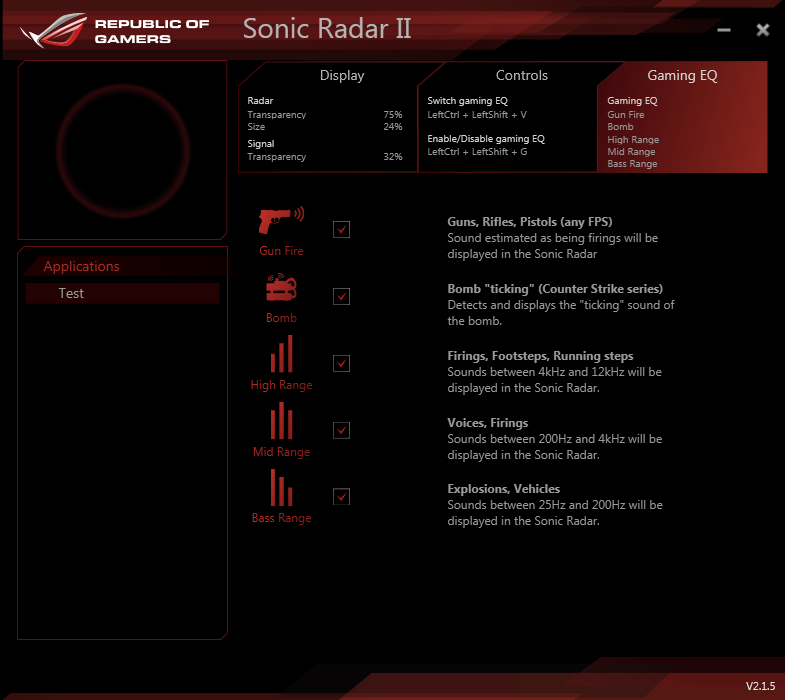
Sonic Radar II is the next iteration of the tool that ASUS has bundled that allows for an onscreen display of localized audio. It half sounds complicated, but what this means is that during a game, if someone is walking down a path to your right, the onscreen display would show that the noise you hear is coming from your right. For people involved in twitch type gaming (such as first person shooters) who do not have a directional audio setup, it might aid reaction times as long as the display is not a distraction. With SR2, the visual implementation can be adjusted in size/transparency, but also the response can be altered.
Sonic Radar can be optimized for different frequency ranges depending on the game, as shown above. It is worth noting that some of this requires numerical transformation of audio signals from the time domain to the frequency domain, and as a result might take some CPU cycles.
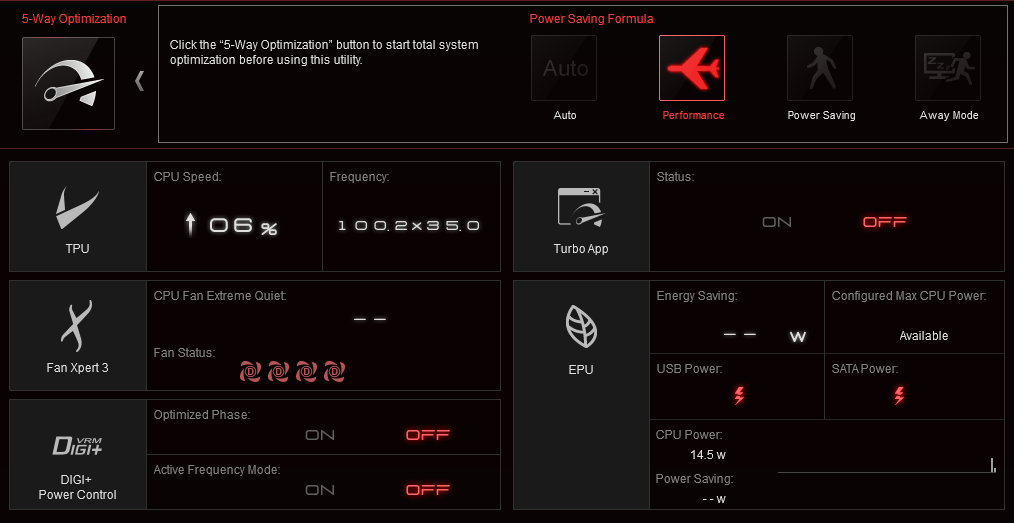
AI Suite
The main software package is AI Suite. This first section is part of ASUS’ 5 Way Optimization, giving five tools to help with power, performance and control. There are several presets up the top, or the user can manipulate each setting as required.
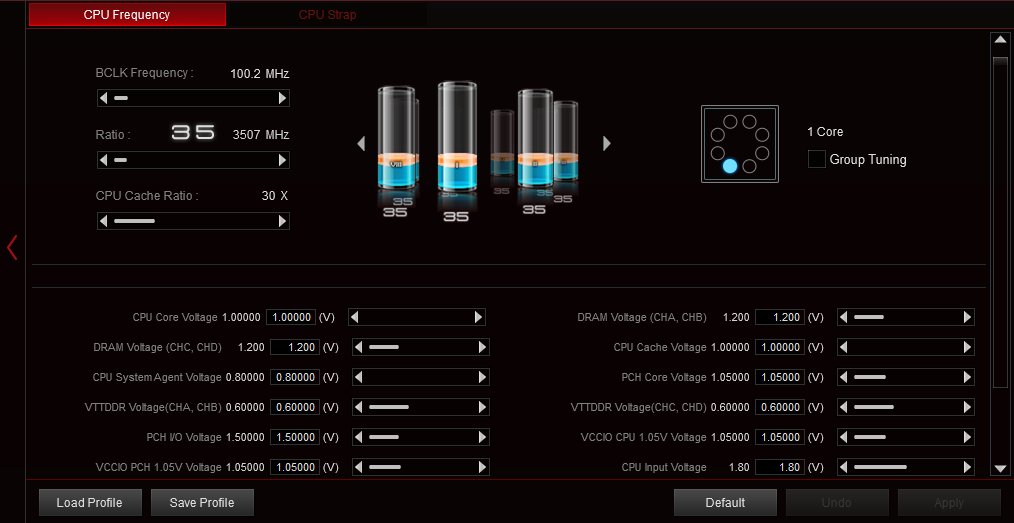
TPU is first, standing for ‘Turbo Processing Unit’, and is the heart of the overclocking options. A lot of what we see here is similar to the list we saw in the BIOS, perhaps focusing on slightly fewer options that are higher priority. The beauty here is that with software we should be able to represent these values in a more graphical and aesthetically pleasing way, which is somewhat achieved. It is worth noticing that it was more graphical on the Z87 variants of this software.
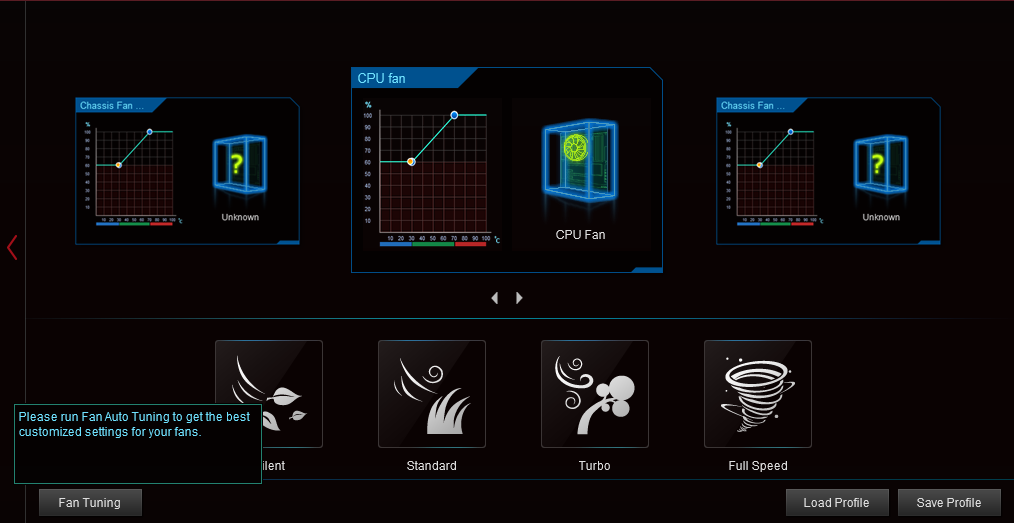
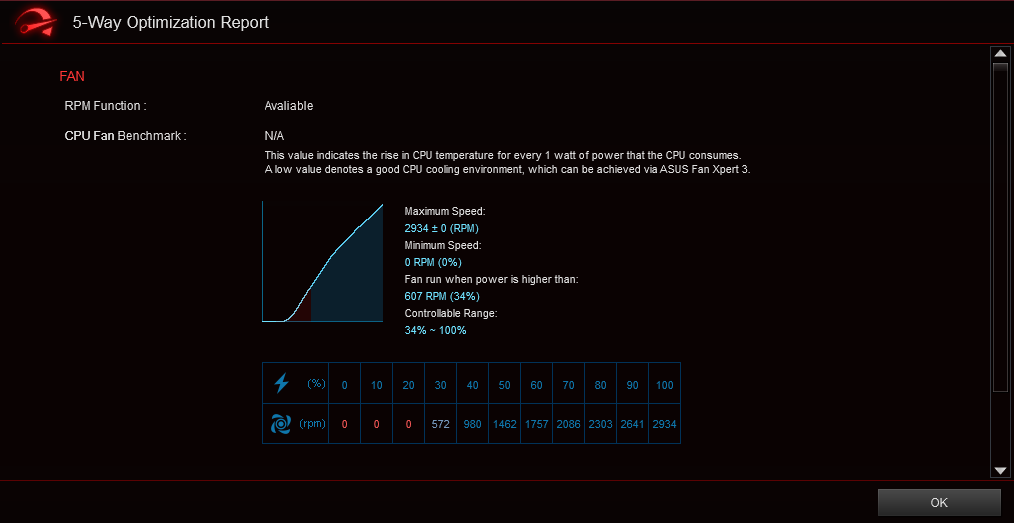
The fan options are also part of AI Suite, giving presets or the ability to adjust each fan group manually. The option in the bottom left here does some fan testing to allow each graph to tune for the characteristics of the fan.
Here we see a fan that has no response below 20%, and only hits the stride until 40%. ASUS lists the controllable range as 34%-100%, and we can see from the graph that the curve is non-linear.
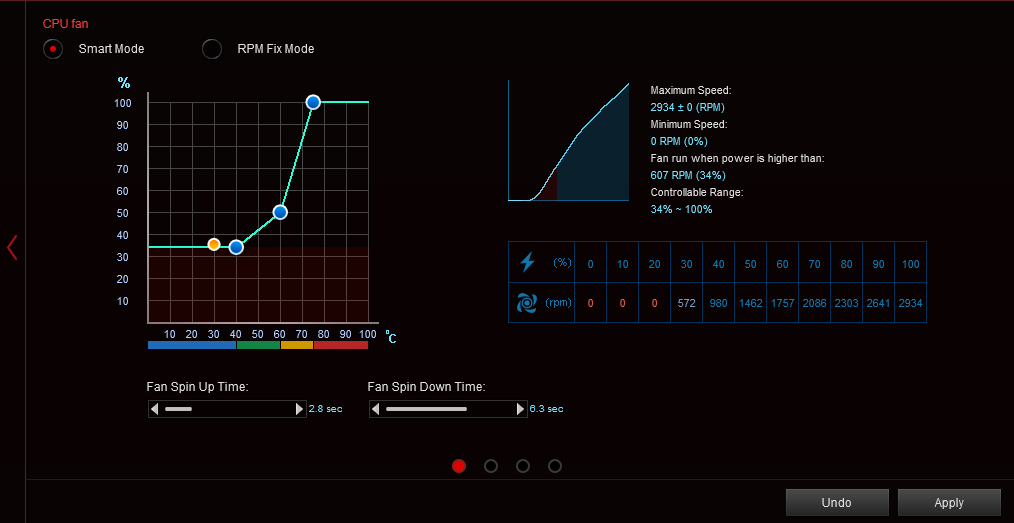
With this information at hand, the manual fan options show the user that the red area is the ‘dead zone’ with little effect from the fan spinning if it spins at all. As noted in the BIOS, the graph axis here just says ‘%’, not indicating if it is fan power or a % of fan RPM, but based on the testing on the right hand side it is clear that we have the y-axis as fan power.
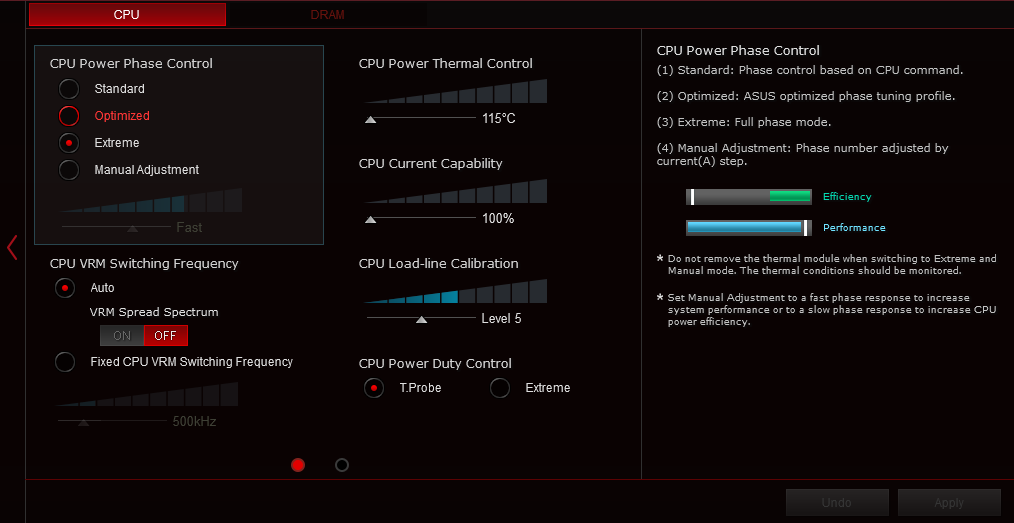
Another element to AI Suite is the digital power management, and much like the BIOS we have options here for power phase control, thermal control, switching frequencies and load-line calibration. These options all have detailed explanations on the right hand side but are also represented slightly graphically to make them easier to see.
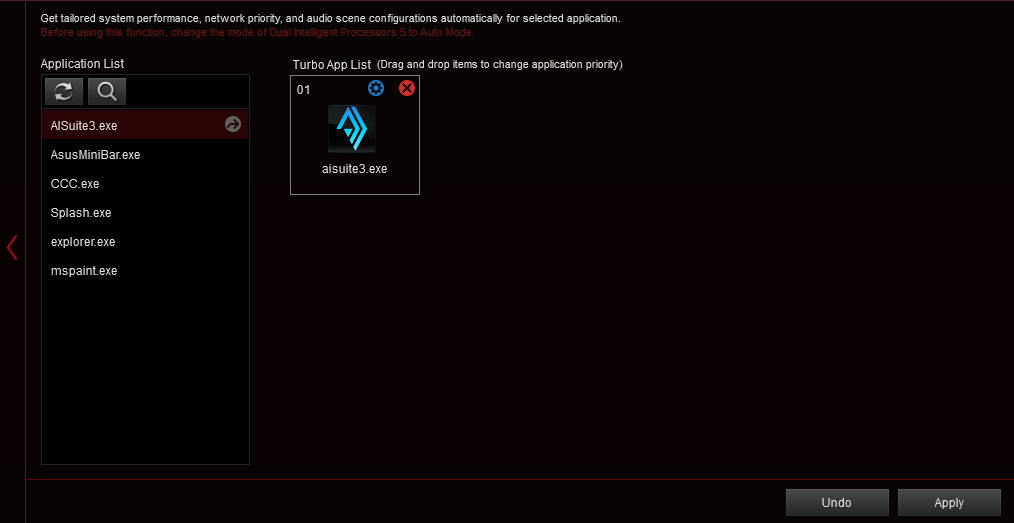
A newer element to AI Suite is Turbo App which implements overclocks based on software priority. Much in the same way that GameFirst prioritizes network traffic, TurboApp finds the program currently running with the highest priority and implements an overclock or priority setting appropriately. The purpose for this is mainly older games that focus on single core speed rather than overall overclock.
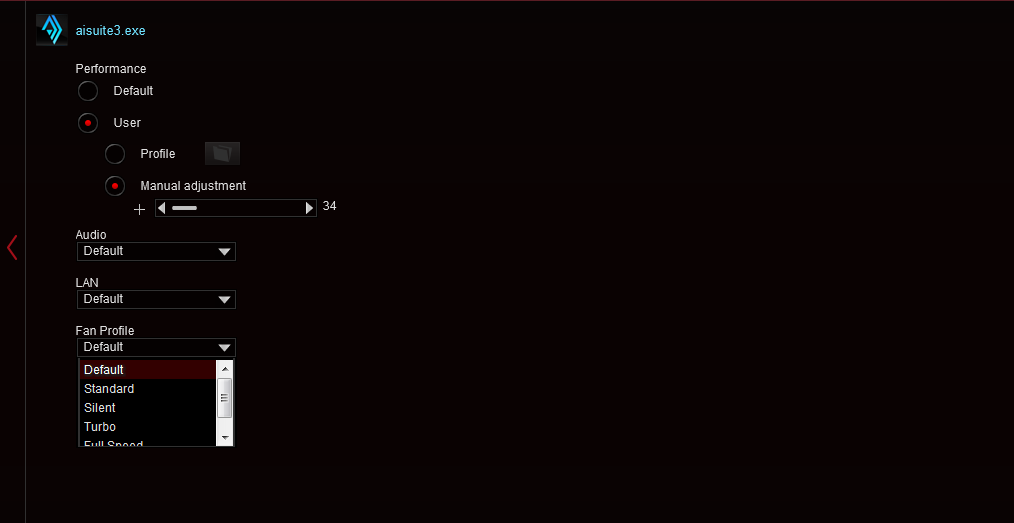
For example here we can select the overclock for a program, but also determine the Audio effect, the network priority and the fan profile to implement, integrating many features at once. If anything, even without overclocking, it allows the user to run different network and fan profiles for gaming and non-gaming.
The EPU, or Energy Processing Unit, runs a series of sensors around the motherboard to monitor efficiency and allows the user to focus on several areas that might improve power usage such as disabling ports when not in use.
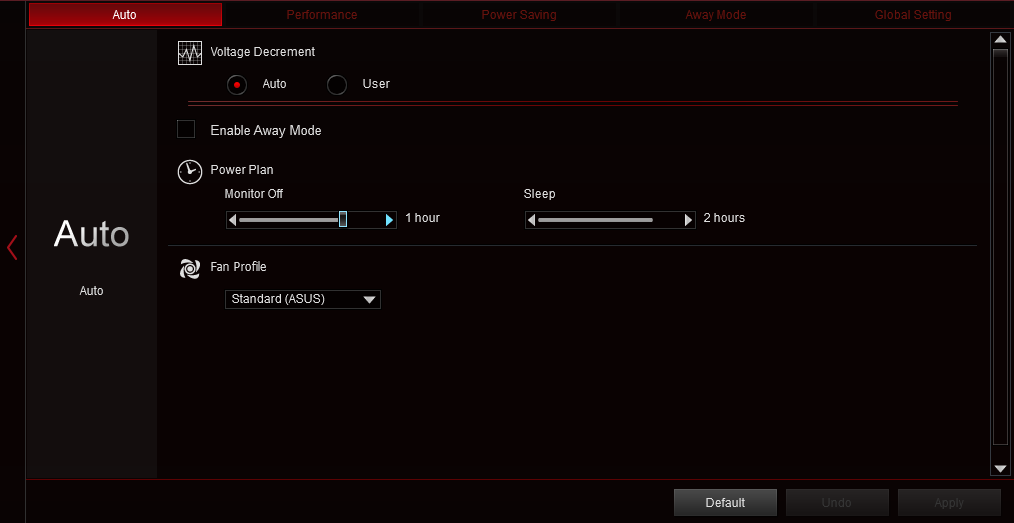
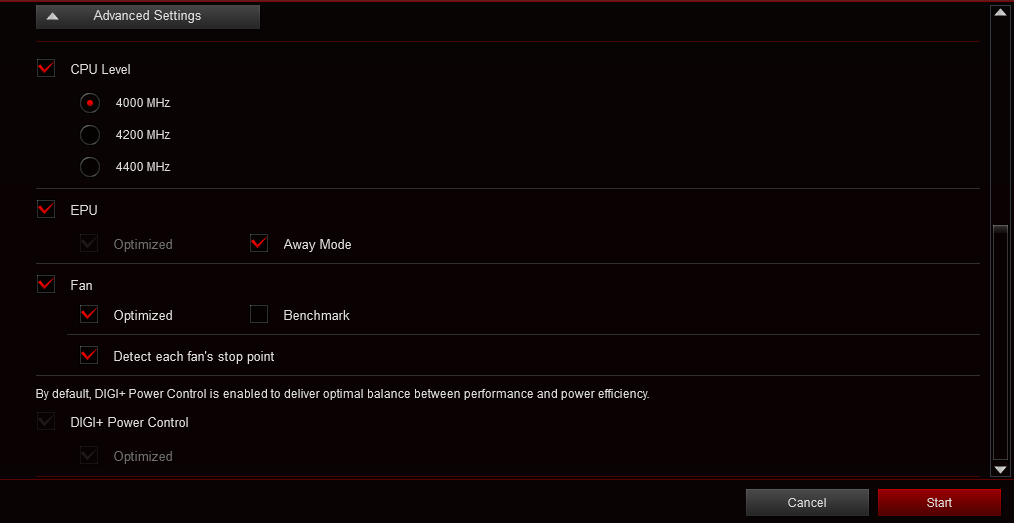
Also as part of the 5-Way Optimization ethos, AI Suite has an automatic overclock mode which uses the five programs above to hit various overclocks. We list our results on the next page in the overclock section.
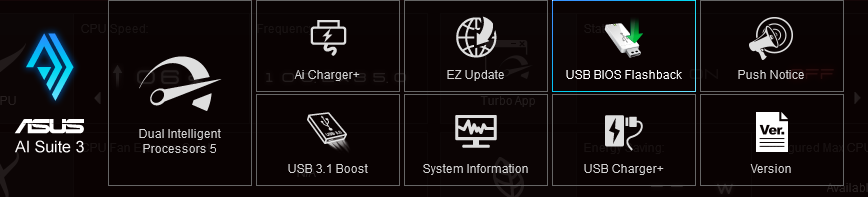
AI Suite also comes with several more options by clicking the link in the top right of the software. We’ve been over these extensively in previous reviews, though a quick rundown on each:
AI Charger: Allows quick charging on BC1.1 compliant devices on certain USB ports.
USB 3.1 Boost: For suitable devices, implements a newer USB protocol to improve USB 3.0 and USB 3.1 speed.
EZ Update: Connect to the web to download updates. I’ve never had it work though.
System Information: Breakdown of the hardware specifications for motherboard, CPU and DRAM.
USB BIOS Flashback: Prepare a USB with a BIOS for updating, or save the current BIOS.
USB Charger: Allows for fast charging while in sleep/hibernate on certain ports only.
Push Notice: Setup a messaging system to another device in case of system errors.
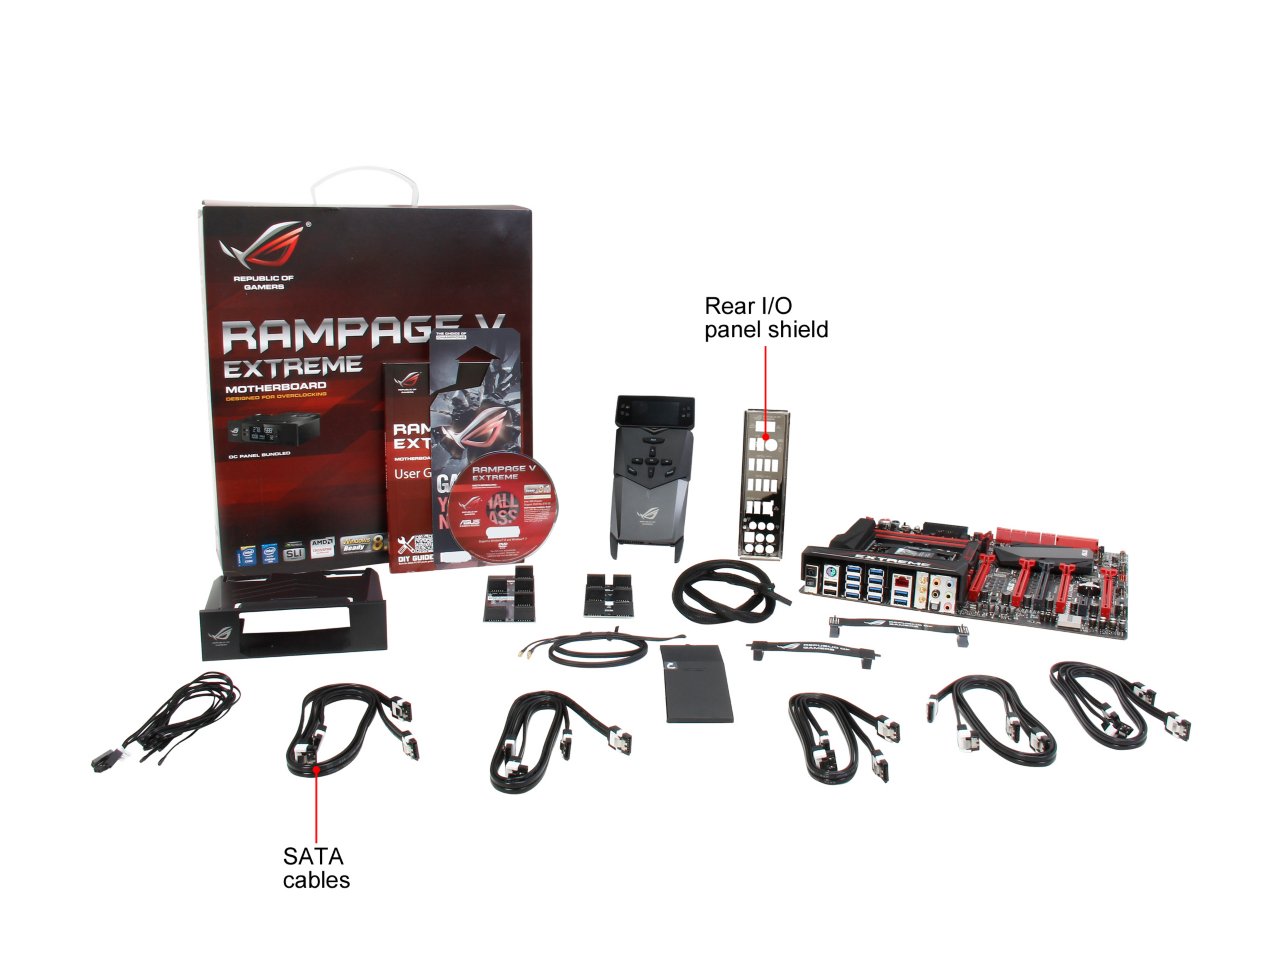
ASUS Rampage V Extreme In The Box
For the products that attempt to encompass both gaming and overclocking in one big mental Venn diagram, the box contents should be aptly scrutinized. Any extra has to be suitable to both parties in order to optimize the value of the product, but also the extras have to introduce a community feeling should users want to take that route. Perhaps ASUS could sell a plain packaged Rampage V Extreme and it would sell just as well, but for buying the big bundle we get the following:
Driver CD
Manuals
Rear IO Panel
ROG OC Panel + ODD Bay Adapter
ROG Door Hanger
WiFi Antenna
Three Thermistors
Ten SATA Cables
Flexi-SLI Bridge
Flexi-CFX Bridge
Rigid 2-way SLI Bridge
Rigid 3-way SLI Bridge
Being a multi-GPU gaming motherboard, it would have been a little naughty to not include 3 or 4-way bridges, but they are included. I’m surprised by the ten SATA cables, but then again as a high end motherboard you might expect the most and more of it. ASUS is pushing the thermal control by bundling three thermistor cables, otherwise users would have to source them elsewhere. Notice that there is no longer any ROG Connect cable bundled.
Many thanks to...
We must thank the following companies for kindly providing hardware for our test bed:
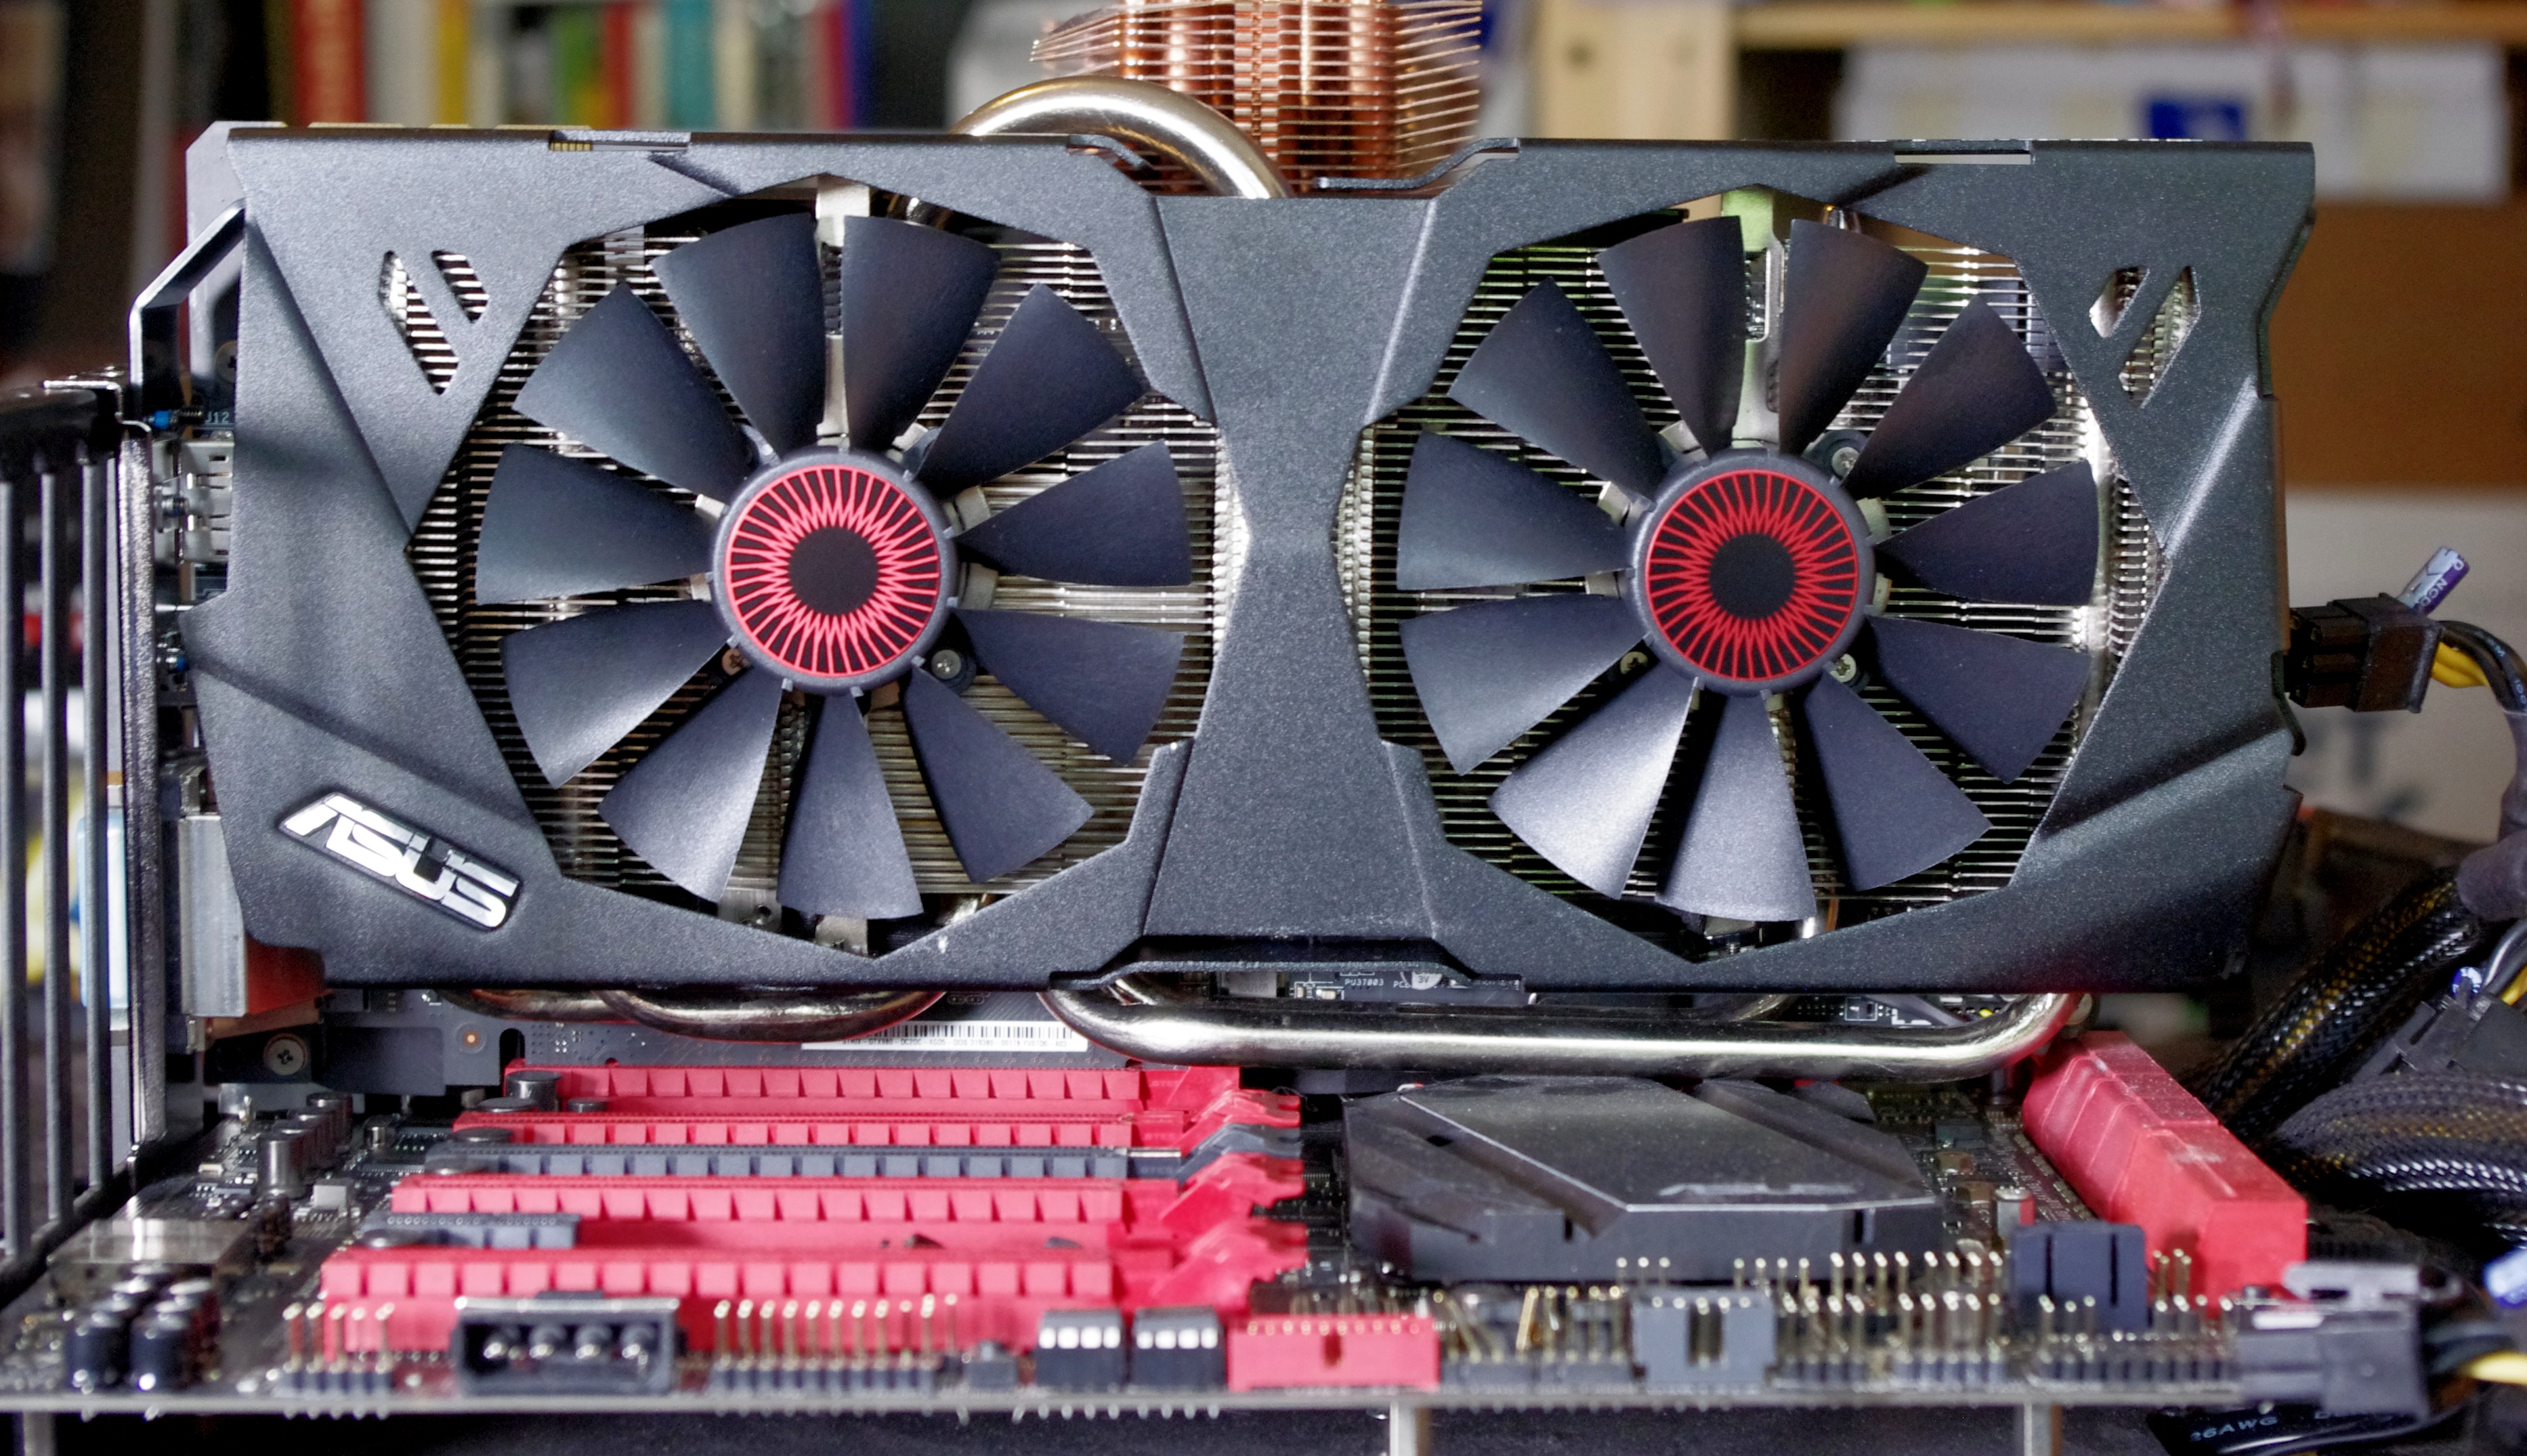
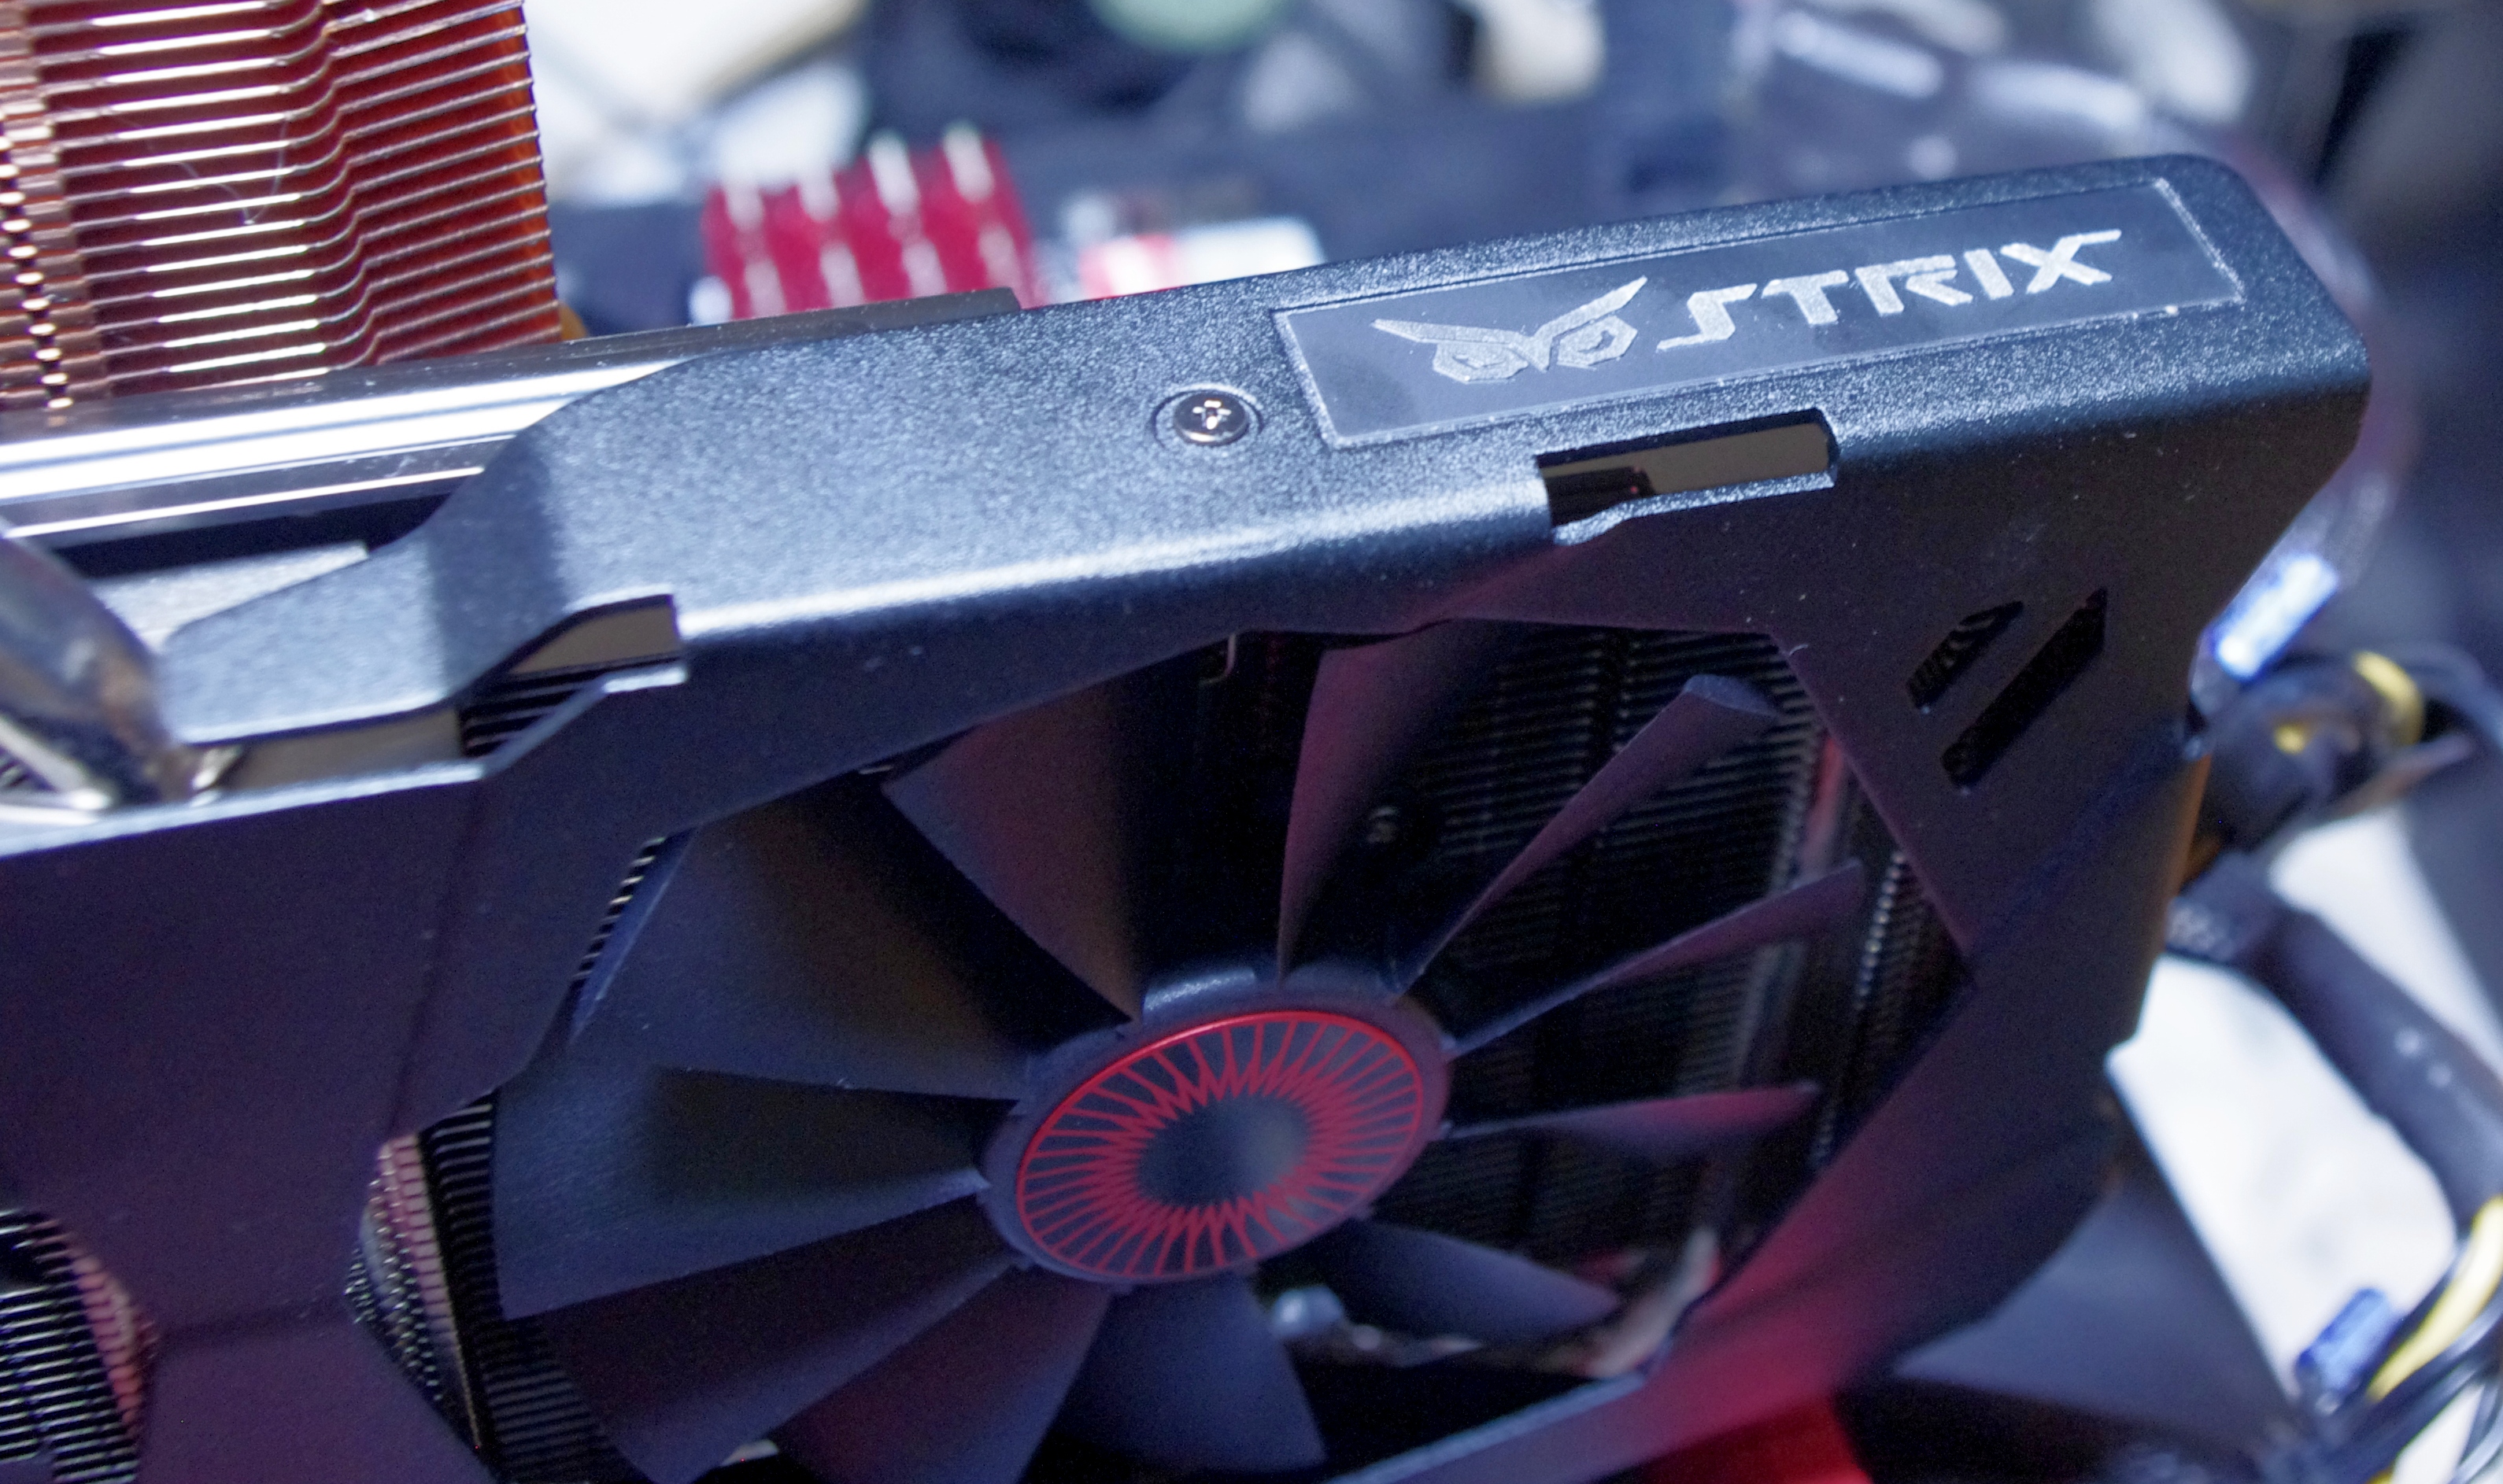
For our 2015 testing, I must give shout-outs to a couple of companies for providing us with test bed equipment.
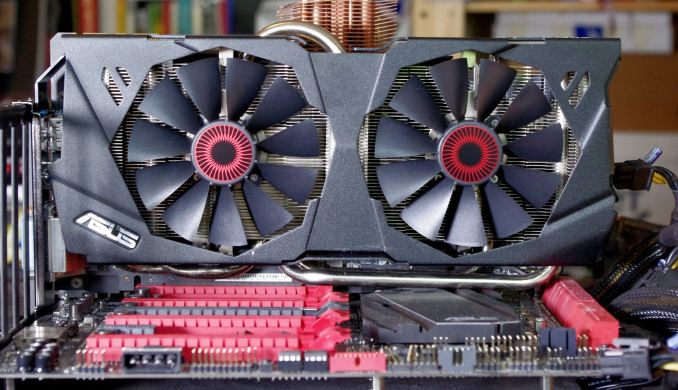
First up is ASUS, who sourced us three of their GTX 980 Strix 4GB cards. The GTX 980 sits second in the NVIDIA graphics card stack below the Titan X, but each card is designed to push gaming to the maximum settings in single monitor scenarios. Specifically with the Strix, ASUS is targeting it more along their mainstream line, compared to some of the highly overclocked cards, but the feature I like is the fact that the fans do not spin until some serious graphics rendering is required. Sitting on the test bed it almost seems odd to be doing most of the desktop oriented benchmarks and have the fans for the graphics card not spinning. Two fans per card and large heatpipes help with heat distribution, and the GTX 980 Strix can be picked up at Amazon or Newegg for around $550 a piece.

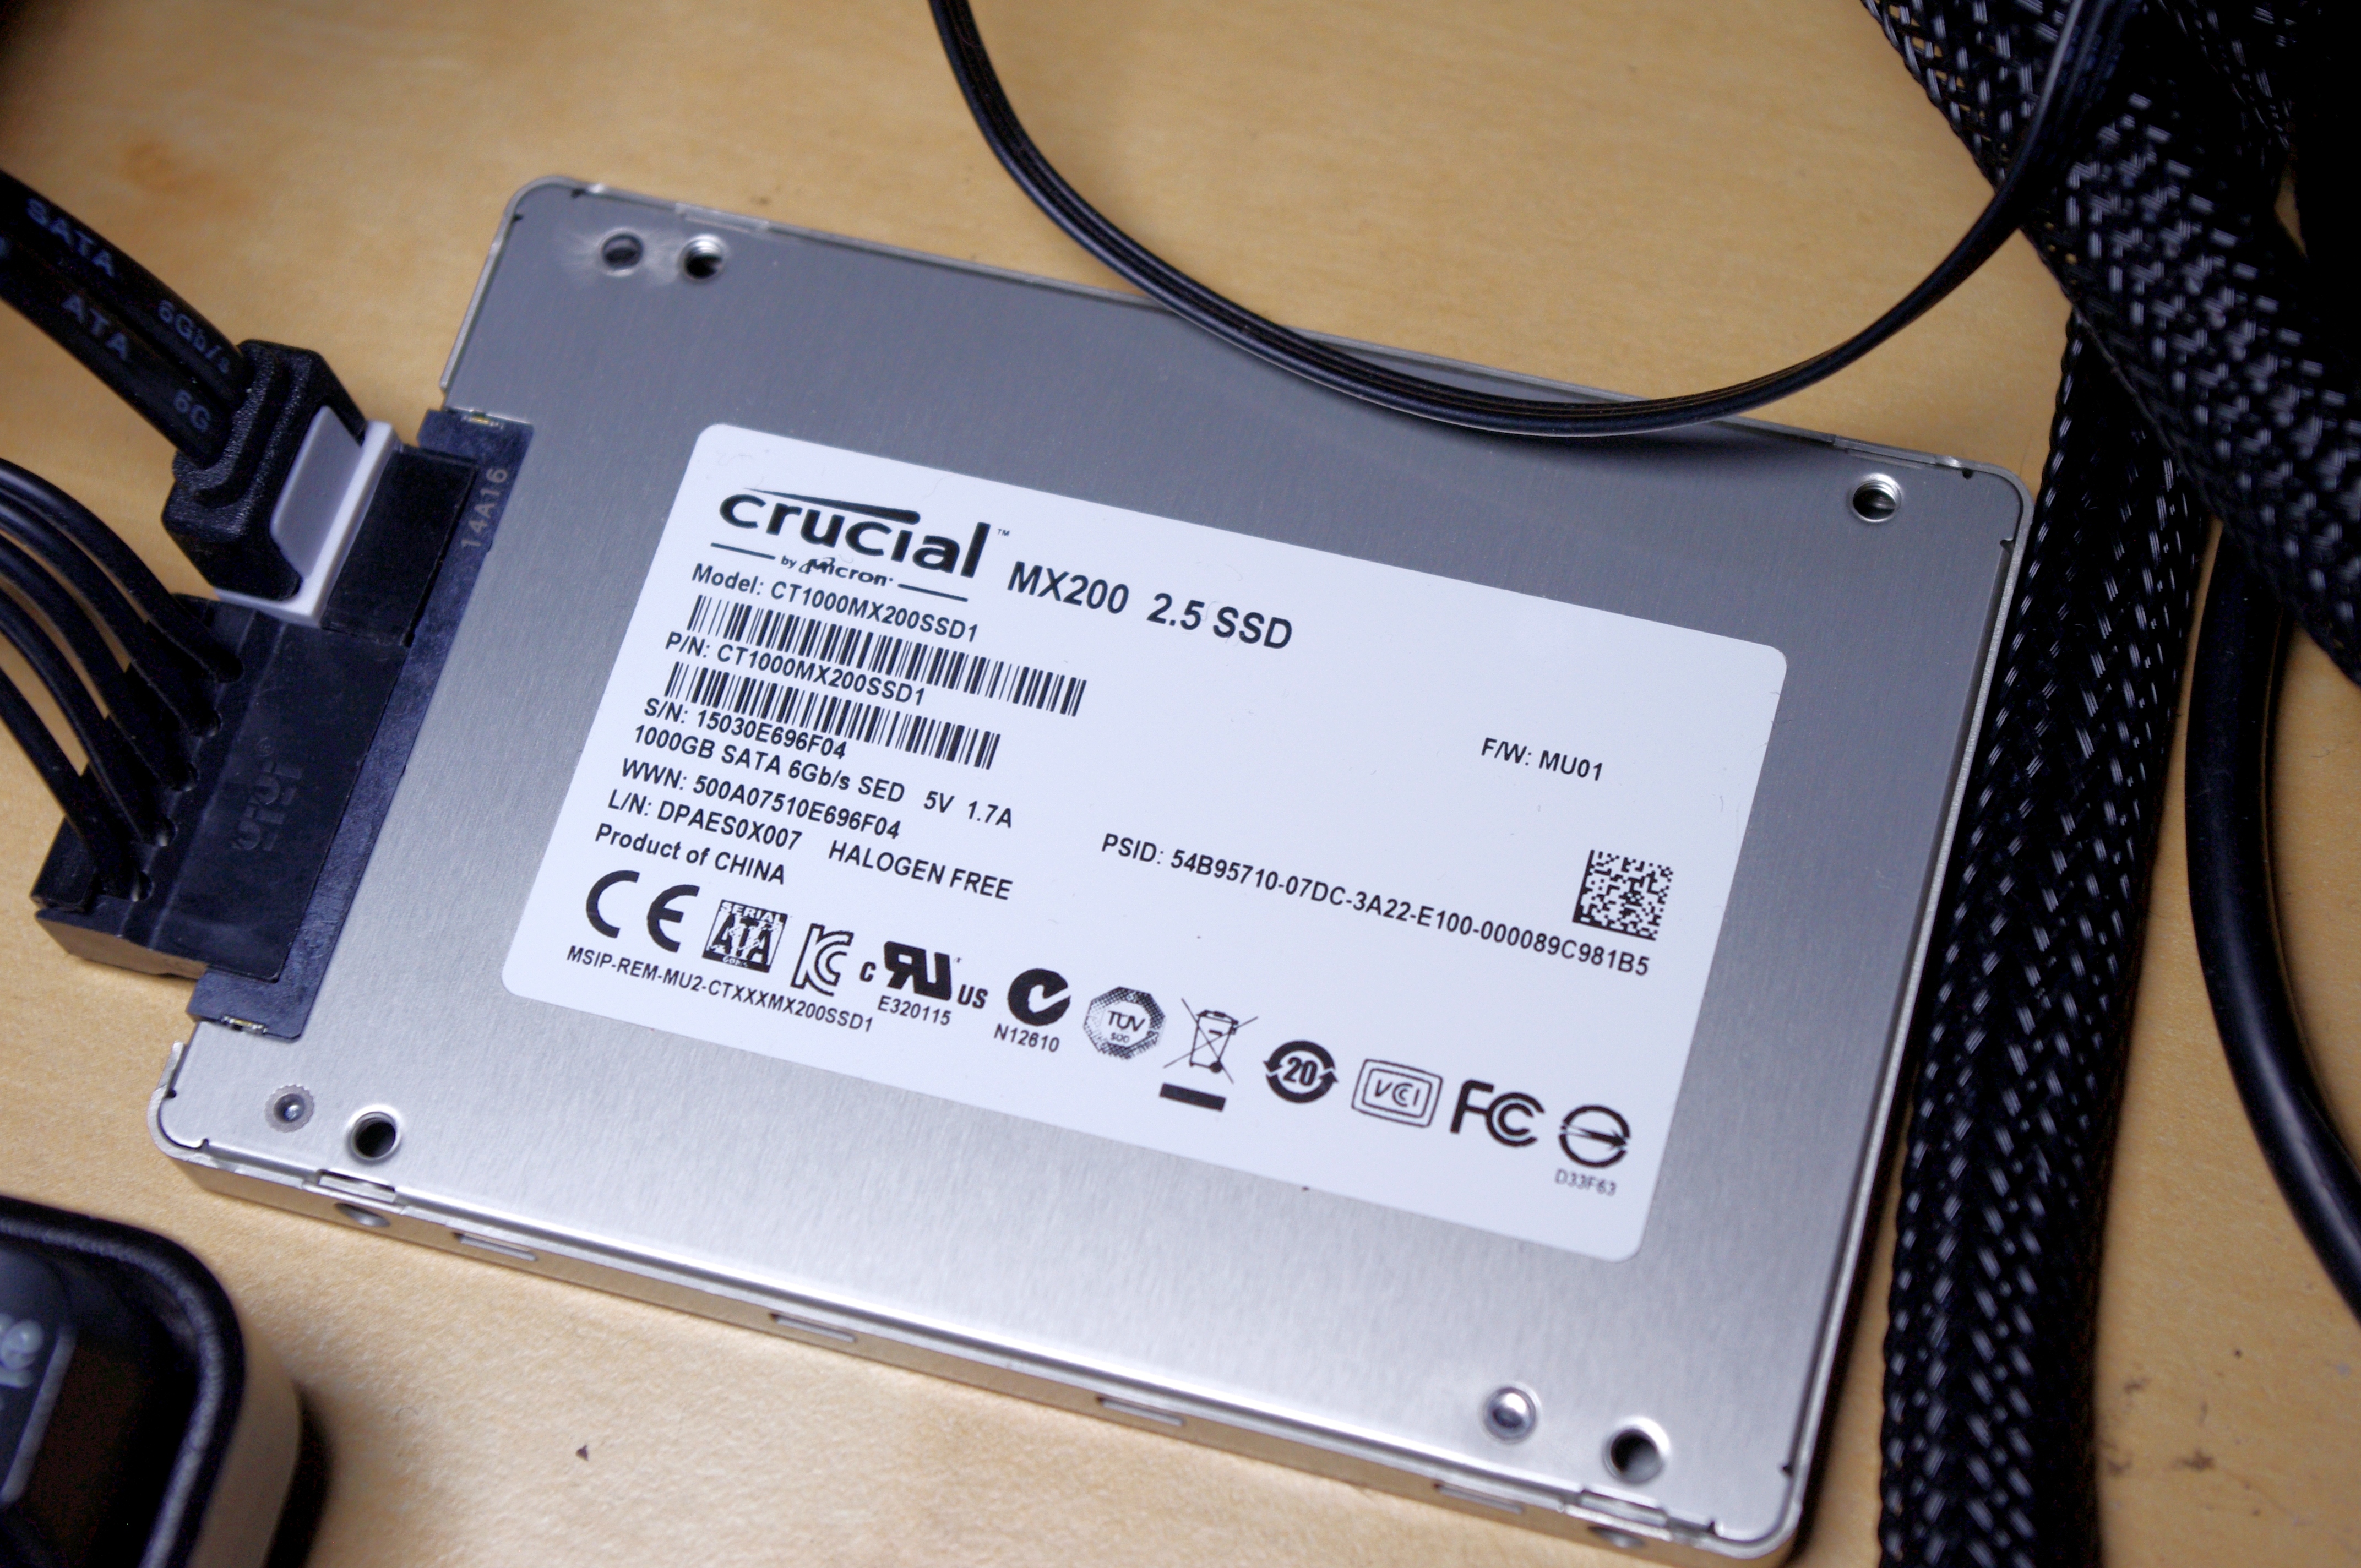
Since I started reviewing as the Senior Editor for AnandTech back in 2011, some of the first samples I received were SSDs from OCZ for our testbeds. These have been rocksteady since then, but due to our new gaming regimen, 128GB for an OS drive and 128GB for a benchmark drive started becoming too little. After meeting with Crucial at CES this year, they volunteered four of their highest capacity 1TB MX200 SSDs which we partition into 250GB/750GB segments. This suits our 300GB gaming suite just great, as well as room for expansion in the future. The MX200 builds on the success of the MX100, with Kristian’s recent reviewhighlighting its features. The drives currently retail for around $110 for 250GB, $200 for 500GB and $427 for the 1TB model.
Test Setup
ASUS Rampage V Extreme Overclocking
Experience with ASUS Rampage V Extreme
The Extreme has always been about overclocking, and thus for the casual gamer ASUS provides both the Turbo Processing Unit (TPU) physically on the motherboard and CPU Level Up in software for an easier method to get to 4.0-4.4 GHz.
Options are expanded in software for enthusiasts, though for the meat of the pie you have to go into the BIOS. With LN2 mode enabled, sub-zero and competitive coolers should be satisfied with the level of options. Here's where we perform our manual overclocking tests. Extreme users can also equip the OC Panel which allows for voltage, multiplier and base frequency adjustments on the fly.
On the whole, our experience with the Extreme was reasonable in auto overclocking but manual settings somehow gave our mediocre CPU a not-so-impressive result. I double checked with both of our processors which are almost as bad as each other, but I wasn't able to gain anything secret through the system. We are using the Extreme in our DDR4 memory reviews (keep an eye out for those) and we've already seen DDR4-2133 at CL9 and some other modules at DDR4-3333, meaning it can stretch its legs in that regard.
Methodology
Our standard overclocking methodology is as follows. We select the automatic overclock options and test for stability with PovRay and OCCT to simulate high-end workloads. These stability tests aim to catch any immediate causes for memory or CPU errors.
For manual overclocks, based on the information gathered from previous testing, starts off at a nominal voltage and CPU multiplier, and the multiplier is increased until the stability tests are failed. The CPU voltage is increased gradually until the stability tests are passed, and the process repeated until the motherboard reduces the multiplier automatically (due to safety protocol) or the CPU temperature reaches a stupidly high level (100ºC+). Our test bed is not in a case, which should push overclocks higher with fresher (cooler) air.
Overclock Results
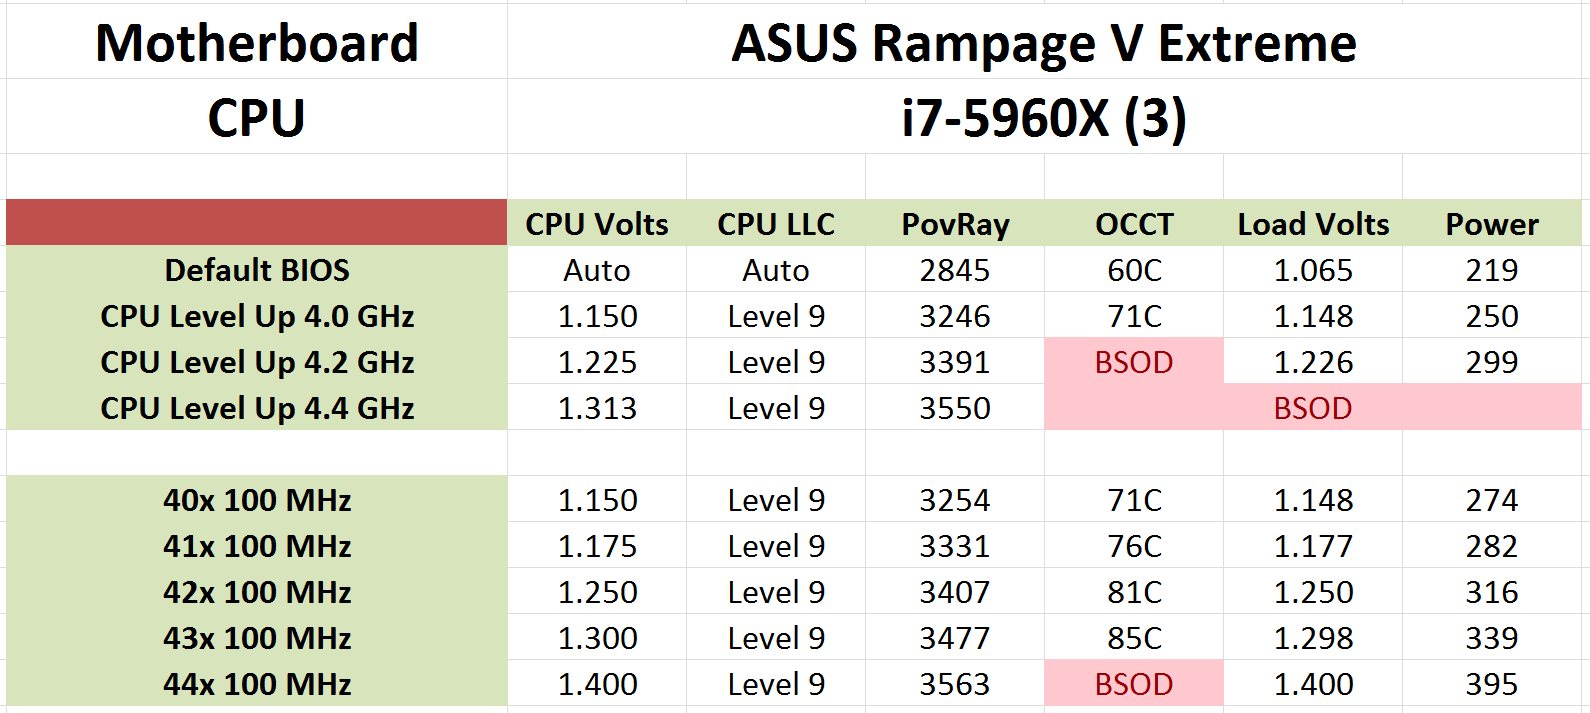
Since we have started reviewing X99 motherboards, I have had three i7-5960X CPUs. The first one, CPU1, was our better overclocking sample but has gone the way of the dodo and lives in some version of a silicon afterlife. I think it went where all the calculators go. The second CPU, CPU2, is a really bad overclocker so we use that for mildly overclocked DRAM testing. When CPU1 went belly up, we immediately sourced a third CPU. After testing CPU3 on a number of motherboards, it wasn’t much better than CPU2. But with the Rampage V Extreme, we tested CPU3 first:
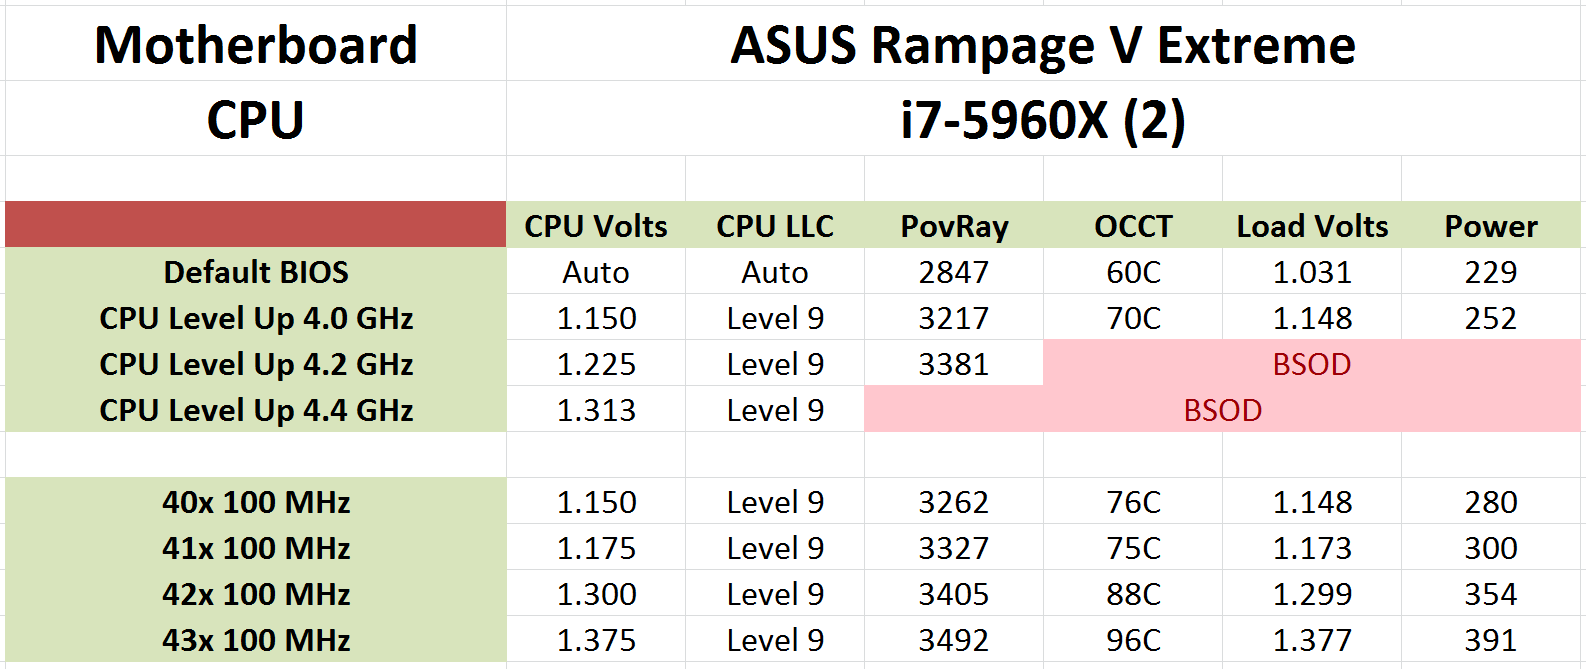
Performance wasn’t anything spectacular, by virtue of the poor CPU, but my initial response was for at least 4.4 GHz. I also thought I had put in the wrong CPU to test, but I then put in CPU2 and got worse:
This isn’t a knock at the Rampage V Extreme, but my CPUs are pretty bad. In most boards CPU3 gets 4.3-4.4 GHz, so we can only point to the fact that our voltage was a little higher in the RVE than other boards, resulting in an overheat/BSOD during our high CPU stability test. Perhaps I should build a cold box, or move to Canada/Finland – it might be worth a few MHz here and there.
System Performance
Power Consumption
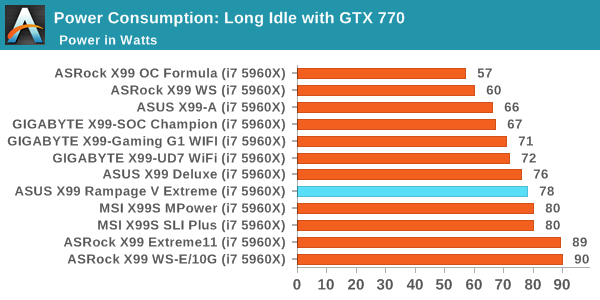
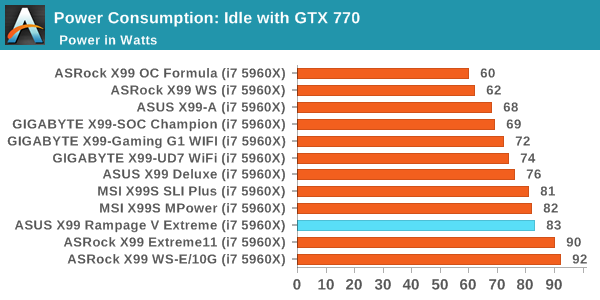
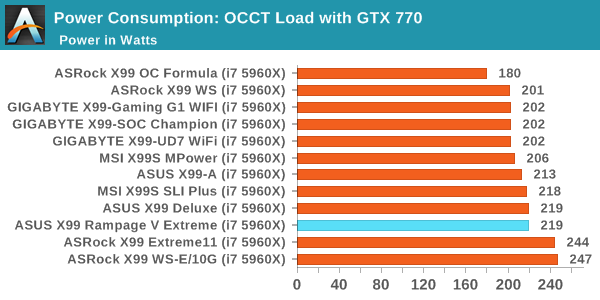
Power consumption was tested on the system while in a single MSI GTX 770 Lightning GPU configuration with a wall meter connected to the OCZ 1250W power supply. This power supply is Gold rated, and as I am in the UK on a 230-240 V supply, leads to ~75% efficiency > 50W, and 90%+ efficiency at 250W, suitable for both idle and multi-GPU loading. This method of power reading allows us to compare the power management of the UEFI and the board to supply components with power under load, and includes typical PSU losses due to efficiency. These are the real world values that consumers may expect from a typical system (minus the monitor) using this motherboard.
While this method for power measurement may not be ideal, and you feel these numbers are not representative due to the high wattage power supply being used (we use the same PSU to remain consistent over a series of reviews, and the fact that some boards on our test bed get tested with three or four high powered GPUs), the important point to take away is the relationship between the numbers. These boards are all under the same conditions, and thus the differences between them should be easy to spot.
Power Consumption for X99 seems to hover around three points in our test – 200W, 220W and 240W. This puts the Rampage V Extreme in the middle, with similarly placed idle and long idle results.
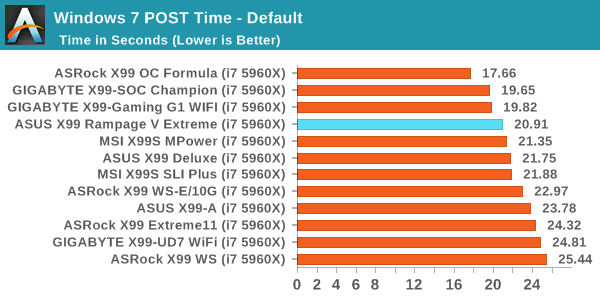
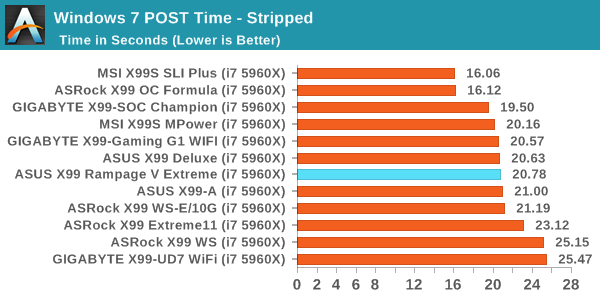
Windows 7 POST Time
Different motherboards have different POST sequences before an operating system is initialized. A lot of this is dependent on the board itself, and POST boot time is determined by the controllers on board (and the sequence of how those extras are organized). As part of our testing, we look at the POST Boot Time using a stopwatch. This is the time from pressing the ON button on the computer to when Windows 7 starts loading. (We discount Windows loading as it is highly variable given Windows specific features.)
Typically the more hardware features we have, the longer the time to post. In this circumstance the Extreme does well, and the holy grail of 20 seconds for X99 is not too far away. One of the big issues with X99, as we mentioned earlier in the review, is that DRAM training can take up to 50% of this time but is a necessary part in order to ensure stability.
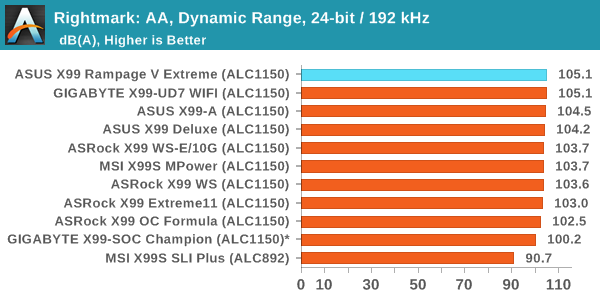
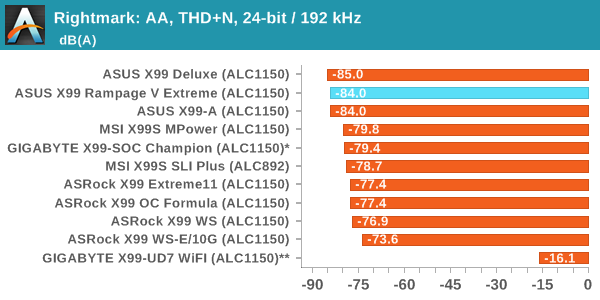
Rightmark Audio Analyzer 6.2.5
Rightmark:AA indicates how well the sound system is built and isolated from electrical interference (either internally or externally). For this test we connect the Line Out to the Line In using a short six inch 3.5mm to 3.5mm high-quality jack, turn the OS speaker volume to 100%, and run the Rightmark default test suite at 192 kHz, 24-bit. The OS is tuned to 192 kHz/24-bit input and output, and the Line-In volume is adjusted until we have the best RMAA value in the mini-pretest. We look specifically at the Dynamic Range of the audio codec used on board, as well as the Total Harmonic Distortion + Noise.
Similar to the X99 Deluxe, the Extreme performs very well here.
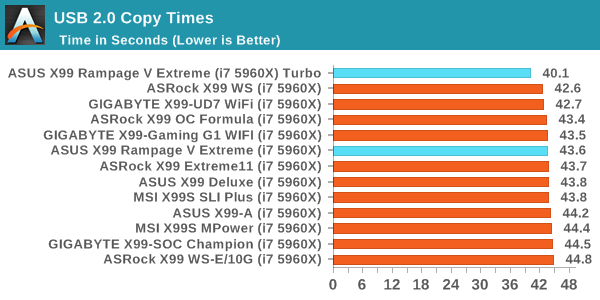
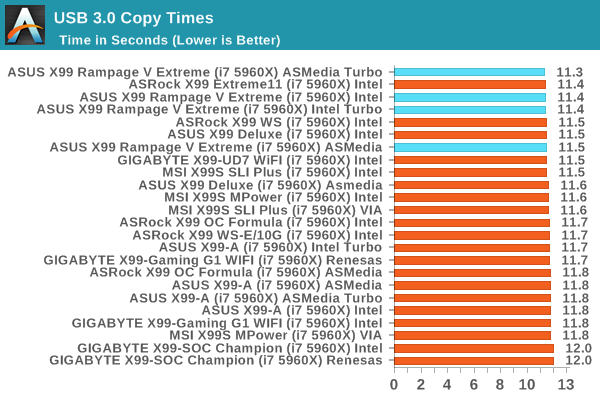
USB Backup
For this benchmark, we transfer a set size of files from the SSD to the USB drive using DiskBench, which monitors the time taken to transfer. The files transferred are a 1.52 GB set of 2867 files across 320 folders – 95% of these files are small typical website files, and the rest (90% of the size) are small 30 second HD videos. In an update to pre-Z87 testing, we also run MaxCPU to load up one of the threads during the test which improves general performance up to 15% by causing all the internal pathways to run at full speed.
All of our USB 3.0 results have hovered between 11.4 and 12.0 with a couple of outliers, so it is good to see an 11.4 second result.
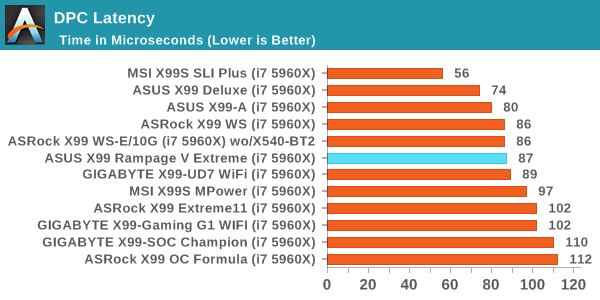
DPC Latency
Deferred Procedure Call latency is a way in which Windows handles interrupt servicing. In order to wait for a processor to acknowledge the request, the system will queue all interrupt requests by priority. Critical interrupts will be handled as soon as possible, whereas lesser priority requests such as audio will be further down the line. If the audio device requires data, it will have to wait until the request is processed before the buffer is filled.
If the device drivers of higher priority components in a system are poorly implemented, this can cause delays in request scheduling and process time. This can lead to an empty audio buffer and characteristic audible pauses, pops and clicks. The DPC latency checker measures how much time is taken processing DPCs from driver invocation. The lower the value will result in better audio transfer at smaller buffer sizes. Results are measured in microseconds.
Under 100 microseconds. Tick.
CPU Performance
Readers of our motherboard review section will have noted the trend in modern motherboards to implement a form of MultiCore Enhancement / Acceleration / Turbo (read our report here) on their motherboards. This does several things, including better benchmark results at stock settings (not entirely needed if overclocking is an end-user goal) at the expense of heat and temperature. It also gives in essence an automatic overclock which may be against what the user wants. Our testing methodology is ‘out-of-the-box’, with the latest public BIOS installed and XMP enabled, and thus subject to the whims of this feature. It is ultimately up to the motherboard manufacturer to take this risk – and manufacturers taking risks in the setup is something they do on every product (think C-state settings, USB priority, DPC Latency / monitoring priority, memory subtimings at JEDEC). Processor speed change is part of that risk, and ultimately if no overclocking is planned, some motherboards will affect how fast that shiny new processor goes and can be an important factor in the system build.
For reference, the ASUS X99 Rampage V Extreme does implement MultiCore Turbo.
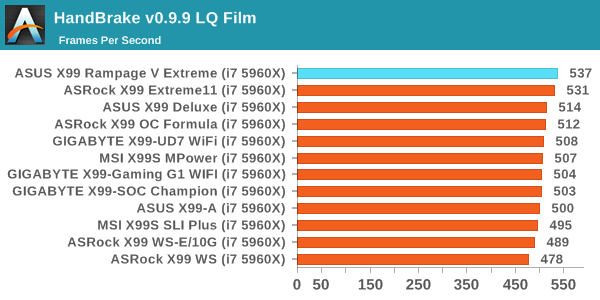
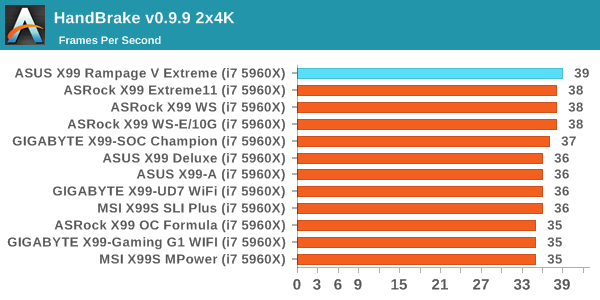
Video Conversion – Handbrake v0.9.9: link
Handbrake is a media conversion tool that was initially designed to help DVD ISOs and Video CDs into more common video formats. The principle today is still the same, primarily as an output for H.264 + AAC/MP3 audio within an MKV container. In our test we use the same videos as in the Xilisoft test, and results are given in frames per second.
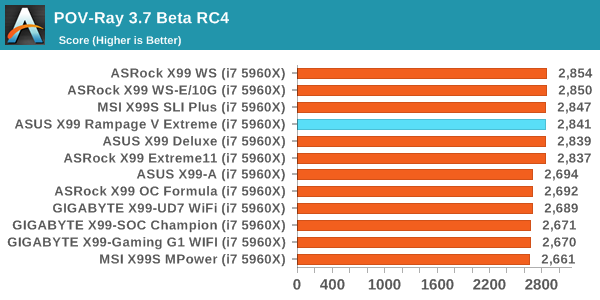
Rendering – PovRay 3.7: link
The Persistence of Vision RayTracer, or PovRay, is a freeware package for as the name suggests, ray tracing. It is a pure renderer, rather than modeling software, but the latest beta version contains a handy benchmark for stressing all processing threads on a platform. We have been using this test in motherboard reviews to test memory stability at various CPU speeds to good effect – if it passes the test, the IMC in the CPU is stable for a given CPU speed. As a CPU test, it runs for approximately 2-3 minutes on high end platforms.
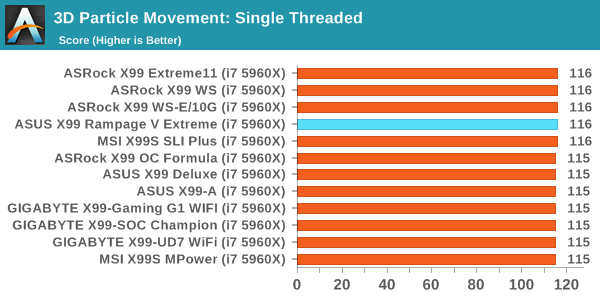
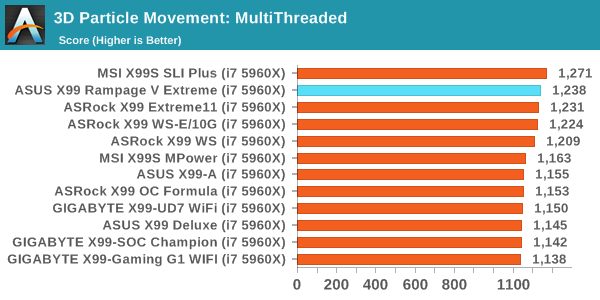
Point Calculations – 3D Movement Algorithm Test: link
3DPM is a self-penned benchmark, taking basic 3D movement algorithms used in Brownian Motion simulations and testing them for speed. High floating point performance, MHz and IPC wins in the single thread version, whereas the multithread version has to handle the threads and loves more cores. For a brief explanation of the platform agnostic coding behind this benchmark, see my forum post here.
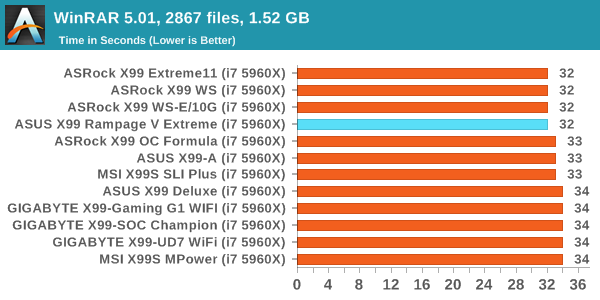
Compression – WinRAR 5.0.1: link
Our WinRAR test from 2013 is updated to the latest version of WinRAR at the start of 2014. We compress a set of 2867 files across 320 folders totaling 1.52 GB in size – 95% of these files are small typical website files, and the rest (90% of the size) are small 30 second 720p videos.
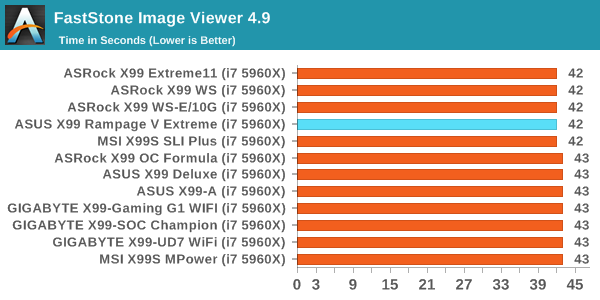
Image Manipulation – FastStone Image Viewer 4.9: link
Similarly to WinRAR, the FastStone test us updated for 2014 to the latest version. FastStone is the program I use to perform quick or bulk actions on images, such as resizing, adjusting for color and cropping. In our test we take a series of 170 images in various sizes and formats and convert them all into 640x480 .gif files, maintaining the aspect ratio. FastStone does not use multithreading for this test, and thus single threaded performance is often the winner.
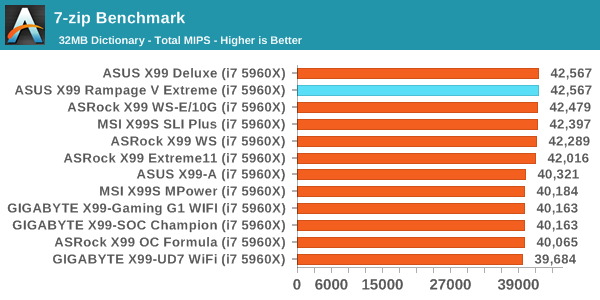
Synthetic – 7-Zip 9.2: link
As an open source compression tool, 7-Zip is a popular tool for making sets of files easier to handle and transfer. The software offers up its own benchmark, to which we report the result.
Gaming Performance 2014 on GTX 770
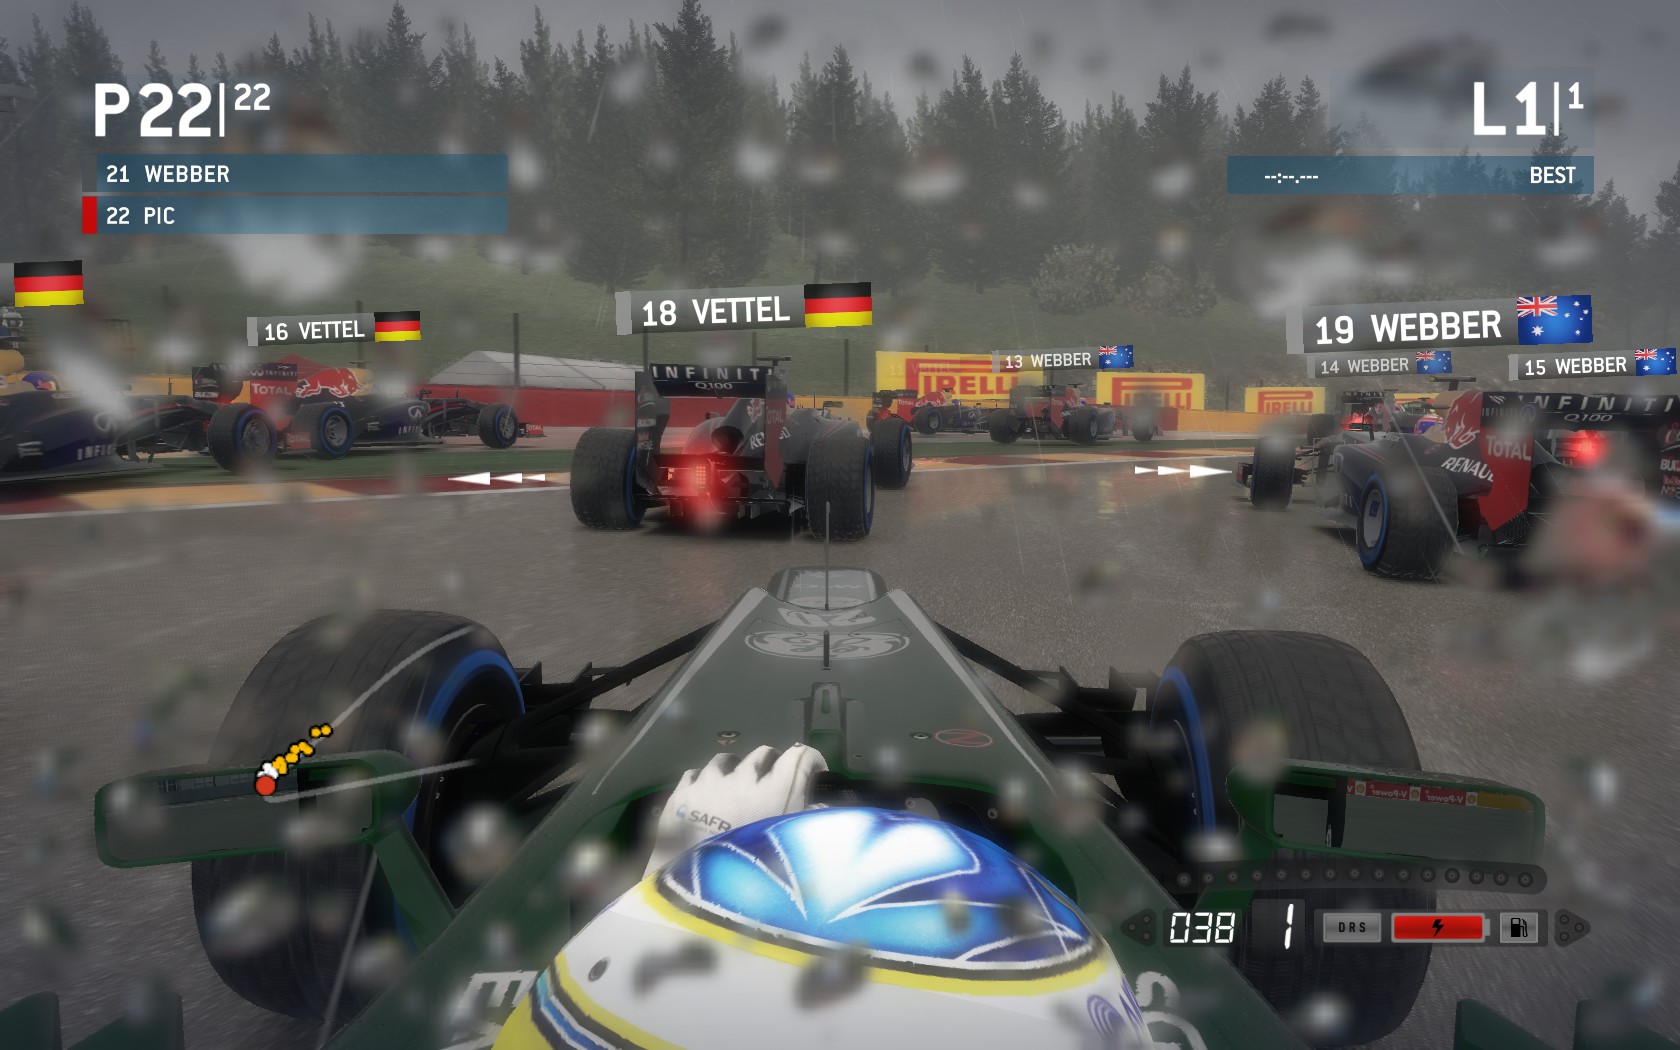
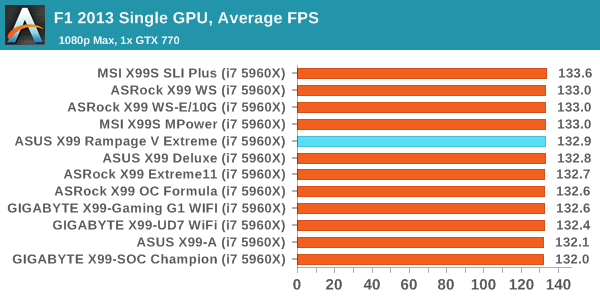
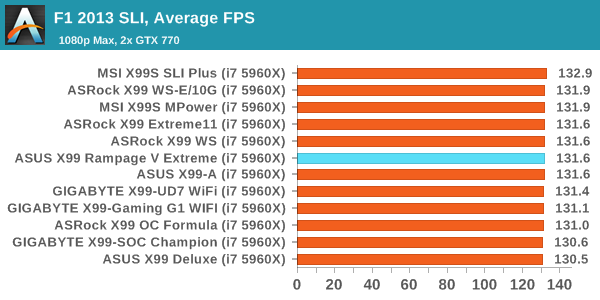
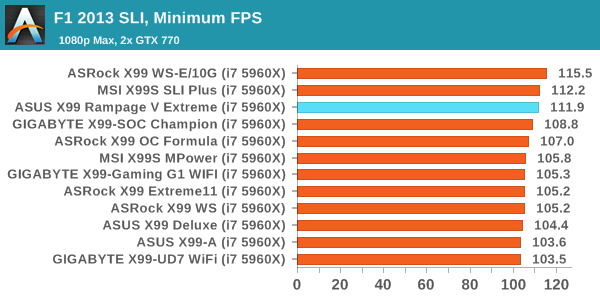
F1 2013
First up is F1 2013 by Codemasters. I am a big Formula 1 fan in my spare time, and nothing makes me happier than carving up the field in a Caterham, waving to the Red Bulls as I drive by (because I play on easy and take shortcuts). F1 2013 uses the EGO Engine, and like other Codemasters games ends up being very playable on old hardware quite easily. In order to beef up the benchmark a bit, we devised the following scenario for the benchmark mode: one lap of Spa-Francorchamps in the heavy wet, the benchmark follows Jenson Button in the McLaren who starts on the grid in 22nd place, with the field made up of 11 Williams cars, 5 Marussia and 5 Caterham in that order. This puts emphasis on the CPU to handle the AI in the wet, and allows for a good amount of overtaking during the automated benchmark. We test at 1920x1080 on Ultra graphical settings.
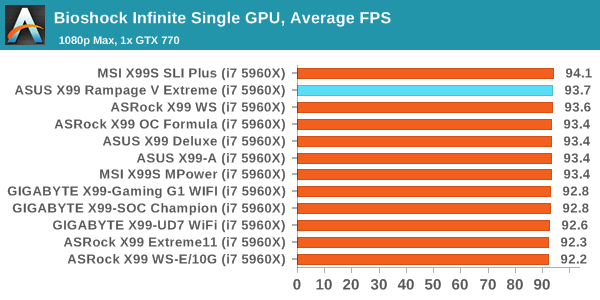
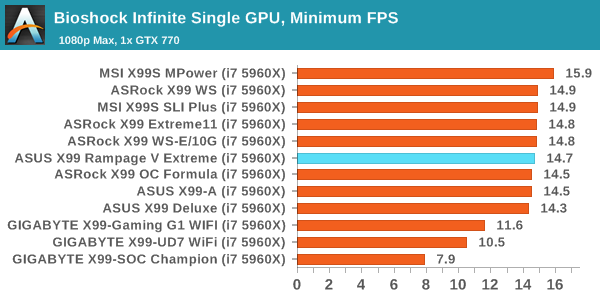
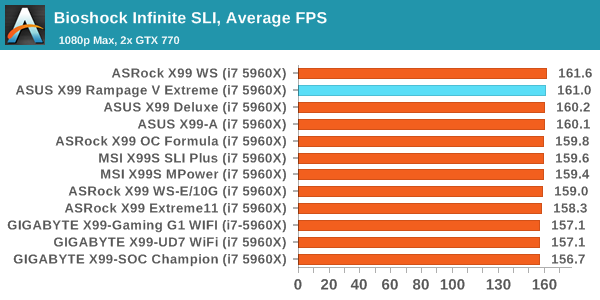
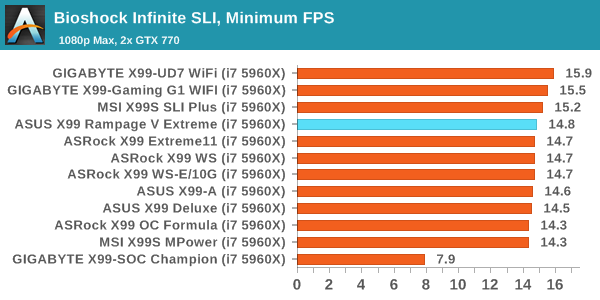
Bioshock Infinite
Bioshock Infinite was Zero Punctuation’s Game of the Year for 2013, uses the Unreal Engine 3, and is designed to scale with both cores and graphical prowess. We test the benchmark using the Adrenaline benchmark tool and the Xtreme (1920x1080, Maximum) performance setting, noting down the average frame rates and the minimum frame rates.
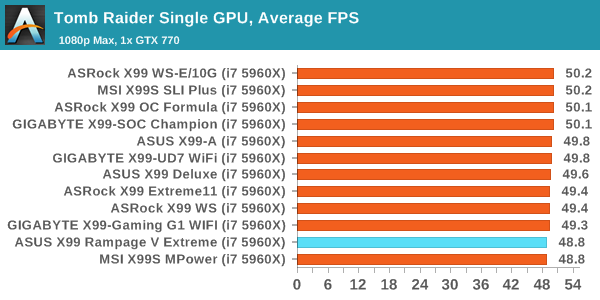
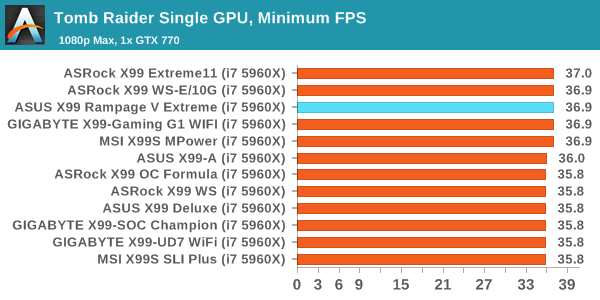
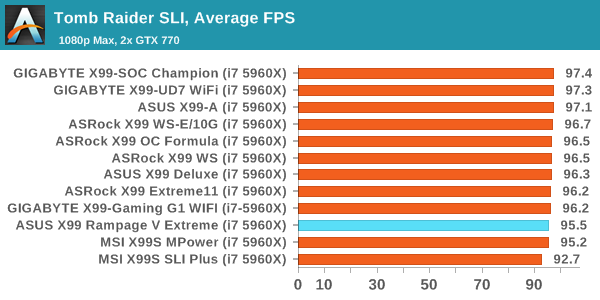
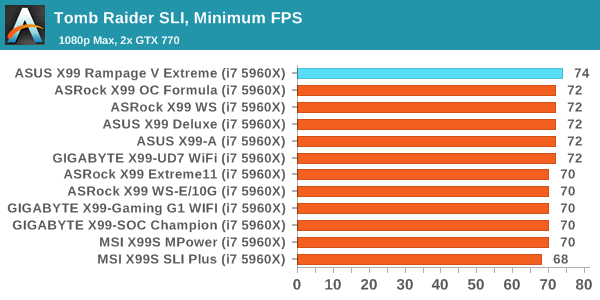
Tomb Raider
The next benchmark in our test is Tomb Raider. Tomb Raider is an AMD optimized game, lauded for its use of TressFX creating dynamic hair to increase the immersion in game. Tomb Raider uses a modified version of the Crystal Engine, and enjoys raw horsepower. We test the benchmark using the Adrenaline benchmark tool and the Xtreme (1920x1080, Maximum) performance setting, noting down the average frame rates and the minimum frame rates.
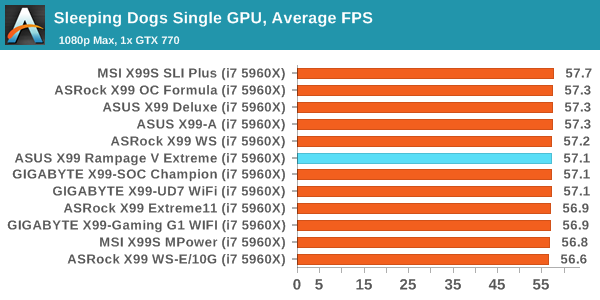
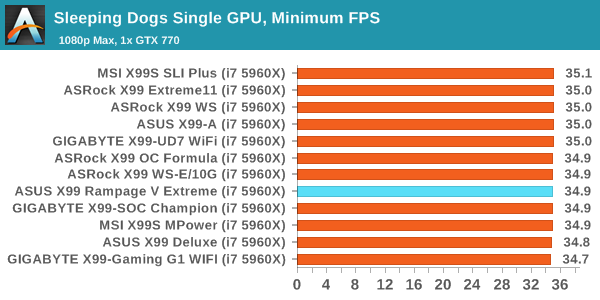
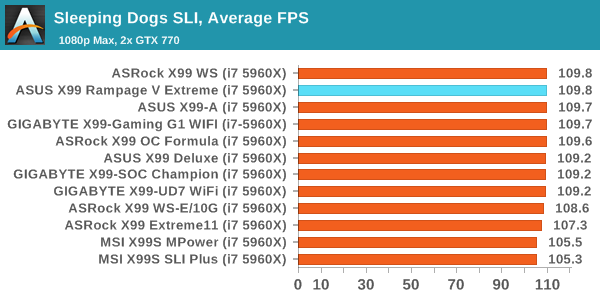
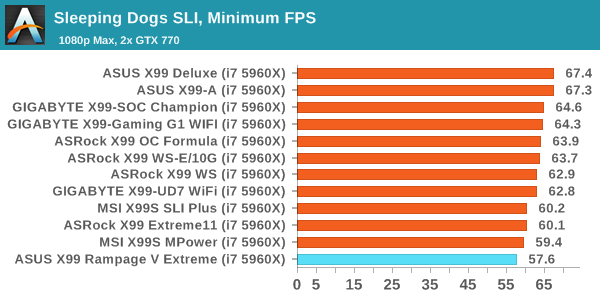
Sleeping Dogs
Sleeping Dogs is a benchmarking wet dream – a highly complex benchmark that can bring the toughest setup and high resolutions down into single figures. Having an extreme SSAO setting can do that, but at the right settings Sleeping Dogs is highly playable and enjoyable. We run the basic benchmark program laid out in the Adrenaline benchmark tool, and the Xtreme (1920x1080, Maximum) performance setting, noting down the average frame rates and the minimum frame rates.
Gaming Performance 2015
As we have not tested our mid-2015 suite on many products yet, we have relatively few results and these are included here for completeness. I've included a few CPU based results as well, to see perspective.
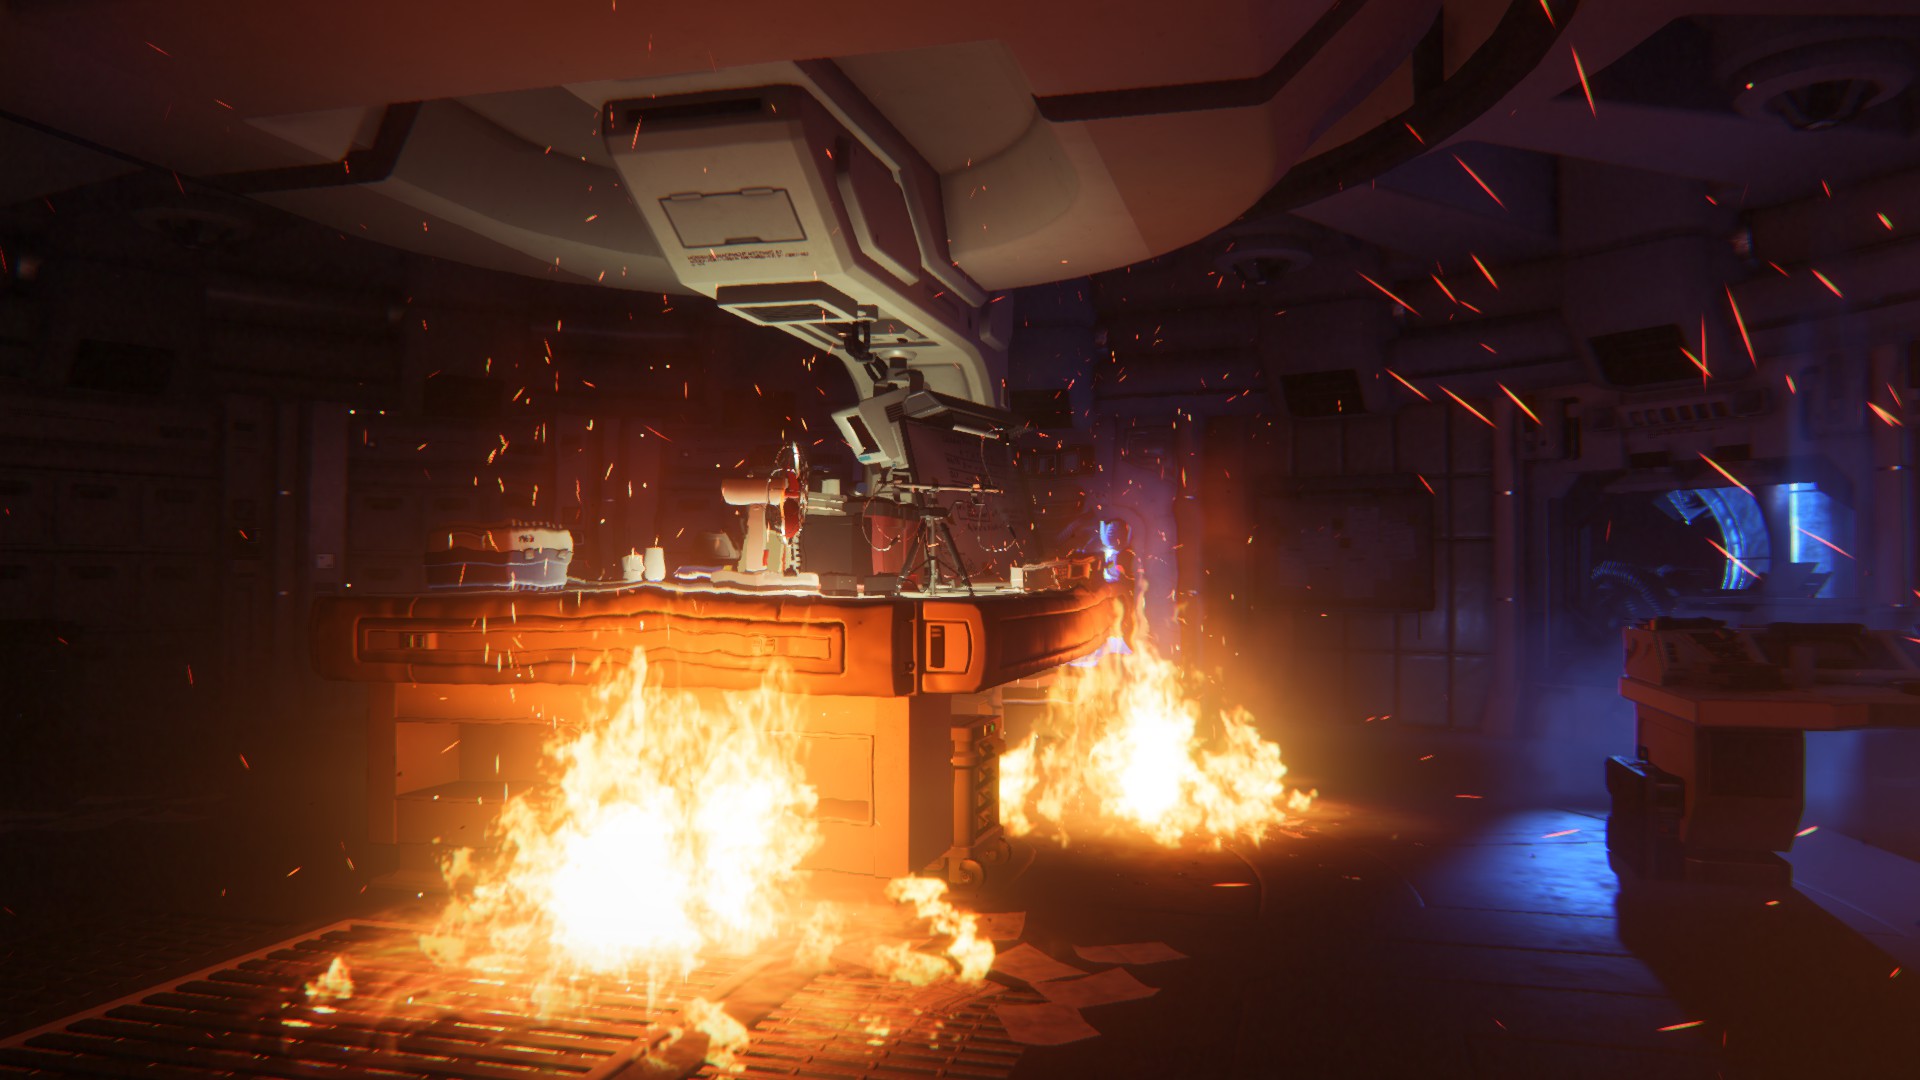
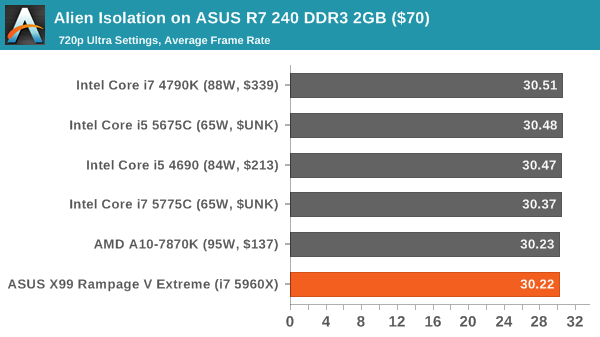
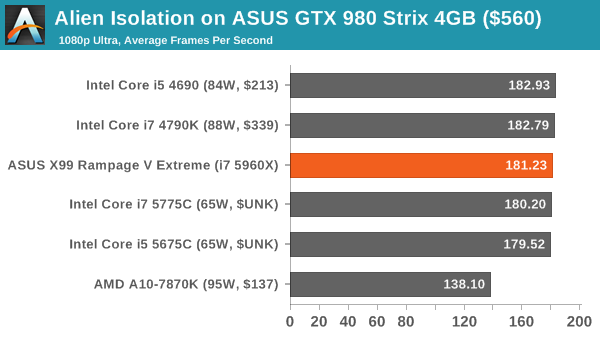
Alien: Isolation
If first person survival mixed with horror is your sort of thing, then Alien: Isolation, based off of the Alien franchise, should be an interesting title. Developed by The Creative Assembly and released in October 2014, Alien: Isolation has won numerous awards from Game Of The Year to several top 10s/25s and Best Horror titles, ratcheting up over a million sales by February 2015. Alien: Isolation uses a custom built engine which includes dynamic sound effects and should be fully multi-core enabled.
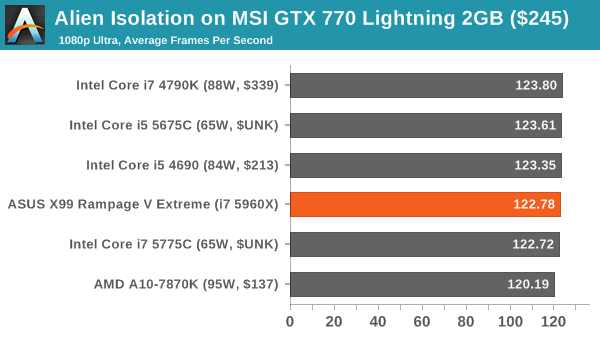
For low end graphics, we test at 720p with Ultra settings, whereas for mid and high range graphics we bump this up to 1080p, taking the average frame rate as our marker with a scripted version of the built-in benchmark.
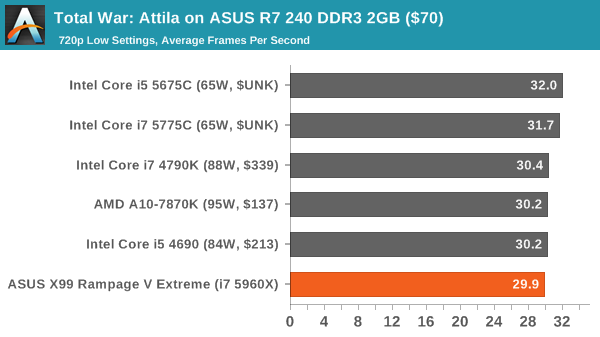
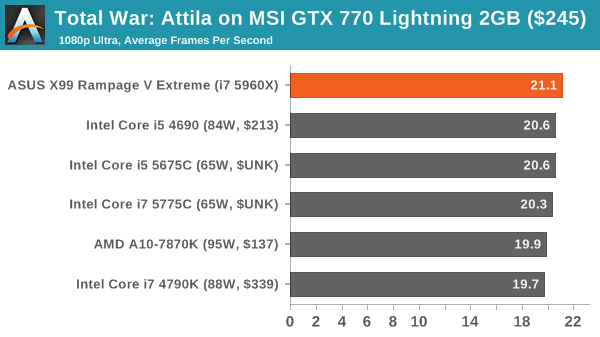
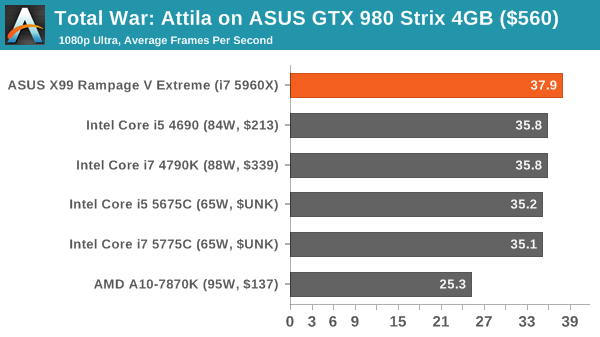
Total War: Attila
The Total War franchise moves on to Attila, another The Creative Assembly development, and is a stand-alone strategy title set in 395AD where the main story line lets the gamer take control of the leader of the Huns in order to conquer parts of the world. Graphically the game can render hundreds/thousands of units on screen at once, all with their individual actions and can put some of the big cards to task.
For low end graphics, we test at 720p with performance settings, recording the average frame rate. With mid and high range graphics, we test at 1080p with the quality setting. In both circumstances, unlimited video memory is enabled and the in-game scripted benchmark is used.
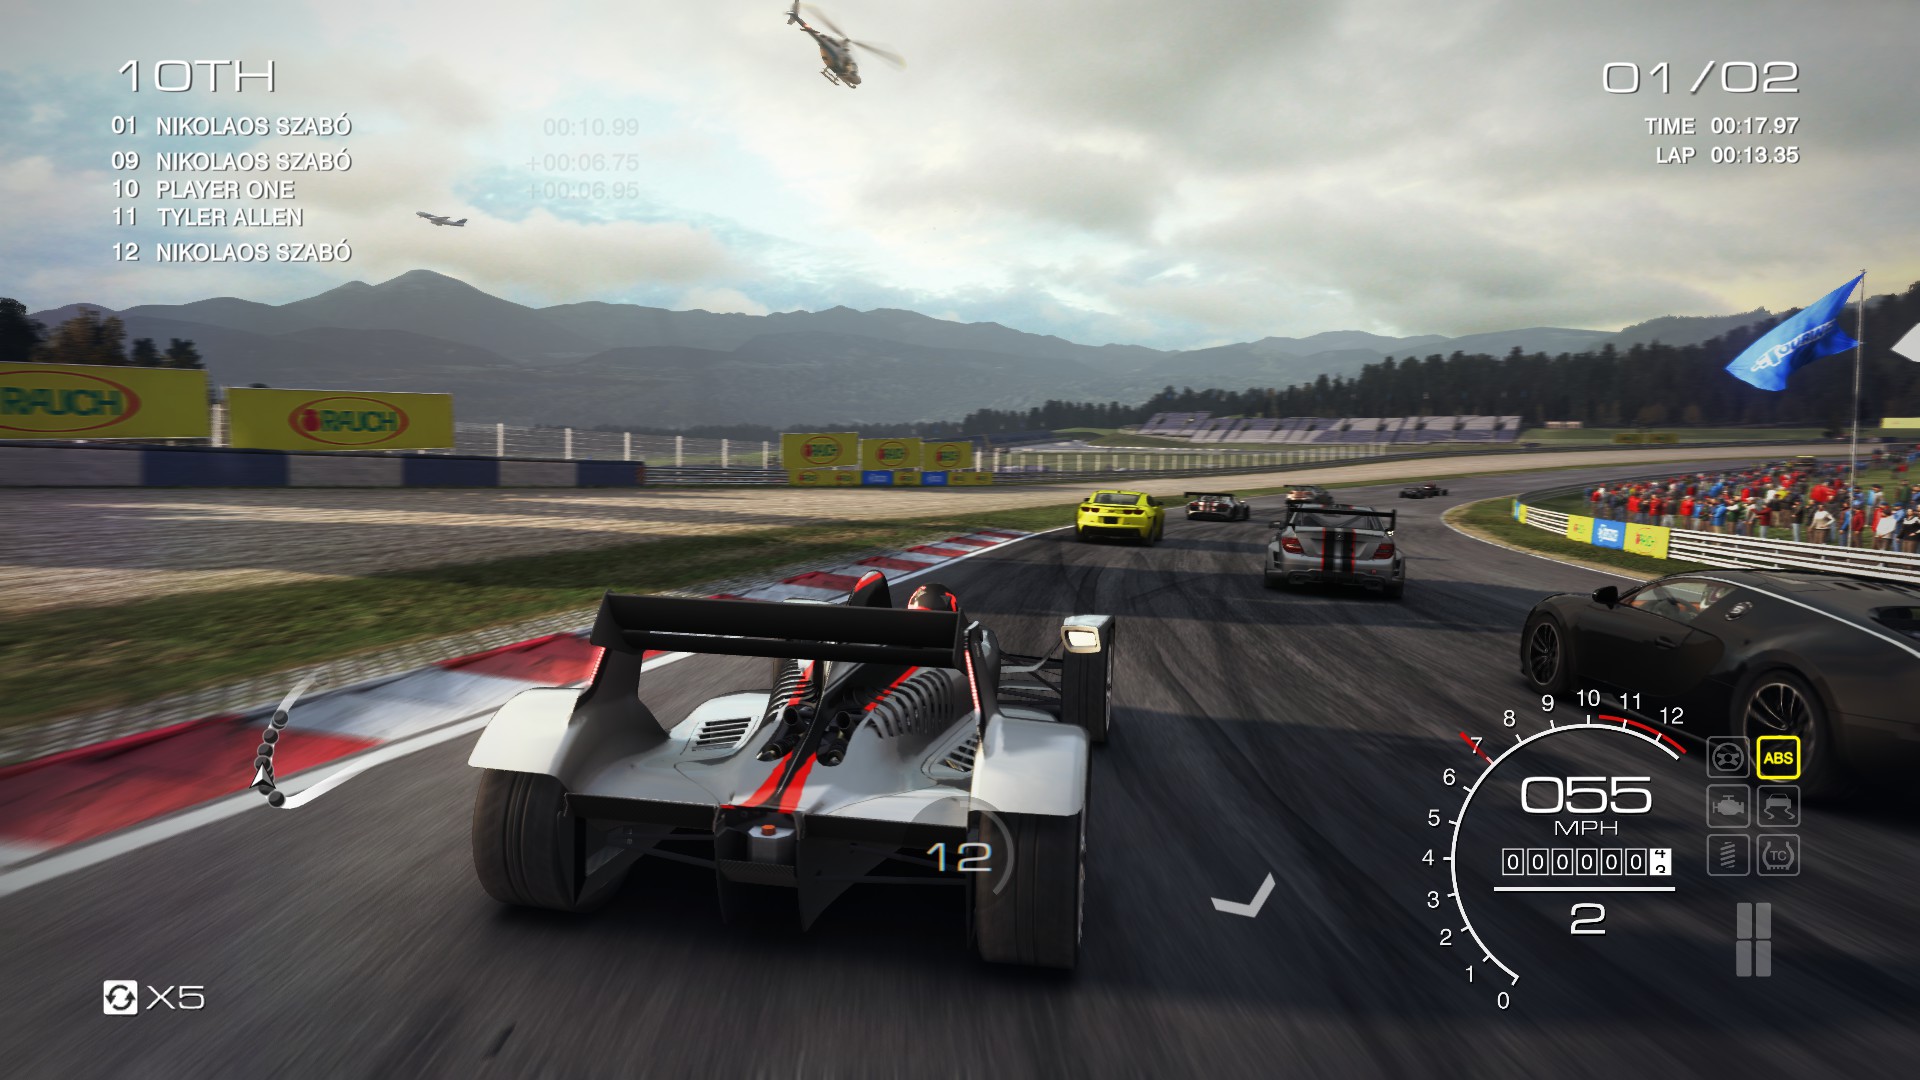
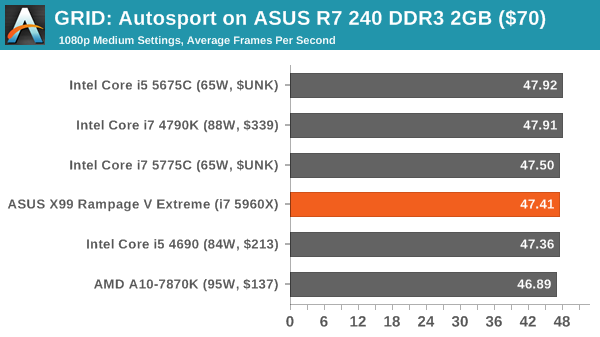
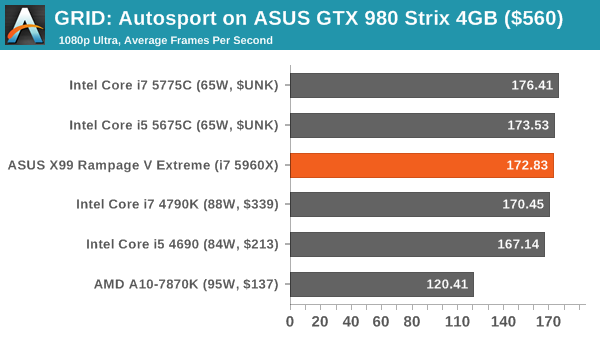
GRID: Autosport
No graphics tests are complete without some input from Codemasters and the EGO engine, which means for this round of testing we point towards GRID: Autosport, the next iteration in the GRID and racing genre. As with our previous racing testing, each update to the engine aims to add in effects, reflections, detail and realism, with Codemasters making ‘authenticity’ a main focal point for this version.
GRID’s benchmark mode is very flexible, and as a result we created a test race using a shortened version of the Red Bull Ring with twelve cars doing two laps. The car is focus starts last and is quite fast, but usually finishes second or third. For low end graphics we test at 1080p medium settings, whereas mid and high end graphics get the full 1080p maximum. Both the average and minimum frame rates are recorded.
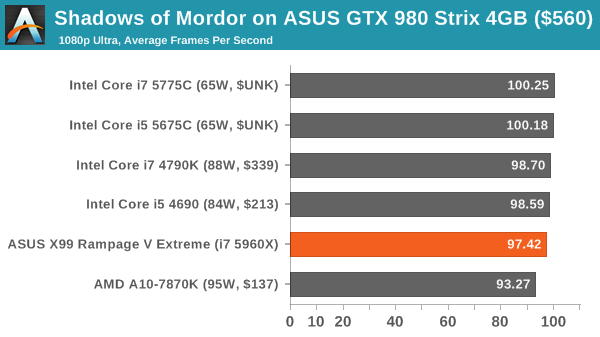
Middle-Earth: Shadows of Mordor
The final title in our testing is another battle of system performance with the open world action-adventure title, Shadows of Mordor. Produced by Monolith using the LithTech Jupiter EX engine and numerous detail add-ons, SoM goes for detail and complexity to a large extent, despite having to be cut down from the original plans. The main story itself was written by the same writer as Red Dead Redemption, and it received Zero Punctuation’s Game of The Year in 2014.
For testing purposes, SoM gives a dynamic screen resolution setting, allowing us to render at high resolutions that are then scaled down to the monitor. As a result, we get several tests using the in-game benchmark. For low end graphics we examine at 720p with low settings, whereas mid and high end graphics get 1080p Ultra. The top graphics test is also redone at 3840x2160, also with Ultra settings, and we also test two cards at 4K where possible.
Conclusion
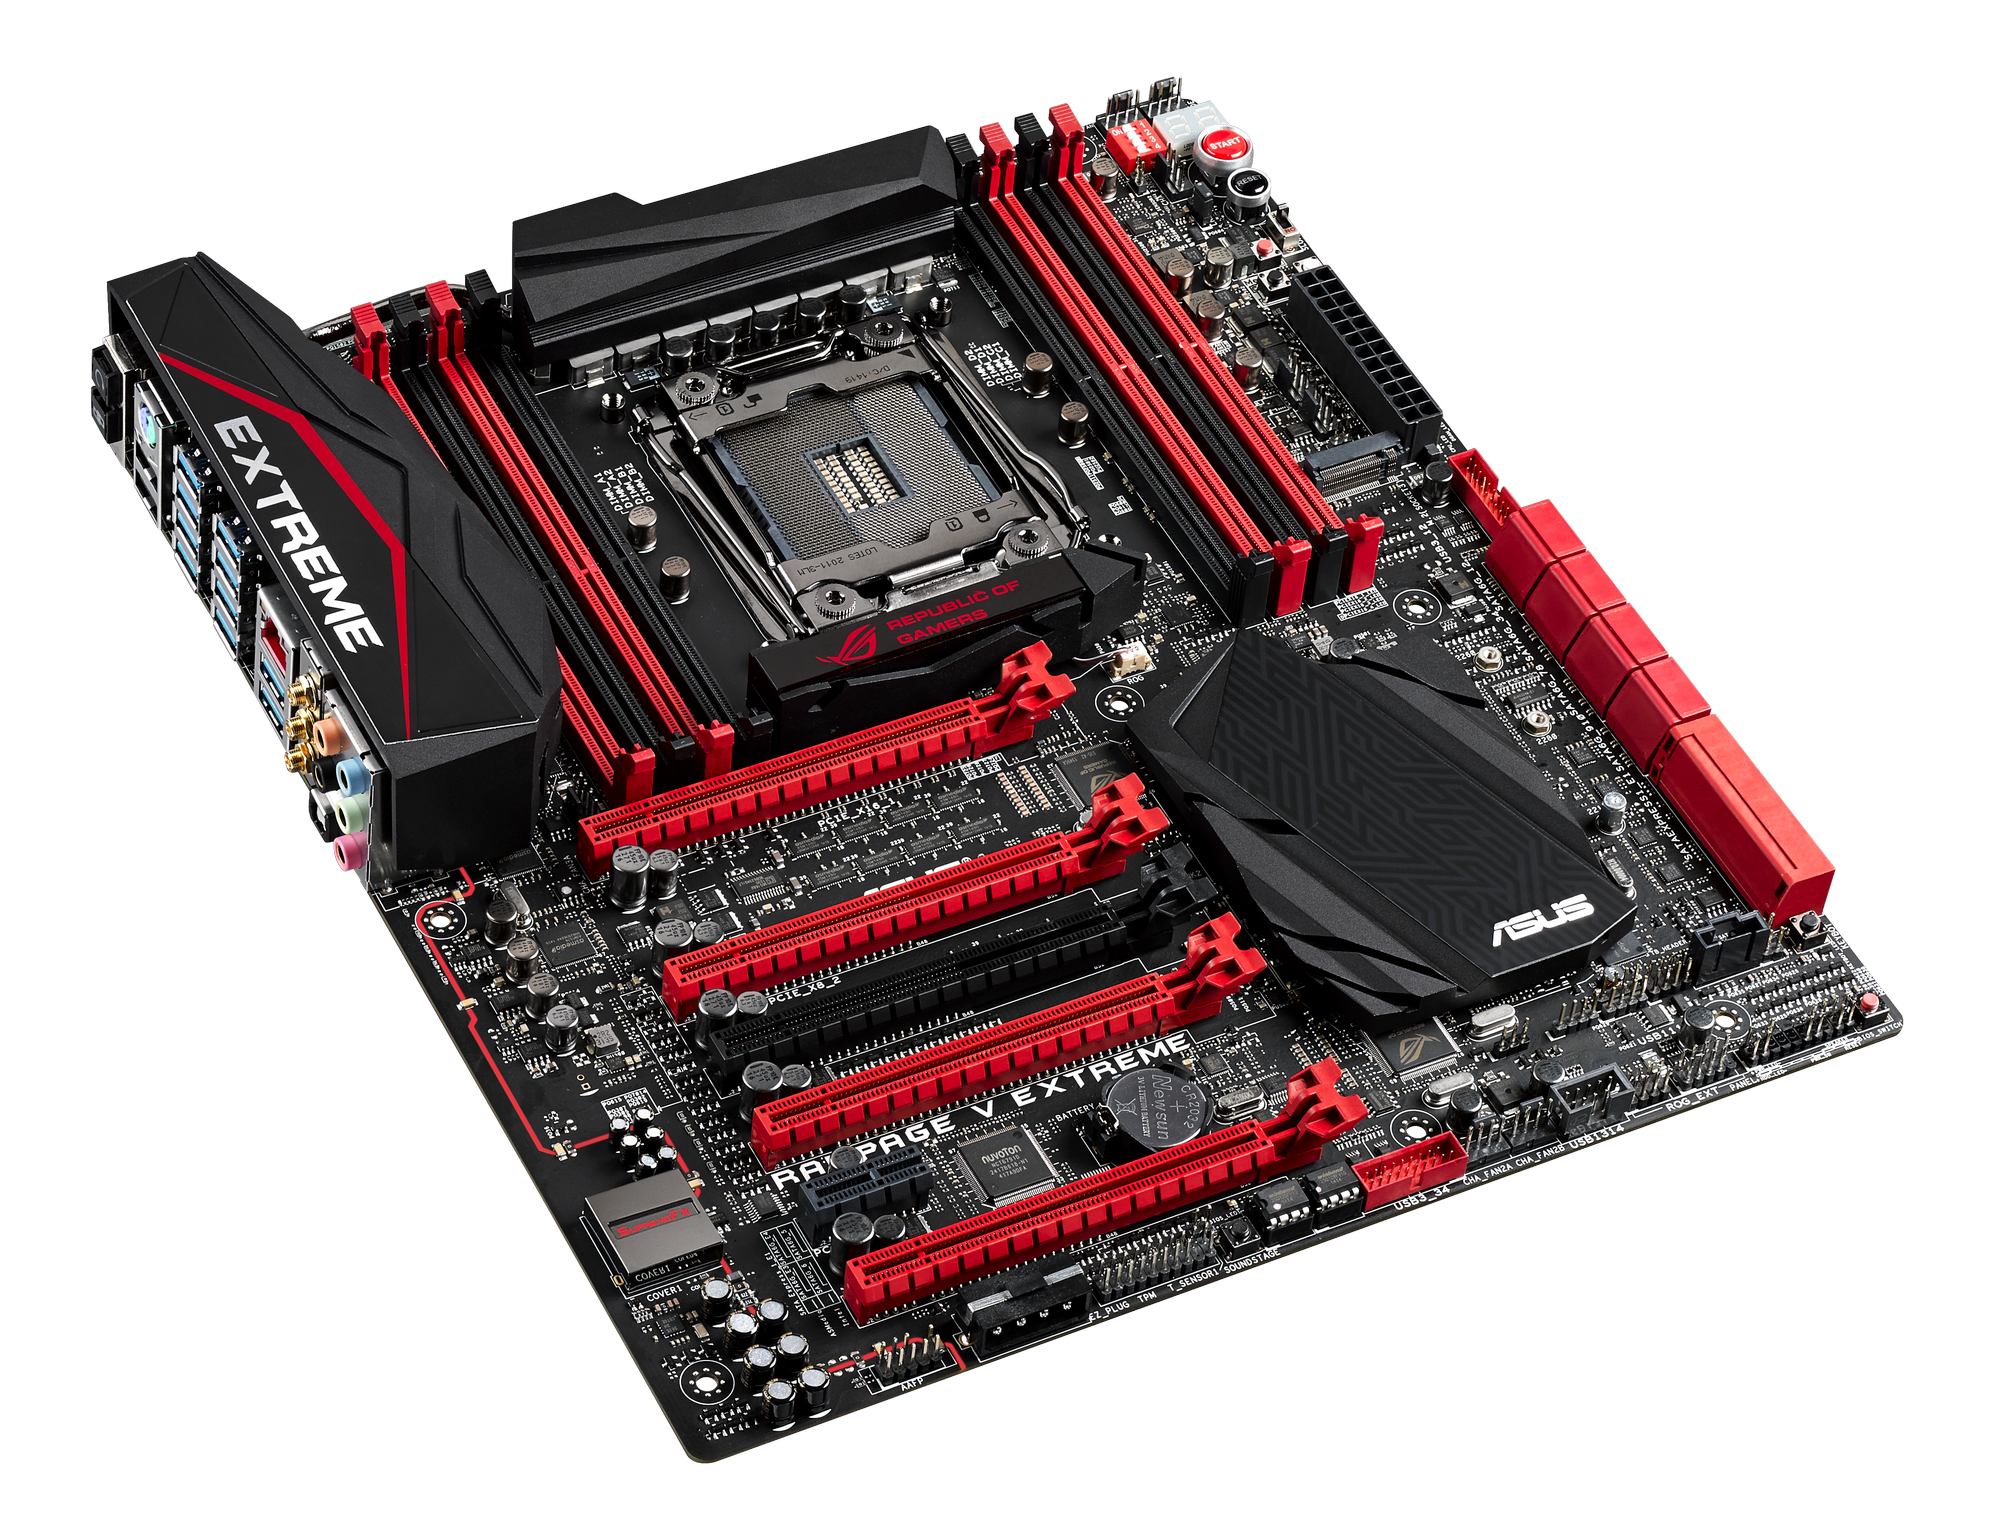
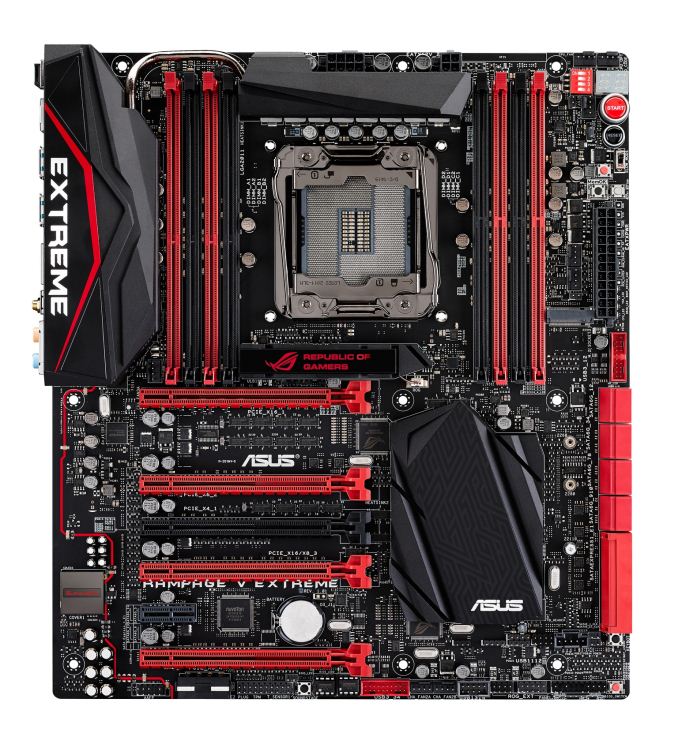
Having used the last two Extreme versions of the top of the ROG line, the Rampage IV Extreme and the Rampage IV Black Edition, it subsequently occurs perhaps the Rampage V Extreme comes across as a little underwhelming. If you've been there, seen that, it's hard to get as pumped up as the first time. The Extreme is a very good motherboard, and comes across as well engineered and with some fun stuff to play with that new users will enjoy. If you were happy with the X79 Extreme and need a comparable hardware option for X99 then the Extreme is ready to take that place. My fear is that it the Rampage V Extreme isn't as breathtaking as the X79 was.
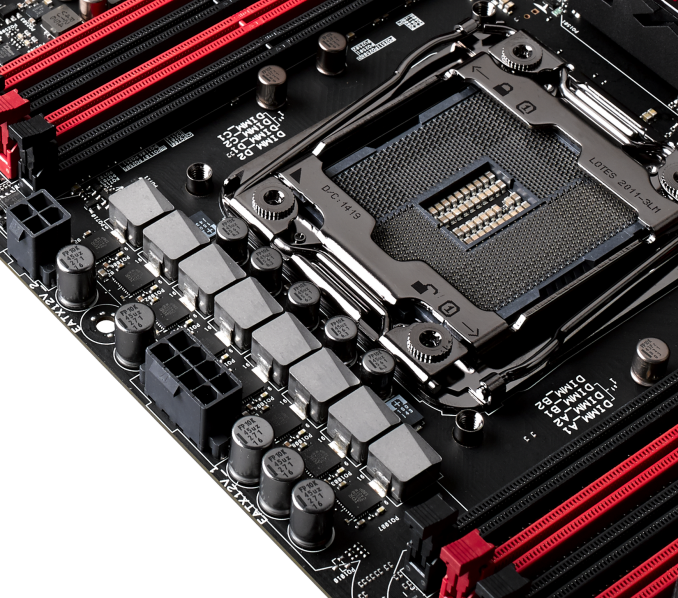
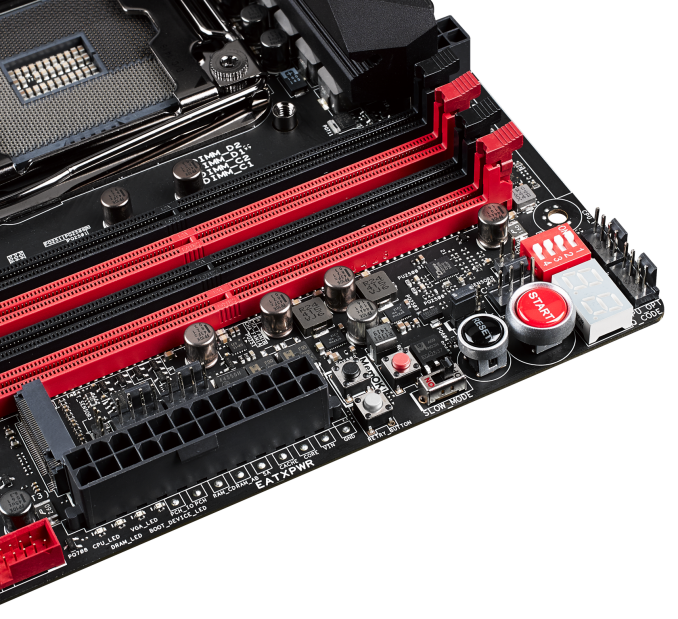
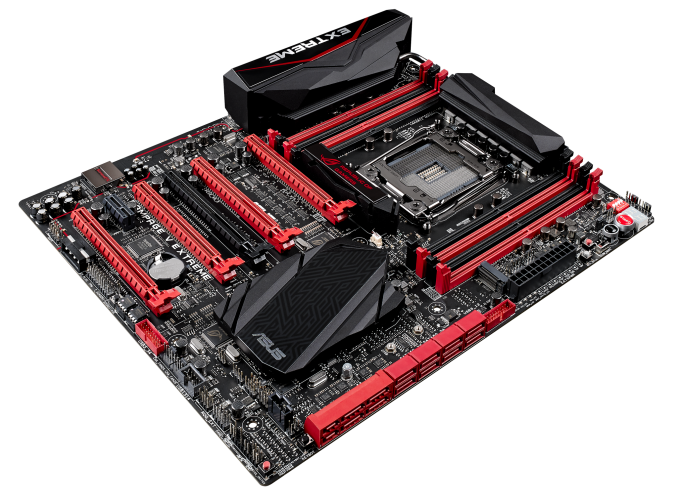
The measure of breathtaking-ness isn't the defining feature of a motherboard however. In terms of kit we get ASUS' enhanced OC socket at the front and center, which reportedly gives better overclocking margins as well as high end memory support which we covered in our initial X99 coverage as it also featured on the X99 Deluxe. Another big feature is the use of three-stream dual band 802.11ac Wi-Fi which will aid throughput and beam forming for routers that are capable. ASUS is using tri-stream as a defining feature on the top end of its product stack, which means it is also on the Deluxe as well. To complete the trifecta, the OC Panel allows gamers to get hardware information and implement fan controls at the touch of a button while extreme overclockers can adjust voltages and frequencies on the fly.

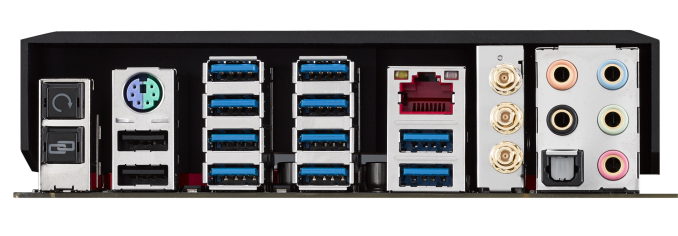
Other features in play include eight fan headers with DC and PWM support, with four extra headers on the OC Panel, SupremeFX audio via an upgraded ALC1150 solution (PCB separation, extended EMI shield, upgraded filter caps, headphone impedance detection) as well as SoundStage and Keybot. Storage comes from the 10 SATA ports provided by the chipset as well as two more from an ASMedia controller and two SATA Express ports therein. An M.2 PCIe 3.0 x4 slot is also here for 2260, 2280 and 22110 drives, but shares bandwidth with the bottom PCIe 3.0 port in red. This has implications when multiple graphics cards are in play and SLI limitations, but the subset of M.2 users and 4-way SLI users should actually be fairly small. A total of 14 USB 3.0 ports populate the board, two from headers and ten on the rear panel from ASMedia controllers/hubs.

The BIOS and Software packages from ASUS still continue to be on the better side of interactive and informative, with the ROG packages aiming for something a little bit more than the standard. Due to the overclocking nature of the Extreme, there is the potential to get bogged down in all the overclocking options for new users. To this end there are several automatic overclocking options, both in the BIOS and software, as well as assistance through the ROG forums. Our overclocking performance showed that a mediocre CPU is still a mediocre CPU, whichever way you slice it, but good luck to those who scored nice silicon. We’ve tested the X99 Extreme up to DDR4-3333 on the latest BIOS as of testing, although our contacts at ASUS have stated that they are working on the new higher-end kits (3400 and up) to add to the QVL.
Whatever the X-Factor (or Y-Factor, or Z-Factor) is, I’m not getting the same feeling as I did from the X79 Extreme. In the words of James May of ex-Top Gear fame, there’s no fizzing root here. Part of that may be the saturation of high-end boards in the market, always going for halo, or the lack of a 4.7+ GHz overclocking CPU architecture when testing as was the case with Sandy Bridge-E and X79, but I’m not sure. It will be interesting to see the sales numbers this time around, and whether ASUS can hold that high end lead. Overall, the Rampage V Extreme continues the trend of the ROG Extreme halo series and builds on the nicely designed X99 Deluxe with an ROG garnish. For users looking for that direct, high-end upgrade from X58 or X79, it will have to be in the list for consideration.
It is also worth noting that since we received this sample, ASUS has released a USB 3.1 edition with a bundled USB 3.1 card in preparation for when the appropriate devices hit the market.
Source: Anandtech com


![GRID: Autosport on ASUS R7 240 DDR3 2GB ($70) [Minimum FPS]](http://images.anandtech.com/graphs/graph9278/75186.png)
![GRID: Autosport on ASUS GTX 980 Strix 4GB ($560) [Minimum FPS]](http://images.anandtech.com/graphs/graph9278/75204.png)


![Shadows of Mordor on ASUS R7 240 DDR3 2GB ($70) [Minimum FPS]](http://images.anandtech.com/graphs/graph9278/75188.png)
![Shadows of Mordor on ASUS GTX 980 Strix 4GB ($560) [Minimum FPS]](http://images.anandtech.com/graphs/graph9278/75208.png)